Friday, July 22, 2022

Everyone Needs a Zippered Pouch!


I have a weakness for pouches, I love them! I love to make them. They are great for organizing not just make up essentials but quilting essentials, EPP kits, first aid supplies for your home or car, quick grab and take office supplies for on the road, there is literally no end to the multitude of uses you can find for pouches.


What a fun way to use up your scraps! For this pouch I have used some 2.5" squares that were left over from a quilt. I simply stitched them together until I had a piece large enough that I could fold in half for the pattern. I chose a pretty liner fabric that would coordinate.


The FREE pattern for this pouch is available through Riley Blake Designs and here is the link for the PDF pattern. Taco Pouch Templates There are several sizes and I will post the video tutorial at the end of this blog. For this pouch I selected the Large Size Template. I used a Chalk Marker to mark around the template and then cut it out with scissors.


This is what your piece will look like when you open the fold.


You will also need to cut your lining and interfacing materials with the same template.


Make sure you get an extra long zipper, it makes this pouch quick and easy to create. Follow the directions in the video tutorial by Riley Blake Designs below and you will have yourself a cute pouch! This would be an excellent pattern to use for crumb piecing, using all your random bits and scraps, stitched together to create your own fabric design. For that I would recommend that you cut your interfacing and crumb piece directly onto that to support your work. Have fun with it!


Be sure to watch the video below for complete step by step instructions to create your pouch!


Wednesday, July 20, 2022

Tips When Making The Wensleydale Quilt


Are you working on or contemplating the Wensleydale Quilt by Jen Kingwell? Have you decided if you will hand piece or machine piece this quilt? Will you be paper foundation piecing? So many decisions. For me, hand piecing is out. Her book Quilt Recipes has templates and complete instructions for making this quilt. I will not be providing those here. What I will provide are tips for what is working well for me and tell you why. There are a multitude of ways to approach this quilt and my way is not the only one. I have chosen to Foundation Paper Piece for accuracy.

This is a list of things you will need to make this block:

Quilting Recipes Book by Jen Kingwell

Foundation Paper packet for the Wensleydale Quilt

Elmer's Washable Glue Stick or glue stick of your choice

Template plastic or clear plastic from folder

Permanent Marker  

Add a Quarter Ruler

An old pair of scissors for cutting the template plastic

Scissors

Rotary Cutter

Rotary Cutting Mat

Old Sewing Machine Needle

New Sewing Machine Needle

Thread and Bobbin

Sewing Machine

Iron and Pressing Mat or Ironing Board

My first recommendation is to get her book. Links have been provided for recommended items. In her book are templates for each of her quilts. Find the Wensleydale templates and make a photo copy of them.

Get yourself some template plastic. You can find this at your local quilt shop, at your local hobby shop, online and if you prefer to save some $$ then just get yourself a clear  plastic folder from The Dollar Store.  You will need a permanent marking pen with a medium tip. Place your clear plastic over the photo copy of her templates in the book and trace them with your permanent marker. TIP: place an arrow to indicate your seam line. This will help you when you are cutting directional fabrics or motifs that you want to align in a certain way.

Take an old pair of scissors and cut out your plastic templates.  

 
Now you may ask, why cut out templates when you are Foundation Piecing? I do this to save on fabric and to allow me to make accurate cuts for directional fabrics and special motifs. By using the template, I know I have a piece of fabric cut to the right dimensions and there will be very little waste when trimming. The plastic template is clear and I can see what I am lining up for my cut. The beauty of having a template to use and Foundation Paper Piecing is that you do not have to worry about being on the cross grain of the fabric, it just doesn't matter.


Purchase a package of the Wensleydale Foundation Papers. They come 60 to a package and that is enough to make the quilt. If you want a larger quilt, purchase an additional package.
 
Tear off about 5 sheets of the foundation paper, keeping them lined up. Put an old needle into your sewing machine and remove your thread and bobbin. Now stitch over all of the solid lines on the foundation paper. You don't need to stitch over the very outside lines as these are just the 1/4" seam lines for when you join your blocks. So on one side you will have the solid lines and when you flip the paper over you will see your lines from your needle perforations like the photo below. I only do five sheets at a time so it keeps the perforations crisp.


These are the indicator lines that will help you align your fabric, you will stitch on the other side on the solid lines. Now change your needle back to a nice sharp sewing needle, thread your machine and place your bobbin. Get yourself a washable glue stick which you will use to place your first fabric. Using your template A, select your center fabric and cut it out. Use your glue stick to adhere that fabric to the Wrong side of your foundation paper. Spread the glue stick only on that center rectangle area, avoid the perforations. You don't need a ton of glue, just enough to stick your fabric for a bit. 


You will notice that your center piece hangs over your perforated lines. This is correct, you want about a 1/4" around as that will be your seam eventually.


 Now, selecting your B and C templates, go ahead and cut out your pieces. Line up your pieces for opposite sides, either B or C and pin them in place. Put your pins to the center so they are out of your stitching area. 


Turn your paper over and stitch on the solid line, starting about 1/4" beyond the line and finishing 1/4" beyond the line. Check and make sure you have not folded back a piece of your fabric when placing it under your needle. Speed is not the object here as much as accuracy. Take your time and you will avoid a date with Jack the Ripper. 


Do the same for the opposite side and then take to the iron and press open.
 

 Repeat this step for your side pieces next.


 Don't worry if things look a bit wonkie here. I want you to place your foundation paper with the fabric on the bottom. Carefully, fold back the line that corresponds to the outside of the current area you are working on, this will be your next seamline and we want to trim things up a bit. Don't fret if your paper tears a bit at the intersection of the seams. You will want to use your Add a Quarter ruler to trim back to just a quarter inch. To do this, fold your paper back to the perforated line, lay your ruler on top of the fabric, you will notice there is a ledge that will catch on the paper giving you a perfect 1/4" seam allowance, you will trim any excess fabric beyond the ruler. 


The rest is a repeat of the instructions above, take your next templates, cut your pieces of fabric and align them with the edges as shown below and turning to the opposite side of the paper, stitch on the corresponding solid lines, press open and place and stitch your next pieces. Press open and then trim as outlined above.


Once you have added your final round of pieces, turn to the paper side and trim your block to the very outside solid line. You will have a perfect block. Now repeat that 59 more times...LOL
 
Hope this helps you a bit. It's a beautiful Quilt and there are tons of fabric options for you to choose from. I highly recommend that you watch her video on selecting fabric, then pick out what you love and have at it!


Sunday, July 10, 2022

Those Airport Cinnamon Rolls!

 
Oh yeah, that smell wafts through the airport, you are early and waiting for your flight and you just have to have one or a dozen! Better get some for later, right?


You no longer have to wait in crowded airports, you don't even have to book a flight! You can make these at home! Here is the link for a PDF download with the recipe for you. Airport Cinnamon Roll Knock Off  They are delicious and the recipe makes 24-30 cinnamon rolls so you will have plenty. It freezes well and you can just take them out and after they thaw, pop them in your oven for pure deliciousness.

* * *
 
I have been watching the Tik-Tok videos of the cinnamon roll bake and so I decided to try it yesterday. This is a completely different recipe than the download above and unrelated other than it's a cinnamon roll.
 
The basic recipe is to get a can of cinnamon rolls, pop them open and put them in a baking dish, pour 1/2 inch of cream on the bottom of the pan around the rolls, top them with a mixture of 1/2 stick of butter and 1 cup of brown sugar. Bake at 350 degrees F for 30 minutes or until done. Frost with the can frosting that came with the rolls.
 
So we did that.


Here is my review of this cinnamon roll recipe. I like the addition of the cream and will try that with my homemade cinnamon rolls next time. They are WAY too sweet, almost cloying, I would cut the sugar for the topping by half and add a tsp of cinnamon. The frosting is just horrible, make your own.
 
So the take away here, use my recipe download up top if you want those good, good airport cinnamon rolls. If you just need a quickie fix for the kids or unexpected company, pop open the canned rolls and do the Tik-Tok version but definitely doctor it up with extra cinnamon and homemade frosting.  


Friday, July 8, 2022

The Glories of The Simple Nine Patch Quilt

 
Ah, The joys of a simple nine patch! Sometimes you just want to sew and not think! and this was one of those times. I promised you some instructions for making this quilt so here we go!

Here is a link to the PDF for basic layout and yardage requirements:
 
You will need approximately:

 
1 1/8 yards of 44" wide fabric in your color choice for the nine patch and and extra 1/2 yard for binding.
2 3/4 yards of 44" wide fabric in your background color choice
4 1/2 yards of backing fabric
 
(these are estimates, I used scrappy bits and mixed them all up)
 
If you are working from scraps or a variety of fabrics, like I did, then cut your colored fabrics into 2 1/2 inch strips. It's perfectly okay to use a jelly roll.
 
Cut several 2 1/2" strips from your background fabric, I used Kona Cotton White for this quilt. Now you will want to stitch together strip sets as shown below. If you are going scrappy, don't agonize over what to put together, stick them all in a bag and just pull out strips and stitch. If you pull out two of the same, put one back and pull out another. You will stitch several sets together, alternating as below, blue, white, blue and then create another set of strips sets with white, blue, white.


Take your strip sets and cut across them to create 2 1/2" strips like below:
 
 
You should have a stack of strips with blue on each end and a stack of strips with blue in the middle. You will use two of the first stack and one of the second stack to create your nine patch. 
 
 
You will need to stitch 50 nine patch blocks for this quilt, if you want a larger quilt, make more blocks.
 
You will now stitch these nine patch blocks to your solid background blocks, alternating every other row to create the "chain".

 
Bind and quilt as desired. I used 2 1/2" strips to create my binding for this quilt. The quilt pattern is called Dawn's Block by Sweet Dreams Quilt Studio.

This was a lot of fun to make, it's easy, it doesn't take a lot of brain power and there is something so endearing about an old fashioned Irish Chain Quilt. Hope you will enjoy making one soon. Come visit us on Facebook at Sister of the Divide and on Instagram at SisterofTheDivide1. See you in the Funny Papers!


It's Been A Minute!


This is a long post. I am just recapping this past year. Scroll through if you don't want to read it. There is some quilty goodness at the end.

Sometimes we just get challenged. And when that happens you just have to suck it up and carry on chicken. You have to look for the positive light in the process, there always is one.

Covid 19 lockdown was a blessing, we got packed and moved during the lock down. Unpacking has been interesting...LOL...why, exactly did I choose to bring this box of .....to Idaho with us? Yes, that has come up more than once. It's funny what we choose to hang on to over the years.

Getting contractors out to make various improvements to the house has been like pulling hens teeth. It's a slow process but it feels as though we are making some headway.

The basement sewing room was finally finished, along with the additional bathroom. The deck on the back of the house and the pergola got finished, the garden area was rocked and the raised garden beds were installed. The RV pad on the side of the house was completed. Fences and gates were replaced with new. The entire front yard was leveled with a dozer and new soil brought in along with sod. A "He Shed" was built for Mr. Sister out back. He says he's going to put up a NO Girls Allowed sign...LOL. The fire pit was dug and rocked pathways created. All the toilets in the remaining three bathrooms were replaced. New shower door for the guest bathroom upstairs. And a gazillion other little things have been done. Looking back it has been quite a year and we have accomplished a lot in a short time.

Two of our sons came to visit, Andrew stayed for the summer in his RV on the side of the house. Jeff, Miranda and the grandkids came in May and stayed for a week. We met John's cousin Jana for the first time, she came to stay for a week and then we all flew back to Minnesota for a family reunion. And there was a shop hop going on while we were there! Wheee! Then back to Idaho for the Eastern Idaho Shop Hop which encompassed, Wyoming, Utah and South Eastern Idaho. Always fun!

And then there was my birthday surprise...November is always a difficult time for me for personal reasons. My birthday is November 9th. I haven't been online much because I had lost feeling in my hands and feet a couple months prior and it felt uncomfortable to type. Long story short, after seeing three different doctors and finally getting a referral into a neurologist, he confirmed that I was not losing my mind, I had no feeling in my hands and feet. He ordered up a bunch of tests and an MRI. 

We were out to dinner with our dear friends the Morrows and after dinner I was driving us home. The phone rings and it's a doctor calling me. He tells me who he is and that the Neurologist asked him to look at my MRI. He then tells me I need to go straight to the emergency room and get checked in for surgery! I said, whoa, I don't know who you are, tell me what's going on. He informs me that by all rights and measures I should be a quadriplegic right now, that my C3 disc has blown into my spinal cord and if I move wrong, that could be it. He texted me a copy of the MRI. One look and I knew I could not avoid it.

Over 25 years ago, I had a similar thing happen, 16 hours of surgery and they got me put back together c-4 through c-7. I got home and just started bawling because I was reflecting back on what I went through last time. Not only was the surgery last time, horrific to go through; but as I was recuperating my best friend committed suicide. We were in our 40's, I had known her since we were 7. It was devastating. I don't think a day goes by that I don't think of her. At any rate, lots of trauma was brought to the surface. One of the Brother's from church came over and he and John gave me a blessing. It was very short but I felt this incredible wave of calm wash over me and I knew everything would be alright.

The neurosurgeon sent me to get a neck brace on the 10th. We were in his office for a consult on the 11th and on the 12th, early in the morning, he did my surgery. I remember coming to in the recovery room and I could feel my hands and feet! The surgery took only 2 hours and here I am typing this blog post. I have even done a bit of quilting and hand sewing.

My husband has been amazing, stepping up to the plate and taking on all the household chores, helping me shower and dress, putting up with my moods. Our neighbors have brought in meals, picked up prescriptions. The neighbor boy plowed our driveway and sidewalks. We are just blessed beyond measure.

In January, as I was feeling pretty good and recovering nicely, I got Covid. A really bad case of it and had to be on oxygen for a couple months. It has been a struggle to get past the side effects that have lingered on. Mental fog, mood swings, body aches. They are lifting, I still have good days and bad days.

So, the bright side...I am recovering, taking things slow and trying not to run (which is my tendency).  Sometimes, you just have to suck it up and do the thing you don't want to do, know that God will get you through it and look for the blessings. There is a Power in Adversity, it is always a teaching experience, a humbling experience, an opportunity for growth and self reflection. This day, this hour, this minute will never come again. 

I am grateful for all of you folks online who have followed me on Facebook and have given me words of encouragement, prayers for healing and have been the kindest friends through this journey. Thank you, you just have no idea how much that means to us. Looking forward to a bright future, new explorations in design and quilting and let's have some fun!

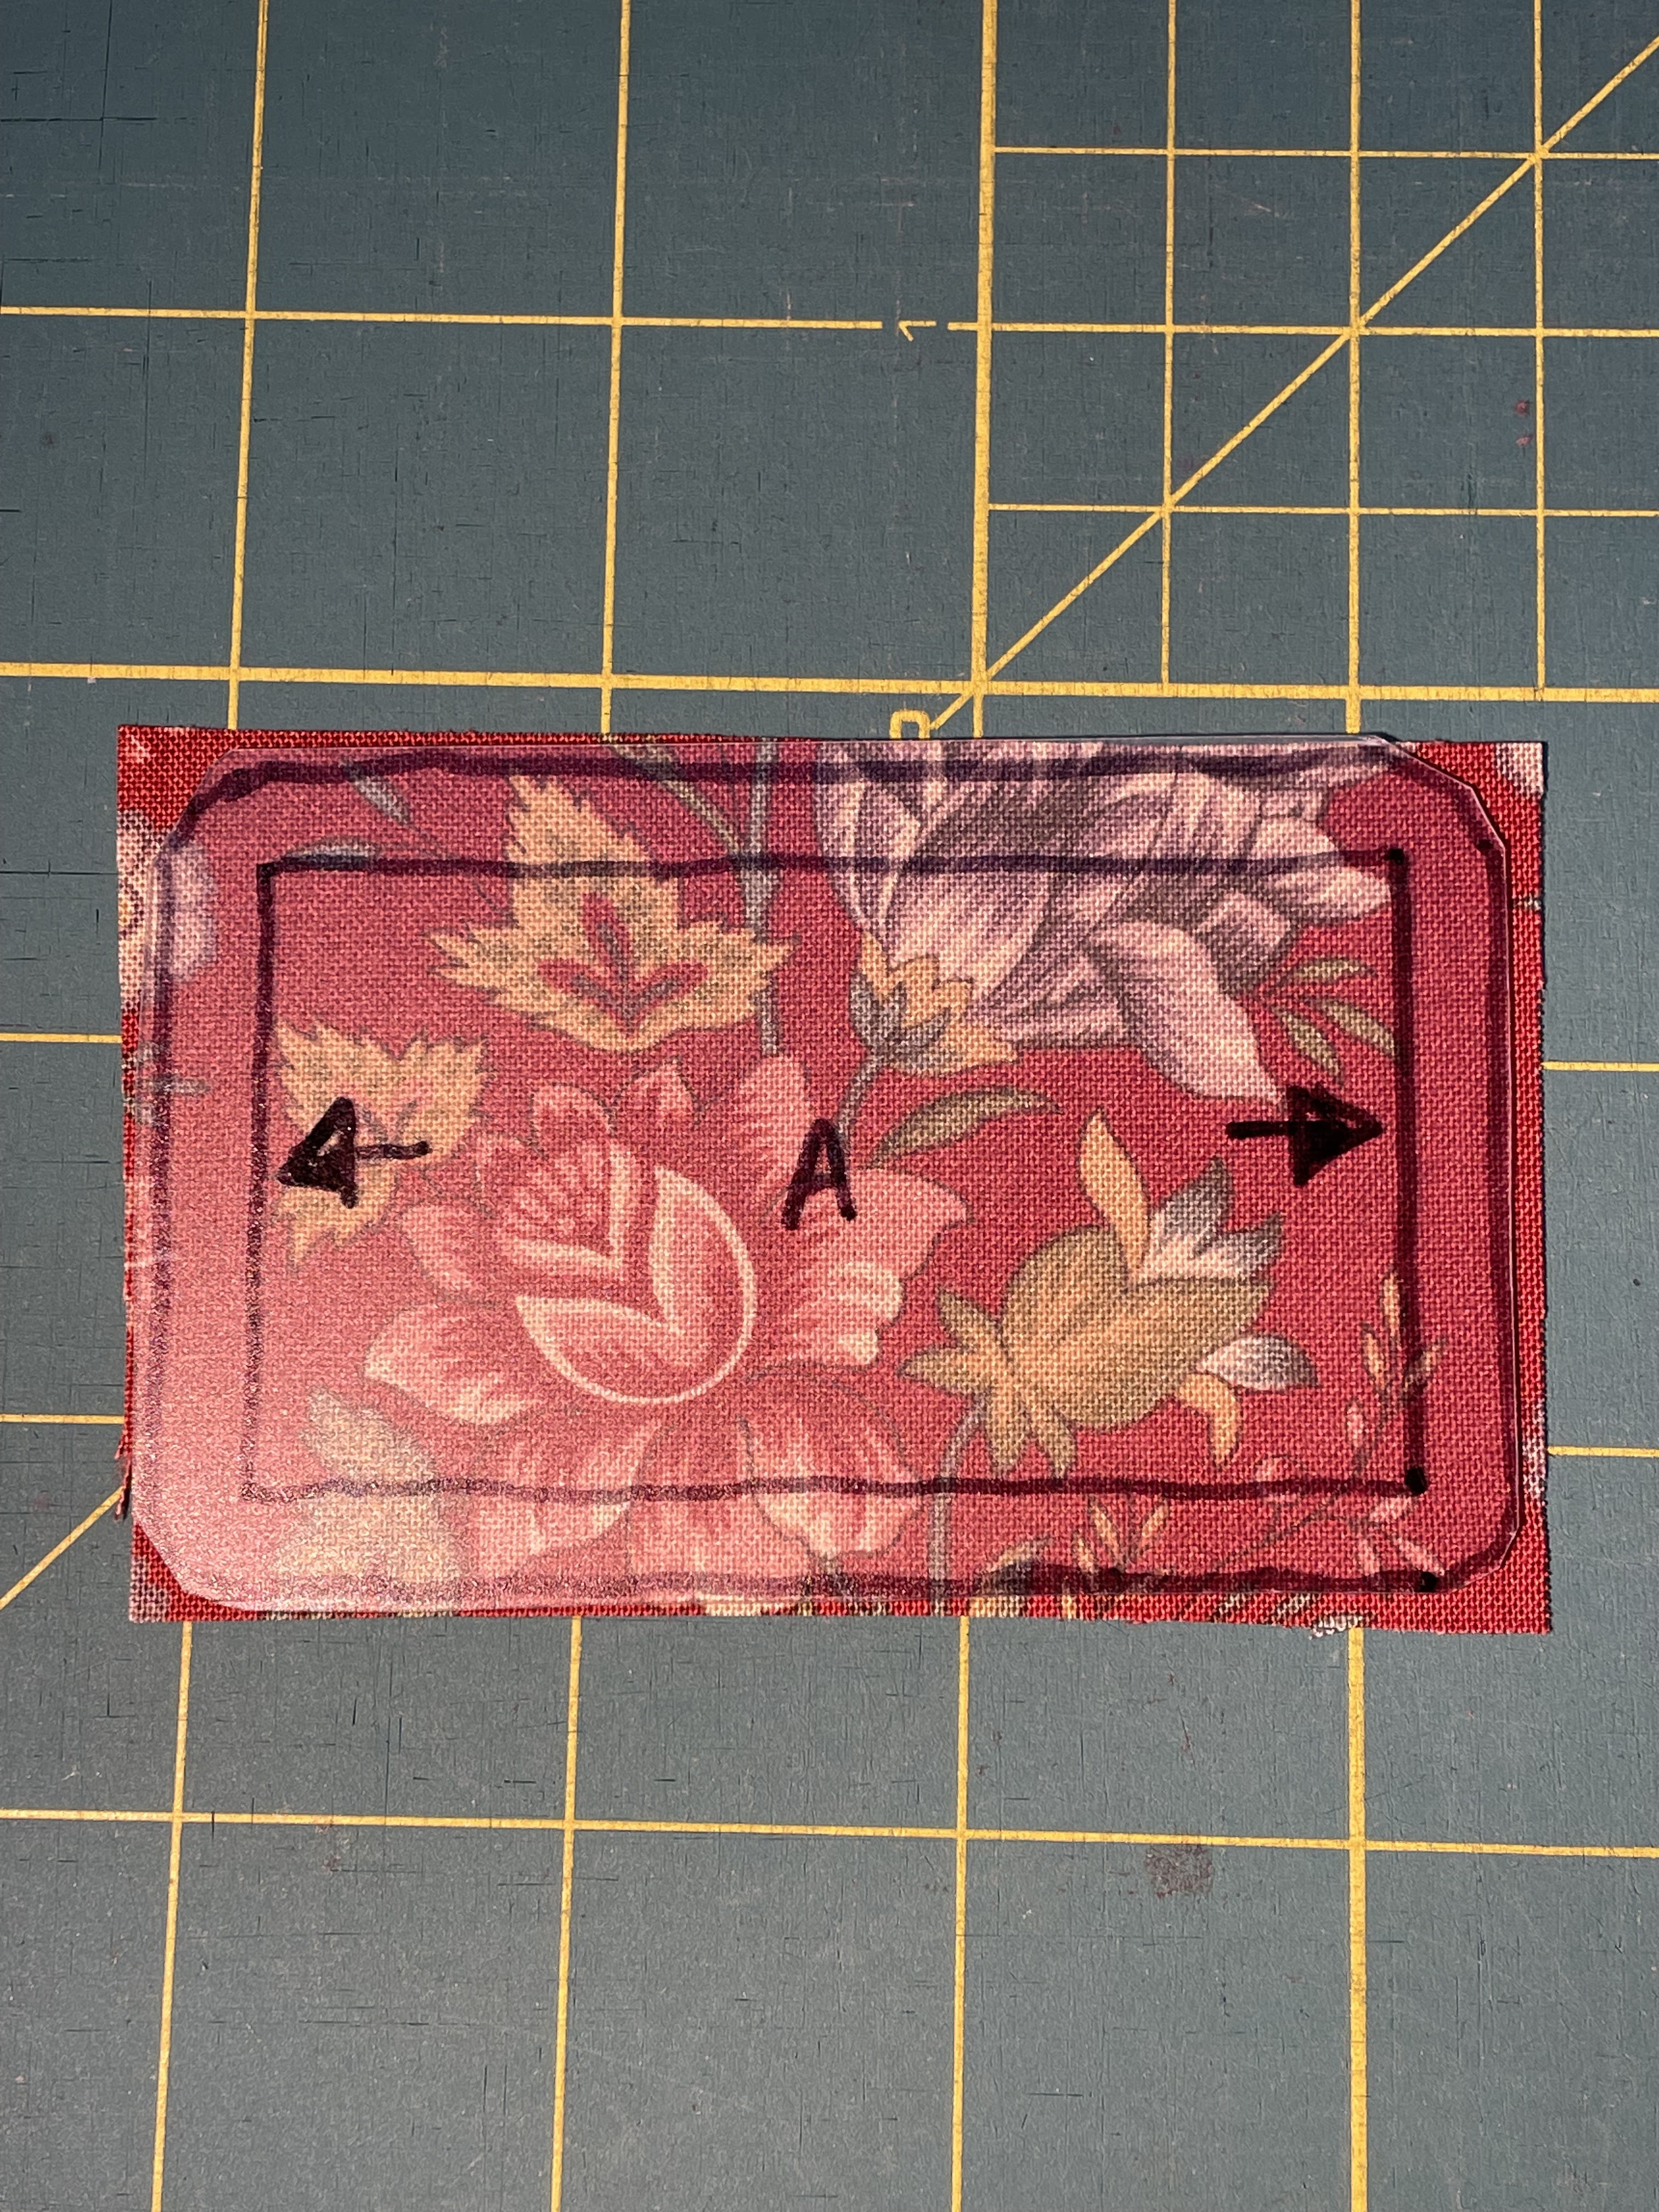
With the brain fog, I wanted to quilt something that wouldn't require a great deal of mental effort. (just reading a pattern was straining my brain for a while there) I love the Irish Chain. A simple nine patch put together with a plain square and row by row it all comes together!

Last summer when I was shop hopping my dear friend Annalee Leonard who owns The Day Dreams Quilt Shop in Idaho Falls, gave me a couple packets of fabric in the prettiest shade of blue. I knew when she gave it to me that I wanted to make it into an Irish Chain.

I will post directions for this quilt in my next blog post!

Thank you all again, for following along!