
Well, I have been tearing my sewing/crafting area apart and looking for ways to organize things more efficiently. So I am in search of creative ways to make boxes, little bins and assorted containers for "things".
These are some links that I have come across this morning and so I am saving them here in my blog to refer back to. I will add to it as I come across more, if you have suggestions, let me know!
And the winner is...
Geta's Quilting Studio: Fabric boxes
Here is my box and part of the process, you can refer to her tutorial for the details. Oh my gosh this went together quickly and is exactly what I wanted for my little "postal" space. I was tired of always reading the mail in the kitchen, making neat little piles only to have them knocked to the floor or mixed up. I needed a little mail sorting space, with little bins..."bills to be paid", "papers to file", "postage and mailing supplies", etc.
Well, look how cute this turned out!

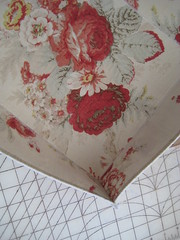
I had remnants from a chair I covered a few years back and while going through my stash I came across them. They would be perfect for what I want to do. So first you cut out your double sided heavy weight fusible interfacing. Iron your fabric to both sides, trim it up. You'll need a bottom and 4 side pieces as shown. Dimensions are your own. This box measures 9.5" x 12" x 3". big enough to hold a piece of 8.5 x 11 copy paper with a bit of room to spare. It was made to fit my space...I'm already planning other sizes for drawers in my bathroom and drawers in my stash area. Oh, I WILL BE ORGANIZED!

Fuse your fabric to both sides, it doesn't have to be the same fabric, I just really like this one so I used it for the outside and the inside.

As I mentioned, I used my serger to serge all the edges that would be at the top of my box before assembling them. You could finish it with a simple zig zag or even use fabric binding. The serger gave me a nice finished edge quickly. The other thing to do at this point...stitch your handle on if you want one. Then as shown in the picture below, zig zag with a close wide stitch, your side pieces to the bottom piece. Look at the picture below this one and you will see how it should look when you are finished.


To finish constructing your box, bring the sides together folding the bottom in half diagonally will let you squeeze the corners together. I just ran these through my serger as well, but you could zig zag them also. And you are done!


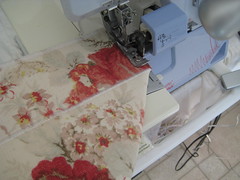

So after I took this shot and uploaded it, I thought, hmmm...I need a handle on the end, so I whipped one up while this was uploading, it would be easier to do it when it's in the flat stage, my recommendation. Instead of zig zagging the top edges to finish them, I just ran them through my serger before assembly! Quick, easy and then I zig zagged the sides to the bottom, used the serger again to complete the side corners and there you have it! I will be making a lot of these, soon as I run down the hill for some more fast 2 fuse heavyweight double sided fusible interfacing! This was fun and I am delighted with the results, it totally serves my purpose. I can see several of these in my drawers already!
More Storage Basket Ideas
Structured Fabric Baskets
Fabric Boxes
Fabric Box tutorial
Cardboard Box covered with fabric
Fabric Basket Tutorial Pink Penguin
No Sew Fabric Covered Boxes
Fabric Container
Embroidered Boxes
I'll add more as I come across them, this will get me started though.