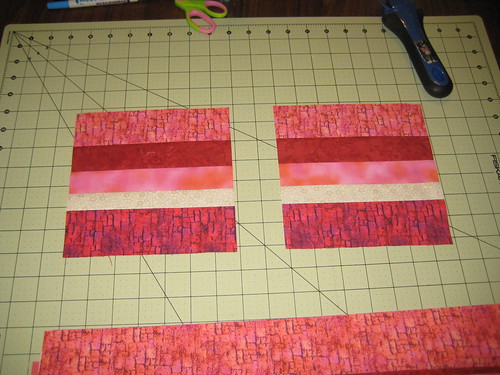
What to do with scraps left over from your quilting projects? Well, you can cut them into strips and use them in a variety of projects. There is a never ending supply of patterns that use strips...This is a little table runner that is fun to make, goes quickly and easily for a beginner.
Step one, cut your fabric into strips, they don't all have to be alike, actually if you vary the strip width it makes your finished block more interesting. A variety of colors will also create fun design possibilities! I would make your strips no thinner than 1 inch and no wider than 3 inches.
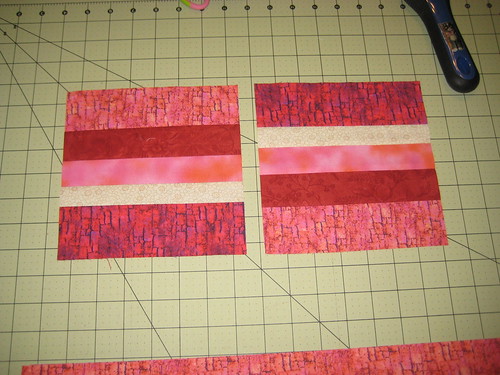
Once you have them all cut out, lay them out in a pleasing order and start stitching your strip sets together.
Press all of your seams going the same direction. Do not press them open. Trim the selvage from one end and measure the final width of your strip set. You are going to cut the length the same to make squares.
Now the possibilities are endless from here. You could just turn the block sideways, stitch them together and you would end up with something that might look like this...Whew, that was quick and easy right?! And man, you can quickly use up a ton of scraps this way...they don't all have to be matchie, matchie either.
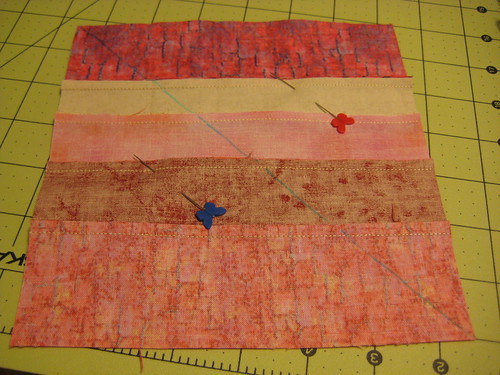
Or you might decide that you want to flip the fabric around and putting them right sides together, make a couple Half Square Triangle Blocks...like we did in the Friendship Star Block lesson.
Place the squares right sides together.
Draw a diagonal line as shown below.
If you want to you can place a pin on either side as shown to provide stability as you stitch.
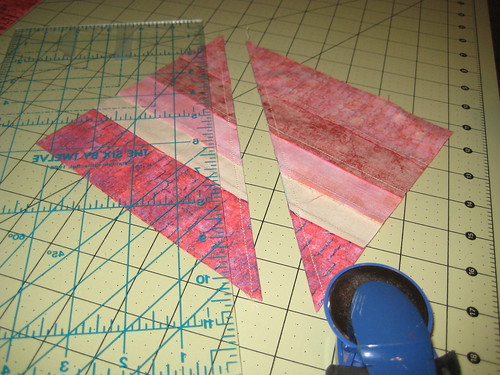
Now stitch 1/4 inch on both sides of that line you just drew. When you get to the end of the seam, just lift your pressure foot, turn the fabric and stitch down the other side...no need to break the thread.
Once you have finished stitching, using your ruler and rotary cutter, cut your block in two on the line.
Take your block to the ironing board, press and set the seam, then press open to one side.
Isn't that pretty? That was easy right?!
Wouldn't those be pretty in a quilt, set on point ...there are lots of possibilities with this...
Maybe, instead of using both of your strip set blocks together, you use one strip set block and a solid piece of fabric...What might that look like?
Here is another option...you must be careful with this as you will have exposed the diagonal which is unstable and will warp and stretch if not handled carefully.
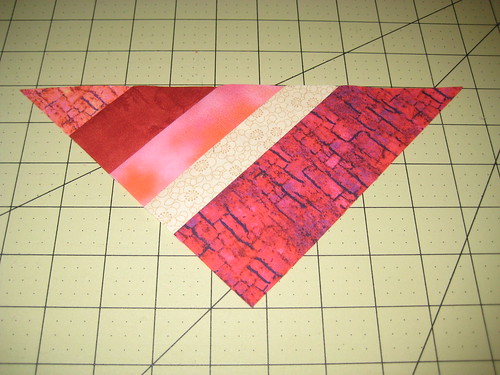
What happens if you cut your blocks on the diagonal...
Take them off your mat and lay one 1/2 of a block down like so...
Then, lay another half of a block down like so...
And continue with another half block like so...
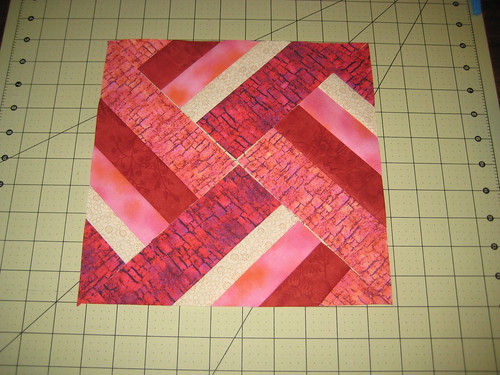
And placing the final 1/2 block...you end up with a bigger block that looks like this...
Stitching them together, 2 quarters at a time, pressing and then stitching the two halves together to create your whole block. What happens if you substitute solid fabric for 2 of the quarters?
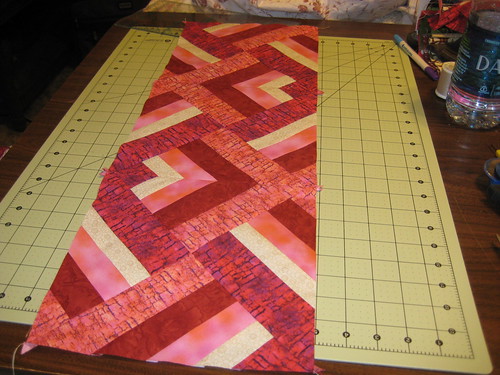
What happens if you place the blocks end to end? (do you see the hearts?)
The beginnings of a table runner? A quilt? Frame your blocks for a placemat. Finish your blocks for a trivet or hot pad. A Pillow maybe? Tote? Your imagination will run wild with possibilities!
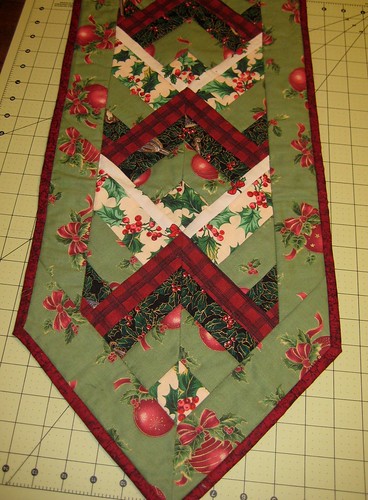
Here is a little table runner that was made for Christmas a few years back, same principle, 2 inch border strip, batting, stitch in the ditch for quilting, binding and you have it! You don't have to have a pointed end like the one shown, you may want a square end, or maybe you use a plate and trim your end into a half circle? Endless possibilities.
Looks like a complex design, but it's only strip sets cut on the diagonal and then stitched back together. See? People will think you did a lot of work and really, it was pretty fast and very easy. Great way to use up your scraps!
We had a great time yesterday, meeting everyone and getting started on our first blocks!
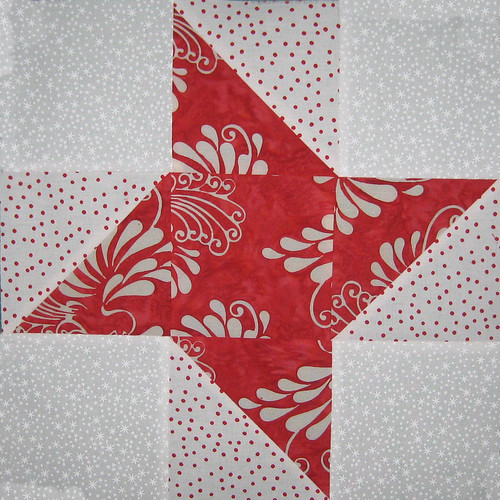
Block by Brenda
We will be learning a new block next class and revisiting some of the elements from our first two blocks.
Some of you want to know exactly how much fabric we will need for the entire quilt. I purposely did not put that information out at the beginning of this class because I don't want you all running out, buying tons of fabric, coming to class and deciding...hmmm...maybe, quilting isn't for me...and now you've gone and spent good money on material you won't use. AND...your first blocks are experiments in quilting, you may want some flexibility in the direction you go with your fabric selection after you try things out. So that is why I tell people just bring a couple fat quarters...that way you have only invested $5.00 in your project.
Block by Sandy
So let's talk about fabric for a second. I passed out some catalogs at our class, in them you will see lots of finished quilts, lots of color combinations, and groupings of fabrics. Color Theory in quilting is something that we will explore in class more...it can be a little overwhelming for a beginner so let's make fabric selection easy for this project. If you look at the quilt we are making which is located at the top of this blog on the right...you will notice that the background fabric is white, the dominant fabric is grey and the accents are colored. There is enough contrast between dark and light to make the quilt interesting. If you look at the quilt squares in our Flickr site....click here to go there: http://www.sisterofthedivide.blogspot.com/
you will see that picking a dark and a light fabric will give you contrast and your design will pop out....you can also see, that if you do not have dark and light, if your fabrics are close in "value", you will not have as crisp an effect. You can see an example of this with the purple block that I put up and the blocks on either side of it. You don't really notice the star in the purple block because all of the fabrics are so close in color and value. We'll talk some more about this in class but I want you to be thinking about dark and light fabrics for your blocks when you are making your selections. That high contrast will make your blocks pop. Brenda's Red Star at the top is a good example of good contrast in fabrics, as is Sandy's Block. Each of their stars pop and you clearly see them.
We talked about utilizing the strip on the selvage of a focus fabric that you love, using those color dots can help you select fabrics that will coordinate in a pleasing way.
First of all...those fabrics you love are designed by smartsy artsy people...they know from color! Take their que, they have done all the hard work for you. You can pick the most outlandish fabric that you might never use in a quilt, but you just love the colors and the way they are combined, that fabric sings to you. I want you to do this exercise before our next class. Go to your fabric store if you have the opportunity...if not you can do it online. Select a wild fabric that you love and study it for a moment. Write down on a piece of paper the feelings that it evokes for you. Exciting, calming, happy, funny, makes me think of the ocean, the mountains, the desert...what ever...just write as much as you can about your feelings when you look at those colors and that design.
When you are done with that, I want you to notice what colors are in the fabric and in what quantities. Is it mostly blue, with a little orange and gold or is it mostly orange with a little blue and gold? Now, without thinking about design (dots, stripes, flowers, animals, etc) just focus on color....I want you to grab fabrics off the shelf that are the same color as those dots on the side of the selvage of your wild focus fabric. I want you to pick at least one fabric for each dot and lay them on the counter at the fabric store. (they won't care, I do it all the time!) When you have all your fabrics pulled, squint at them and you may notice that you like the way that looks....hmmm. Make a note...now take those fabrics that you pulled and start swapping out in the same color for a fabric you love. Put them all on the counter and squint again...you like? Hmmmm.
Do this exercise a few times....maybe look in your own fabric stash if you have one already and do the same. You will be an expert at putting fabric together in pleasing color combinations no time and with very little effort or consternation!
Again, think about what you want to evoke in your finished quilt. Maybe you are a traditionalist...maybe you like those civil war fabrics, maybe you like those 1930's fabrics, maybe you like a very modern look, or an oriental theme, there is no limit except your imagination... you will see as we finish our quilts together, there will be many different interpretations of color and design in the finished quilts. Maybe you like all batiks, maybe all solids, maybe hand dyed, maybe tiny chintz, maybe bold patterns, maybe polka dots, maybe florals...this is your quilt, a projection of what you love, your creation! I give you permission to go for it! We will explore color and fabric combinations at each of our classes.
Please make sure to visit the blog for hints and tips, links and fun exercises. If you make extra blocks for practice and want to donate them, we will put them together in charity quilts...there is no obligation to do this...just putting it out there for those that might enjoy this and want the opportunity to practice their blocks.
The next meeting will be on Friday, February 10th. 9am to noon or beyond!
If you want to bring a sack lunch, stay longer and sew together, that is fine with me. I will make myself available. My husband will be there to help set up the room, so if any of you ladies need help getting your machines in, he will be delighted to carry them for you. Don't dress up for us...come in your sweats, be comfortable and enjoy yourself!
So happy you can join us! This is very basic instruction. For those of you who are seasoned quilters, much of this will be old stuff. For the Newbies this is uncharted territory which I hope will open new vistas of creativity for you. Please, if you have questions, drop me an e-mail and I will try to answer them. There are many roads that lead to Rome, some more traveled than others. Quilting is much the same, there are many ways to accomplish the same thing. I am teaching you one way, again, there are many...my way is not the only one or the "right" one, it's just one of many. As you build your quilt, block by block, I hope you will take a moment to post your creations on our Flickr site so everyone can enjoy them! And with that, here we go!
You should have 2-3 fat quarters to get you started.
Select the fabric that you want to use as your "star" and the fabric you want to use as your "tips", put them right sides together, with the lighter of the two fabric's on top. This is just for ease in marking, it has nothing to do with placement of the fabric in the finished block.
If you need a little quickie course on how to use a rotary cutter...here is an excellent link, you may want to read it first and get familiar with your rotary cutter and the proper way to use it, before you proceed. If you are coming to class we will cover this information in class. Link for Rotary Cutting Instruction
Place the fabric on your cutting board so it looks like a rectangle with the long edge at the top and bottom.
If you are right handed, take your ruler and "neaten" the left side selvage.
If you are left handed, take your ruler and "neaten" the right side selvage.
(this simply means that you are taking a small strip off the edge so that you are cutting from a straight selvage.)
Now place your 6 inch ruler so that one edge is exactly on your neatened selvage and proceed to cut a 6 inch strip. Fold up the remainder of your fabric and set it aside.
Now turn your strip so that the long edge is at the bottom by you as shown below, still keeping the right sides of the fabric together and cut a strip 12 inches long. Fold up the remainder and set aside.
Take your marking pencil and your ruler. You are going to mark a line dividing the fabric into two 6 inch squares as shown below. I have used a blue permanent Sharpie marker to show this line for instructional purposes only. You can use a pencil, a chalk pencil, a disappearing marker (my favorite)...what ever... DON'T USE SOMETHING THAT WILL BLEED ON YOUR FABRIC WHEN YOU WASH IT.
Mark a line dividing the fabric strip into two 6 inch squares as shown above. Again, I have used a permanent Sharpie marker for demonstration purposes only:
Draw 2 diagonal lines dividing each of the squares as shown below.
When you are done marking up your piece, it should look like this, the diagonal lines will be our stitching guide...we will be stitching 1/4 inch on both sides of this line, we will NOT be stitching on the line. (don't freak out if you got ahead of yourself and stitched on the line...that is why we have seam rippers ;-)
Start stitching 1/4 inch from the diagonal line, don't break your thread when you get to the end, just lift up your pressure foot, turn your fabric and sew 1/4 inch from the diagonal on the other piece...don't break your thread, lift up your pressure foot, turn your fabric and sew 1/4 inch from the diagonal line going in the other direction till you reach the center, again lifting your pressure foot without breaking the thread, turn the fabric and complete your last 1/4 inch seam as you see below. I have used black thread for instructional purposes only, you would select a thread to match your fabric.
When you have completed this step, give your fabric a pressing to set the seams and then back to your cutting mat. Cut all the lines apart, starting with the one in directly in the middle and then cutting your diagonal lines that are between your seams as shown below:
Take your pieces to your ironing board and press them open. Press all seams in one direction. It's important not to scrub your fabric with the iron because we are working with a diagonal piece and you can distort your fabric. If you want you can finger press your pieces open first and then hit them with the iron.
Okay, now you should have 4 pieces that look like this...These are the "tips" of your "star".
This is a good time to talk about squaring up. Squaring up is just what it sounds like, you are making sure that each component of your block is square and the same size. Squaring up is an important part of quilt making, it let's you put the components together evenly so that your quilt will lay straight with out puckers or ripples. So how do you square up your components?
Take your fabric and place your ruler on it so that you can see the edge line up with 5 1/2 inches on both left side and the bottom. Trim away any excess fabric on the right and the top. Turn your piece 180 degrees (flip it around) and do the same, you should have your component squared up to 5 1/2 inches. Please refer to the Video link below, it has an excellent example for you.
MEASURE TWICE, CUT ONCE.
Video demonstrating How To Square Up
From the remainder of the strip of fabric that you cut, you should have enough to cut a center piece that measures 5 1/2 inches square. Whether you chose two fabrics or three; you will need to cut 1 or 2 strips that measures 5 1/2 inches . From these strips you will cut 4 squares that measure 5 1/2 inches square each.
When you are done cutting, you should have the following components for your block, all measuring 5 1/2 inches square:
4 - half square triangle units
1 - center square
4 - corner squares
see below:
Lay out your block on your cutting mat, just the way you want it to look, see below:
Take the top three pieces, stitch them together and press all the seams going in one direction. Set it back on your cutting mat. Do the same with the next two rows, always setting them back in place and checking your design.
Now take the top row and flip it down onto the next row with the right sides together, take your hand and grab the top right seam, you should have one seam pressed in one direction and the other seam pressed the opposite direction like below. You should be able to squeeze them together with your thumb and fingers, so that they butt right up against each other, you will feel them lock in place. Place a pin on either side of the seam, not in the seam and then stitch.
Once you are done sewing the seam, finger press it open with the seam going away from the center of the block and press with your steam iron. Check your seams, they should match up precisely as below:
Repeat the process placing the piece back on your cutting mat, lining it up with the remaining segment and repeating the above instructions to finish the block. Once done, give your block a good pressing and you are finished for now. We will not square up our blocks until we finish constructing all of them.
CONGRATULATIONS!
YOU JUST FINISHED YOUR FIRST QUILT BLOCK!
Ready to start your second one? Yes, we are going to do two blocks in this first class, see if you notice anything about this block before we get started.
Shoo Fly
Have you noticed what is special about this second block? Look at the picture below and see if you can figure it out.
Do those components look familiar? They should, they are exactly the same as those used to create the Friendship Star Block! By simply turning the fabric a different way, you can come up with other combinations to create other blocks from the same components! Wheeee!!! This is EASY....before you stitch this block together, see what other combinations you can come up with.
Here is a layout that is called Snowball. Notice how completely different it looks from the block above and yet we are using the same components!
Here are a couple more possibilities...
Each block is completely different and yet they ALL use the same components. That is the lesson I want you to take from this class. In quilting there are a multitude of options to express your creativity, you only need to open yourself to play and experiment.
Sew your second block together using the same method described for block number one. Make sure you lay it out on your cutting mat the way you want to stitch the block.
HINTS:
You may notice that I used a directional fabric in the second block. Directional fabrics can be a challenge sometimes and I don't recommend them for beginners. But, with that said, this method for making your half square triangle units will provide you with positive results, just check the direction of your fabric in your layout before you start sewing your block together and flip your component as necessary to make sure they are all going in the direction you wish.
***
Set up your sewing space, if possible with your mat next to your machine and your ironing board close by. Have everything at hand that you will need for your project before you being. Make sure you have adequate lighting. Wind several bobbins before you start, nothing worse than running out when you're on a roll.
***
If you have wall space, take a piece of thin batting and pin it to your wall...you can use this as a design wall. Your fabric will stick to the batting like a felt board, no pins necessary. This gives you an opportunity to step back from your project and assess things. Don't have a free wall? The floor will work. You just need some distance to see if your fabrics are "reading" the way you want them too. Using a digital camera to take photos of your blocks and your quilt will be helpful as you sew. It gives you that "distance" from the project and you can often times, quickly see a fabric that doesn't work, or a design element that you want to change, before you get to the finished product.
***
The center square of fabric in each of the blocks can be "fussy" cut. That means, you might have a motif in a piece of fabric that you want to center in that block. Normally you would cut from the edge of your fabric. With a fussy cut, you are aiming to center that motif. Maybe it's a large flower or a particular floral spray, it could be an animal, it could be anything special that you want to center and focus in that block. Here is a video by Eleanor Burnes that nicely demonstrates
fussy cuts.
This has been fun! We now have two of our blocks finished! Join us Friday, February 10th at 9am for our next class! And please take a moment to post your blocks to Flickr, the link is at the top and we want to see your creations!
Well, here we go together! An exciting and creative adventure, learning and sharing. For those of you just thinking about joining us, the classes are FREE, we will be learning the basics of quilting and completing a new quilt block each month for 9 months, in month 10 we will be putting it all together and finishing our quilts! Each block that you make, you will learn and master something new that will take you on your quilting journey.
Meetings will be held the second Friday of each month, starting in January with our first meeting on:
Friday, January 13, 2012
From 9am to Noon
At the LDS Church Cultural Hall
20895 Todd Valley Road, Foresthill, CA 95631
Before we get started with the materials list, I would like to suggest that you get a binder and some plastic inserts. As we go along you will have printouts with patterns and valuable information on them, if you will put them in your binder in the plastic inserts you will always have them handy as a resource for you after our class.
You will need to bring the following:
Your sewing machine, including bobbins, electrical cords, foot peddle. (I know that sounds funny, but people forget simple things and we don't want you to be sitting on the sidelines not having any fun)
Scissors, Rotary Cutter, Rotary Cutting Mat, Rotary Cutting Ruler (size 6" x 18" will serve you well, see below), thread, pins, a chalk marking pencil and sharpener or a "mark-b-gone" double sided pen and if you have an extension cord that would be a good thing to bring as well. We will have irons and ironing boards set up at each meeting.
For the first block, you will need 2-3 fat quarters of fabric. Don't know what a fat quarter is? It is a piece of fabric that is cut 18" x 22". Here is a link that will help you understand fabric dimensions and "quilting speak". What is a Fat Quarter? (print out the link pages and put them in your binder) Don't freak out if you don't have a fat quarter...bring what you have and I will teach you how to work around it. Fat Quarters will just make this block go fast and easy, which is what you want when you are learning. Where can you get fat quarters? Most all fabric stores carry them. If you are not by a fabric store, like those of us who live out here in the mountains, there are plenty of online opportunities to select your fabric and have it delivered right to your door. Two companies, Keepsake Quilting and Connecting Threads, have been gracious enough to provide their fabric catalogs for our first meeting and I will distribute those on January 13th. If you want to go check out their websites before hand, here are a couple links: www.keepsakequilting.com and www.connectingthreads.com . Make sure you put in your e-mail address and get on their mailing list for their catalogs...it's fun to look at all the new fabrics and they are chock full of fun ideas and interesting color combinations for your inspiration. The thing to remember when you are selecting fabric...get 100% cotton. Mixing fibers when you are quilting is not a good idea. Polyester fibers will cut through your cotton and over time you will have a stringy mess on your hands. If you are going to take the time and effort to make something beautiful...you want it to last a long time.
If you don't have a rotary cutting mat, rotary cutter or rotary cutting ruler...there are several places online to get one, they also have them available at Beverly's in Penryn and Joann's in Roseville. The cheapest way to get started here is to get a kit, it comes with a mat, cutter and ruler. If you sign up online with Joann's they will e-mail you 50% off coupons and you can purchase your kit at half price...it will cost you about $25. +/- You can also use your coupons in their store, so either way it's a win/win. Now here is my suggestion...Fiskars Rotary Cutting Set it comes with a ruler, mat and cutter all the right size to get started!
For those of you who cannot physically attend the classes, we invite you to join us here online each month. All lessons and tips will be posted and you can quilt right along with us. There will be plenty of photos to show you step by step how to proceed and if you get stuck, just drop me an e-mail and I will try to help you out. As an added incentive to attend the meetings, those in attendance will receive a "bonus" pattern each month...so not only will you have your quilt finished before the holidays, but you may even have some of your stocking stuffers completed as well!
Again, tutorials will be posted online after the meeting, complete with how to photos, photos of our meeting, participants quilt blocks and more! Finished quilts will be displayed at the Fall Harvest Party! And I have set up a link at the top of this blog to link to our "Flickr" site to display your blocks and quilts.
Charity Opportunity: If you would like to join us and make one extra block each month, we will put those together for charity quilts. Drop me an e-mail if you are interested in participating meyerkaren99@yahoo.com
Here's to a Happy New Year with Lots of Quilting Fun!
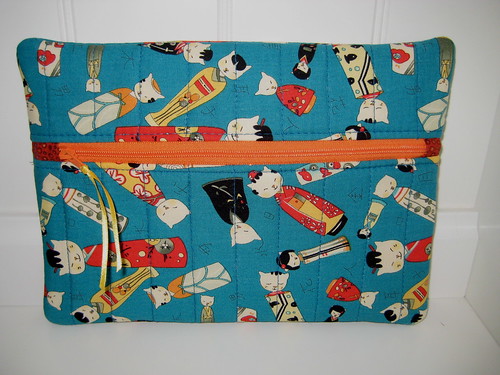
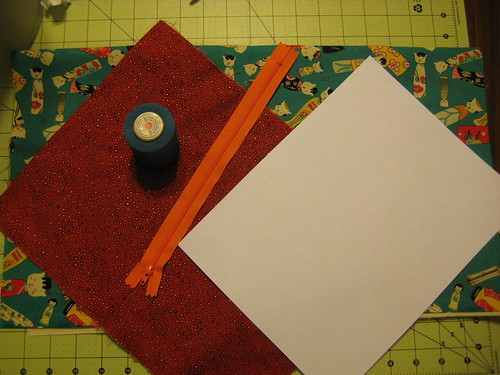
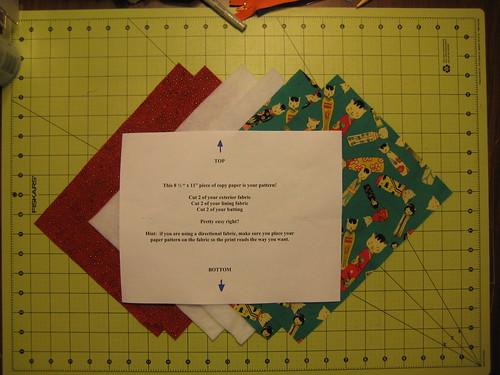
This is a tutorial for a simple little pouch, your pattern is a piece of copy paper 8.5" x 11"
To get started, you will need a sheet of paper 8.5 x 11", standard copy paper.
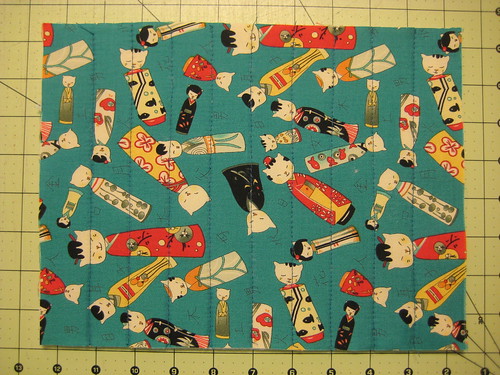
Some fabric for your lining and your feature fabric.
A zipper at least 10 inches long or longer (you can cut it down to size)
Batting
Thread and your sewing machine
A six inch quilting ruler
A marking pen with erasable ink.
Your rotary cutter, scissors and your rotary cutting mat.
A small piece of ribbon to loop through the zipper as a pull.
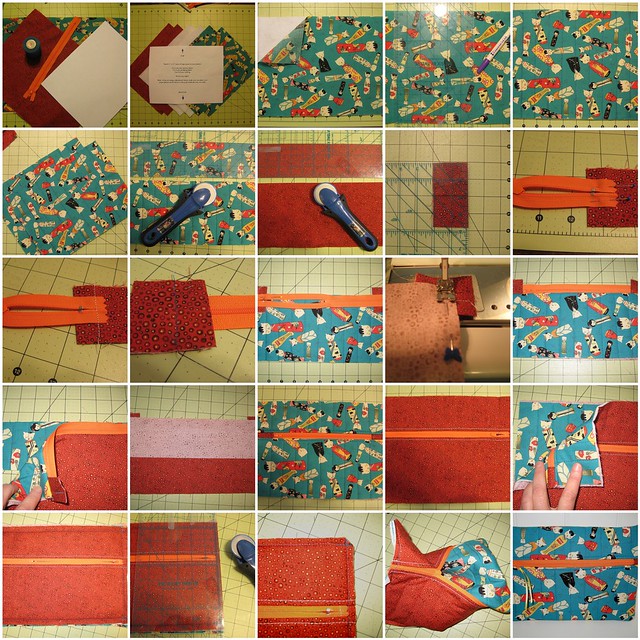
Now using your copy paper as your pattern, cut 2 lining pieces, 2 batting pieces and 2 exterior fabric pieces.
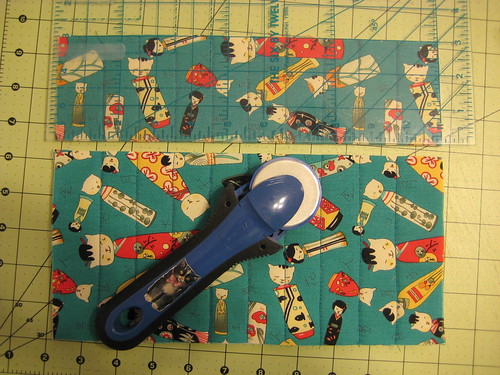
Lay your exterior fabric over your batting and press lightly.
Using your ruler and your erasable pen, mark one inch lines on which you will quilt.
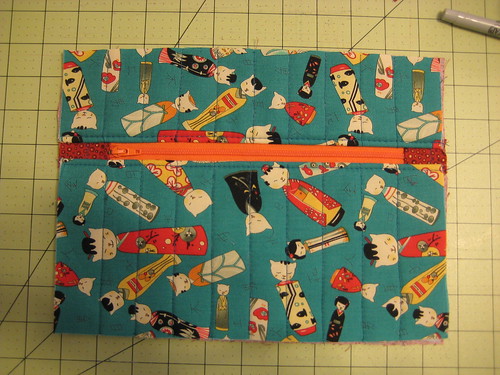
When you are finished quilting, your piece should look like this...
Do the same thing to the other piece, you should now have a front and back that are alike.
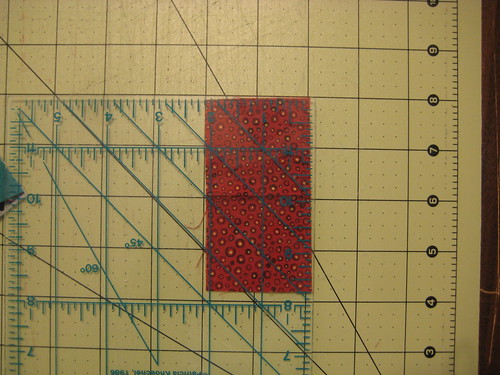
Take one of the pieces and measure from the top down 3 inches and cut. Only do this with one piece!
Do the same thing with one of the lining pieces, measure down 3 inches from the top and cut.
Now you are ready to put in your zipper! First let's get the zipper prepared.
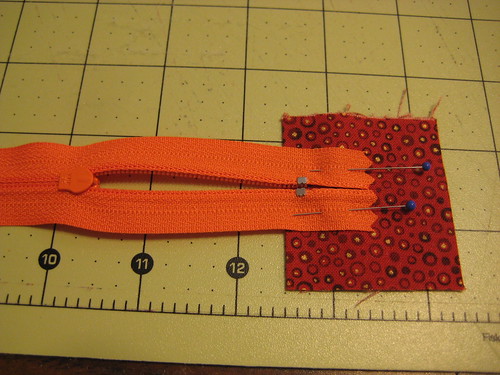
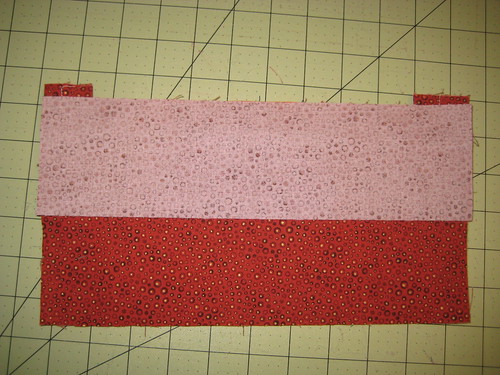
Cut a little piece of fabric 2" x 3.5", fold it in half and press.
Carefully pin your zipper to the folded edge of the fabric with the zipper pull facing down as shown.
Stitch across the zipper catching the ends.
Measure your zipper to your fabric and do the same thing with the opposite end, cutting off any excess zipper.
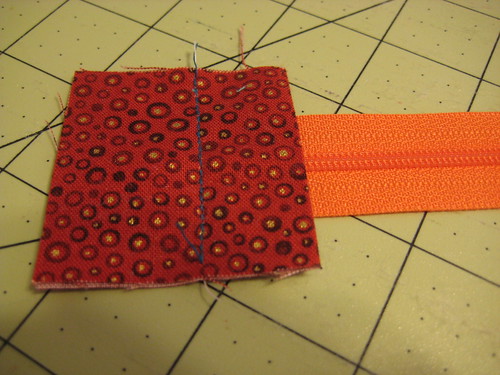
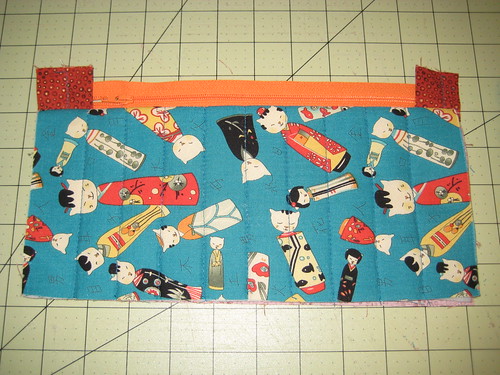
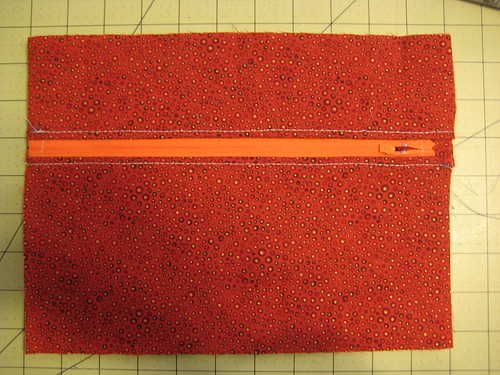
Okay, here we go...take the larger piece of your cut exterior fabric and lay the zipper with the pull facing down at the top, place your lining fabric over that, pin in place and stitch 1/4 inch along the zipper edge.
Trim off your excess fabric, fold your lining over and press...should look like so...
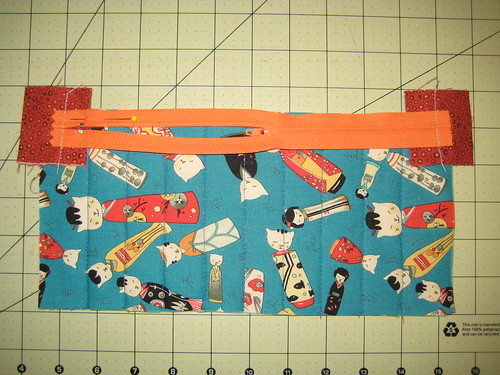
Take the smaller piece of the facing fabric and lay it in front of you, again, placing the zipper with the pull size down facing your short piece, line up the edges
and put your lining fabric on top
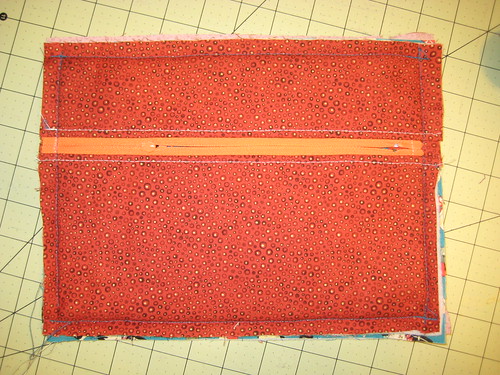
...stitch as above, clip, turn and press. Top stitch on the front side of your fabric, both sides of the zipper.
lining side should look like this....
Whew...well that was the hard part...you are almost done with your pouch!
This is very important! OPEN YOUR ZIPPER COMPLETELY!!! Before you proceed.
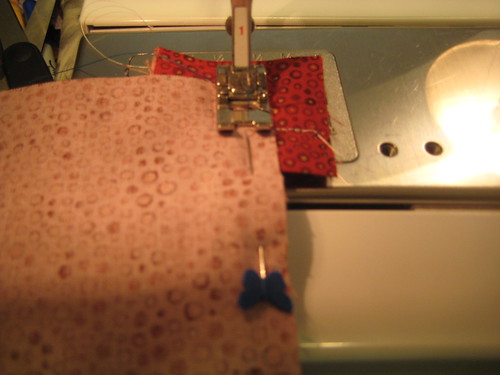
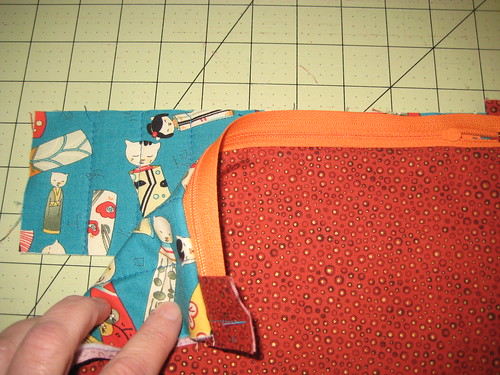
Put right sides of exterior fabric facing each other, pin the four corners to hold in place.
OPEN YOUR ZIPPER COMPLETELY!!! Before you proceed.
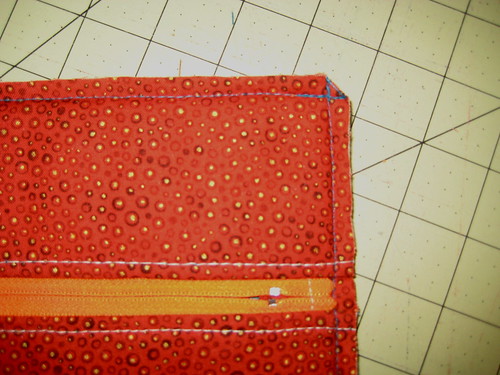
Now, simply stitch all the way around, using a 1/2" seam allowance. Double stitch your corners.
NOTE THE ZIPPER IS OPEN!!!!
Trim your seams to 1/4 inch...if you have a serger, this would be a great finish on the inside, but if not, don't stress...just trim to 1/4 inch.
Trim your corners
Now it's time to birth your pouch, turn it inside out and use a blunt pointed object...like a knitting needle to push out the corners. See why you needed to have the zipper open? You'll only make the mistake once, I guarantee it.
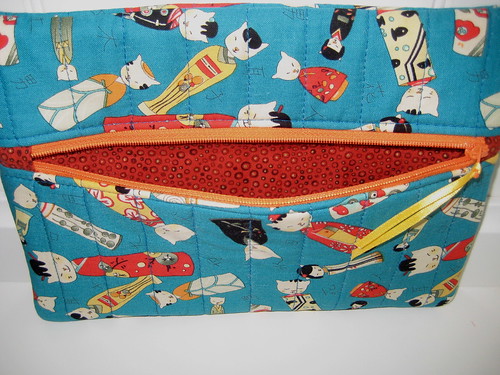
Run a little piece of ribbon through the zipper tab for a pull, give the whole thing a press and you are finished!
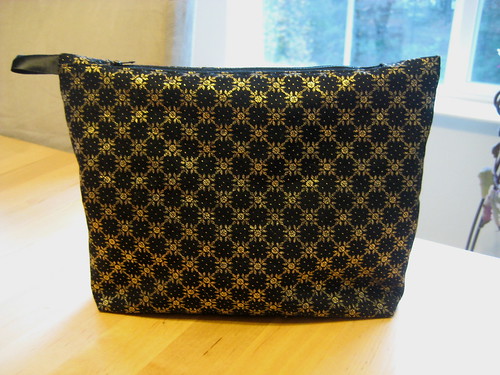
There are a million variations you can make with this...put the zipper at the top instead of in the middle and you have something that looks like this...
Box the corners and you have something that looks like this...