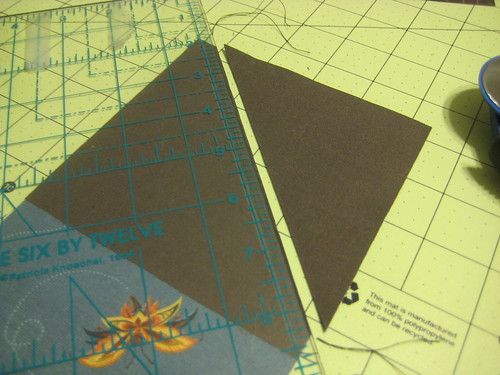
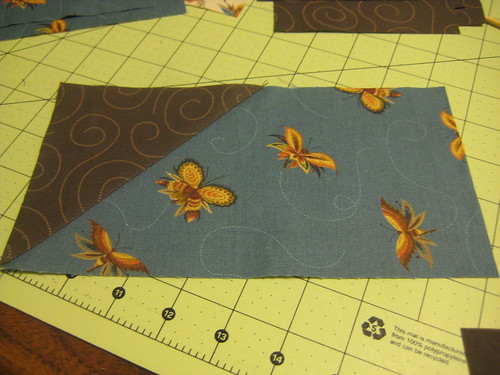
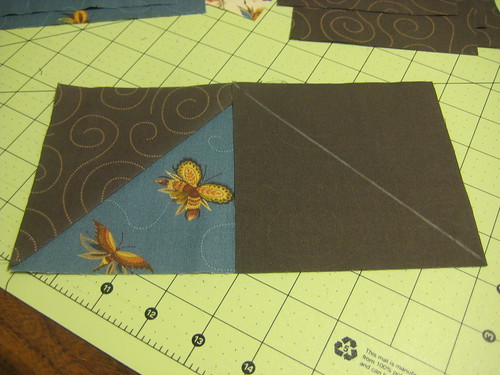
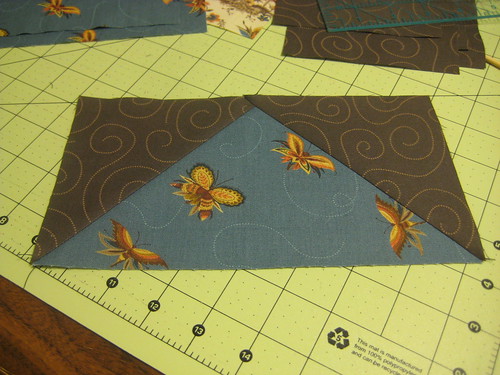
Today I am starting a Zig Zag Quilt with two charm pack that I have of Tula Pink Prince Charming. It's an easy quilt, made of half square triangle units. For my solid fabric I have selected Kona Cotton Ice Frappe, it's a lovely color that I am very fond of. To construct the quilt, you cut 6 inch squares of the Kona Cotton, draw a line diagonally across each one and then pair them up right sides together with one of the Prince Charming squares. Stitch 1/4 inch away from the line you have drawn on both sides of that line, then cut on that line, you will have two half square triangle units pieced quickly and easily. Then it's just a matter of laying them out in a pleasing pattern.
I have been playing with the blocks on my design wall and have decided that I prefer them in a like color sequence rather than mixing them all up. It's just an individual choice, there is no right or wrong way. So I am starting to piece them. I will piece each color run separately and then place them on my wall in a way that I find pleasing before I stitch the long strips together. My initial thoughts are to exchange the dark strip with the pale blue strip, I don't want the red and green next to each other, and I think the bold stripes will look better on the outsides. This will be a lap quilt.
Here is another option I looked at for design earlier today...mixing all the colors up...
It looks pretty this way as well, but my eye was darting all over the place and I was happier with the solitary color run on my design wall above...just personal preference. Well, back to the sewing machine and the iron. More to reveal later!
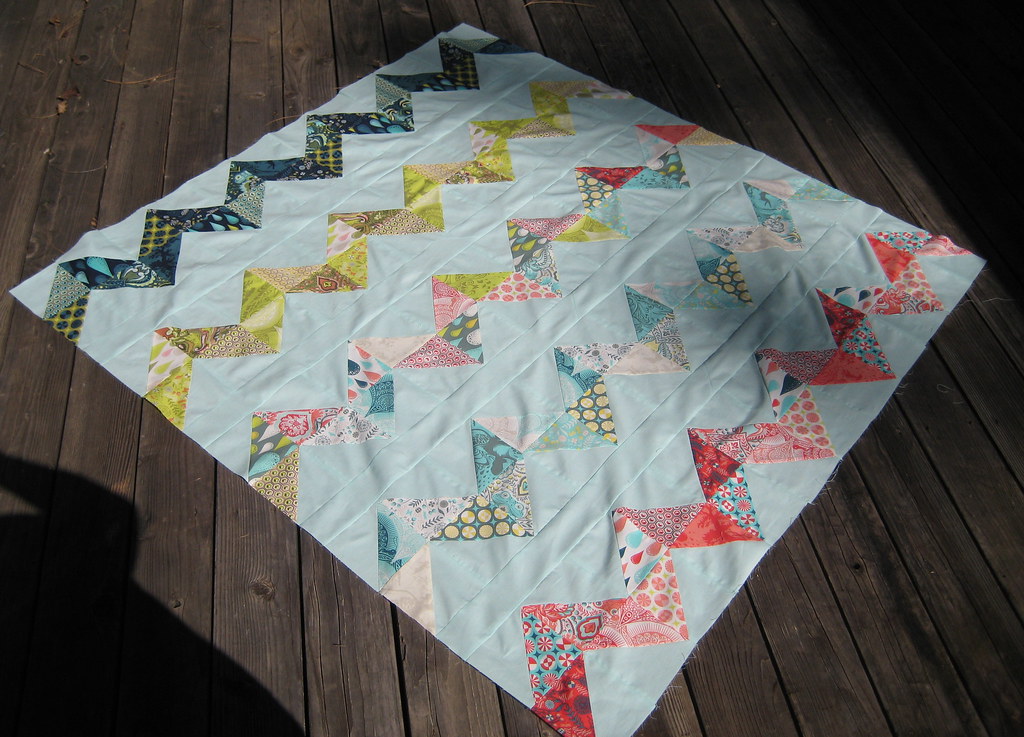
So, I have completed the top, I ended up doing one zig that is mixed from left overs and placing a 3 inch strip of the Kona Cotton Ice Frappe in between the rows to expand it a little. I'm happy with how the top turned out. Now to select some backing and binding. I will probably add another 3 inch strip around the entire piece as a border. Don't want a big one. I'm pretty sure I know how I want to quilt this as well. More to reveal later!
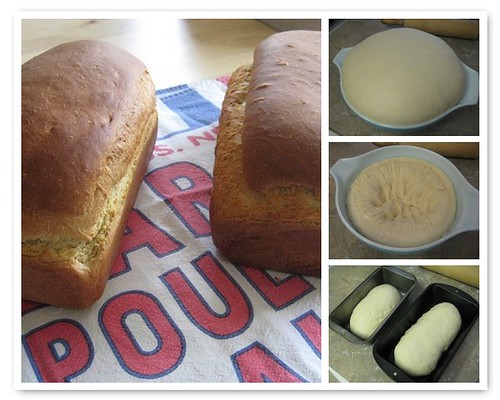
Love Hot Bread right from the oven, so delicious with a big smear of butter! It's Sunday, I have been battling hay fever pretty much all weekend. We didn't go to church this morning, neither one of us was feeling up to it. So I dosed myself with allergy medication and sat there in a stupor for a bit. Looking at my tablet, I was surfing for a good sandwich bread recipe and came across this one. Well, you can see the results above! The recipe is on food.com at this link : Quick Yeast Bread NOTE: I will swap out the water and oil for milk and butter next go around for more flavor.
And concurrent to making those two lovely loaves of bread, I decided to use up the rest of the dough that my husband made yesterday for our pizza and made Focaccia.
The kids all know the pizza dough recipe, for those that don't....here you go.
61/2 cups of unbleached flour
1 1/2 TBLS kosher salt
1 1/2 TBLS Yeast
3 Cups warm, not hot water
Mix all together in a BIG bowl, cover with saran wrap and let rise for 2 hours (don't knead, just stir until moistened)
Take half that dough and roll out onto a parchment lined jelly roll pan (use a baking dish if you don't have one)...you will want to flour your hands and the dough liberally as it is a very sticky dough. Let rise while the oven is warming to 475 F.
Top as you wish, for this one, I caramelized 1/2 of a large onion coarsely chopped, in 2 tbls butter and 2 tbls olive oil with a pinch of salt.
Cool the onions and then top your focaccia, sprinkle with crushed rosemary and oregano, cracked pepper and kosher salt.
bake 18-20 minutes or until done.
We like to dip our focaccia in olive oil and balsamic vinegar. It also makes amazing sandwiches!
I am so excited to teach this class. This is a favorite old time block with lots of potential! The blades of your fan could be all the same color, all completely different, you will have to decide. Perhaps you want a small quarter circle at the corner to finish it off. Maybe you would like to embellish your fan with some stitching or lace. Perhaps you want to echo stitch around the blades. Maybe your fan doesn't have tips...or maybe the tips are rounded. There are just so many options to be creative with this block.
We will start by cutting a square piece of fabric for our background. This should measure 15 inches, or the same as your other blocks in our series.
The next step will be to cut the fabric for the fan blades. We will be making a template before we cut. Template making is a new concept for us. What is a template, how do you use it and what do you make it out of?
A template is a pattern. You will place the template on your fabric and draw around it to create the shape you are after. We don't typically use a template to cut around, they are too thin and you may end up cutting the template. ( I say typically because you can purchase plexi-glass templates which you can use to cut around, but for our purposes, we will not be doing this.)
You can make a template using a stiff light weight card board, like the ones you would find in a man's dress shirt. You can use the side of a shoe box, a folder, a plastic lid, anything that will hold it's shape while you draw around it. For this block I have created a paper pattern for you to use and will provide some poster board in class for you to experiment with. We will trace this pattern onto our template material and then cut out our template.
(if you are doing a Dresden Fan and you want more blades or fewer or you want to do a plate, then you will need to do some math and equally divide your circle or quarter circle, Remember to add 1/4 inch to each blade measurement so that you have your seam allowance) We will talk more about this in our class.
Once you have your template created, you can "stack" your fabrics, trace your template and cut. I would not recommend for a beginner to stack more than 4 pieces of fabric at a time.
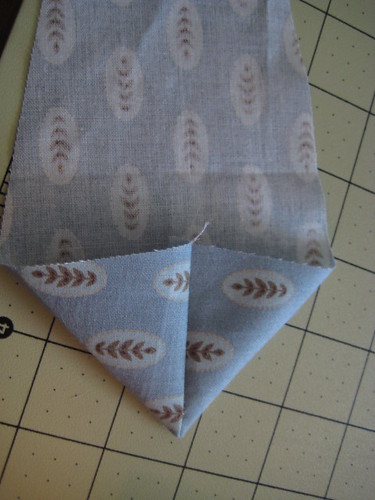
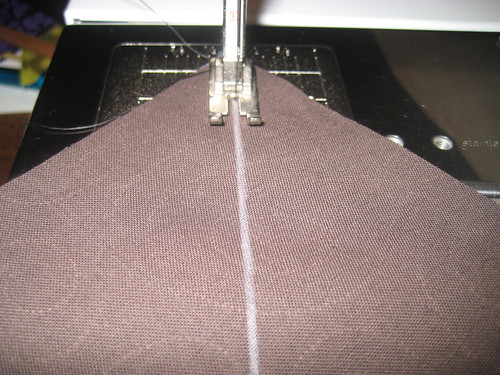
Carefully fold each of your blades in half long wise, and machine stitch along the widest end only as shown above. You don't need to clip your threads between stitches, just keep feeding your fan blades in until they are all done. This goes quick! Chain piecing is great when you are quilting and I encourage you to look for opportunities to incorporate this technique in your quilting.
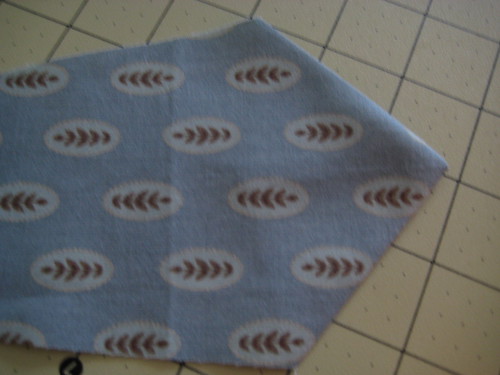
Once you have all your blades stitched at the top, clip them apart and turn them, use a stiletto or a knitting needle or a bamboo skewer to turn that sharp point, careful not to poke through your fabric. Now line up the seam to the center of your blade, you can finger press at this point if you wish. Take all your blades to the iron and press carefully, making sure to keep that seam in the center of your blade.
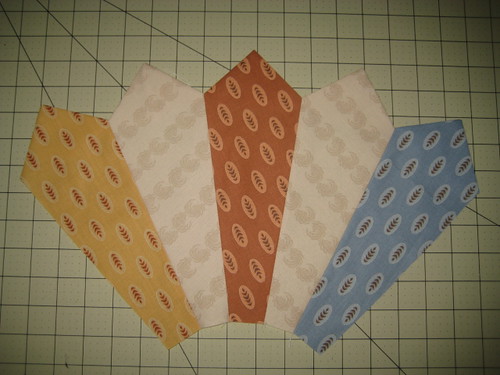
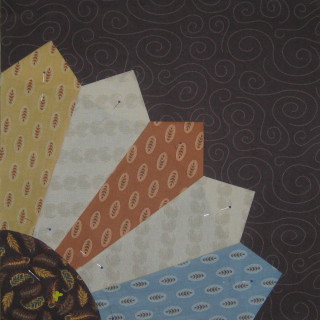
Once pressed, your blades should look like this above. Now you will arrange them the way you would like your finished fan to look and stitch the long edges together so that they look like the fan below.
Now take two pieces of fabric, right sides together and draw a quarter circle. You can use a bowl or a plastic lid the size you want for your fan "base". The two pieces of fabric can be different, you can use interfacing for one side or remnant fabric, it's not going to show. If you don't want a base, be sure to extend your template pattern all the way to a point.
With right sides together, stitch along the curved edge only! Clip your curve, turn and press.
Now for the Assembly! Place your fan on your fabric block, pin in place. Place your fan base on top of the fan and pin in place. It should look like the example below. Carefully top stitch your fan blades in place along the blades only, then carefully top stitch your fan base along the curved edge only. Press and you are done with this block.
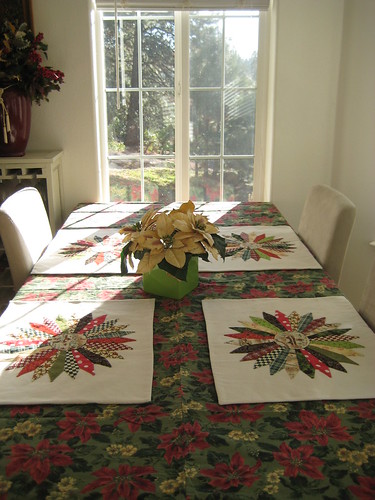
Here are some examples of Dresden Blocks.
My Christmas table mats, with holiday colored narrow blades on a muslin background.
The block below is from the blog Fresh Lemons and has a wonderful modern look due to the fabrics selected and the quilting.
There are lots of possibilities for you to explore with this easy and fun block!
Template For Dresden Fan
You will need to enlarge this to a size appropriate for the block you are making. If you are taking the class, I will provide the template in the class. If you are not in the class and want a copy, just drop me an e-mail and I will get a copy off to you.
If you are cutting just one block, stack your fabric about 4 layers thick and cut...if you are cutting for a large quilt or multiple blocks, you can cut strips the width of your fabric and lay your wedge template down, marking one wedge, then flip it and mark another as shown above. There will be little waste with this. Also, as you see above, you can get creative with your fabric and strip piece it for a totally different effect. Just an option.
Speaking of options....you can leave your blades flat, you do not have to have points on them, you will simply cut a piece of fabric to match the curve of your fan and stitch along that curve right sides together, then turn and press for a very neat clean edge. Maybe you like a scallop...you can do that too, with the same technique, mark your scallops, stitch the backing on, clip your curves, turn and press.
Here is a great video Making a Dresden Block by the Missouri Quilt Co.
I'm glad you joined us today, I know you'll have a lot of fun with this block and find a variety of uses for it.
Our next meeting will be on Friday, June 8th at 9am. We will be making two blocks at our June meeting and I will be sending home the pattern for the final block...to finish up our blocks for the year and then in July we will be assembling our quilt tops and getting them ready to quilt and bind! Start looking at the blocks you made. Think about how you want to lay them out, do you have enough for the size quilt you want to make? You can have duplicate blocks in your quilt, it's okay. Maybe you like one of the block and want your whole quilt to be that block! That's okay too! Enjoy yourself. The blocks can be made into pillows, table runners, placemats...what ever you desire, you don't have to make a quilt. Here are the blocks that are coming up for June! Don't get scared, these are basic...you have already learned the techniques to make these...they will just be a review! Study the blocks below and see if you can recognize the components it takes to make each block!
I thought it might be fun to recap the blocks we have done so far. I put them in a Mosaic using BigHugeLabs.com. It's fun to see it coming together! We only have three blocks to go now. Friday was a bit of a challenge with the power going on and off due to the storms here. I am anxious to see the blocks finished by the gals that left early. A few of us die hards stayed and played till noon! There are some corrections to the printout. The "wings" of the geese should have measured 4 1/2" square and you need 8 of them. So much for typing things up in the middle of the night! Please forgive me.
Big thanks to Mo! Although she could not stay and quilt with us, she scored some older quilt tops to donate and also made up this pinwheel quilt using the Twister ruler. It turned out really cute! Someone will be delighted to receive this.
So grateful for her generosity! And that of others in the class that have donated blocks and fabric!
I am washing up some donated fabric and will be stripping it up this week. When we have our next class, in addition to making our scheduled block which will be the Dresden Fan Block...we will make a quick and easy block from strips of fabric. All of the blocks will be collected at the end of class and we will put them into one quilt. I think you will love this technique and will be amazed how fast it goes together. All fabric will be precut for you. Should you decide that you want to make more for yourself at home, this block would be a good option for a "jelly roll". Jelly Rolls are precut strips of fabric that are generally 2 1/2 inches wide by the width of the fabric. Usually there are 40 strips in a roll. They are fun to work with, because someone has done all the hard work of picking, cutting and blending fabrics for you. You just start sewing! You can find jelly rolls everywhere, they look just like they sound, a colorful roll of fabric.
The Dresden Fan Block looks complicated to a beginner, but when you learn the secrets you will be stunned at how very easy they can be! No paper piecing necessary!
Corrections to measurements when cutting your fabric for your block below!
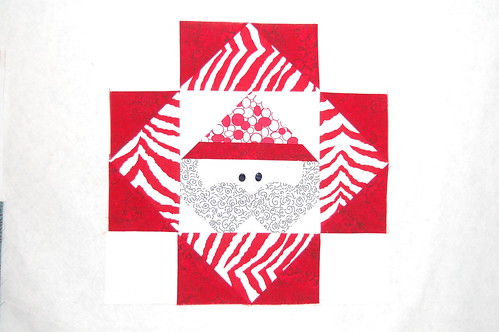
This is our 4th class now and our 5th block! The Kings Crown Block incorporates 4 flying geese around a center square that can be creatively developed as a focal block. You could fussy cut a fabric for the center, your could embroider, applique, you could even piece the center as Brenda has done below. She has used a paper piecing method which we will discuss in class a bit.
Where you place your fabrics, as we have discussed in previous blocks, will create the emphasis. So let's get started!
There are several tools and techniques out there to make flying geese. Here are some of them.
This first one uses the Lazy Girl Flying Geese X 4 No Math Ruler. Good Demonstration, easy to do.
The next one demonstrates the Eleanor Burns method and rulers. Also easy and fun to watch.
These are both great tools and wonderful methods...if you need those sizes.
Now here is a method by Ricy Timms which is truly amazing and fun, one seam and you can make it the size you need for your project!
I do not recommend her method #1 for beginners as you will be working on a raw diagonal and there is a risk of stretching your fabric and having a disappointing outcome.
We will be using her method #2. Her method #3 is actually demonstrated in the video at the top and I will demonstrate that in class as well. You can make them anyway you like...like I said at the beginning, there are a number of roads and they all lead to the same place!
To make the Kings Crown Block, you will need to cut the following:
4 squares measuring 4 1/2" square for your corner stones.
4 rectangles measuring 8 1/4" x 4 1/2" for your flying geese body
8 squares measuring 41/2" x 41/2" for your flying geese wings
1 square measuring 8 1/4" x 8 1/4" for your center
Set aside your corner stones and your center for the time being. We are going to make four flying geese.
Lay your "wings" on top of your "body" as shown, fabric right sides together. Draw a diagonal as shown.
Stitch on the diagonal. This is a relatively thick chalk line so you can see.
Using your ruler, cut 1/4 inch away from your stitch line as shown above.
Press open as shown. You have completed 1/2 of your geese block.
Do the same for the other side as shown above.
Trim and press open as you did for the first "wing". You now have a finished flying geese. You will need four of these for your block.
Lay your block out with the large square in the center, your small squares in the corners and your flying geese in between...they can point in or out, your call. Stitch each row together as you have been taught in lesson 1 and your block is complete.
Now, as in our previous lessons, I want you to think outside the box for a minute. Before stitching your block together, play with the components, what do you come up with? Here are some different blocks, made with the same bits.
Lots of variety here! Again, I encourage you to experiment, let your creativity fly. Do you love to embroider? Maybe an embroidered focal piece in the center would be fun. Some iron on applique, or stitched if you are so inclined. Fussy cut a focal piece. Use diagonal fabrics in your flying geese as Brenda has done, to give additional interest.
Okay, We are moving right along.
Our next meeting will be on May 11th at 9am.
We will be having another surprise that day, so I hope you can make it! If not, please join us online and quilt along with us.
If you are inclined, please pack a sack lunch, refrigeration is available...we will stay in the afternoon and you can work on your project or help with a charity quilt!
Our Next Block will be a 5 blade Dresden Fan! So much fun to make, so quick and easy with lots of creative variations for you to try.
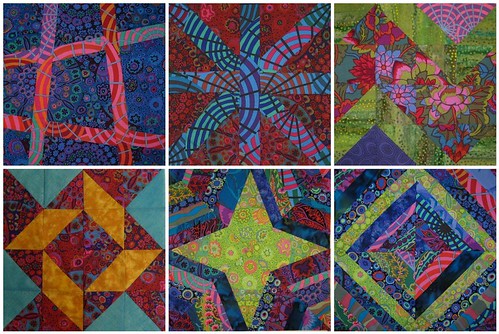
Before I started teaching my quilt class, I thought it would be a good idea to take a beginner class myself just to make sure I'm not missing anything. I'm working on my March blocks today, I'm a bit behind with everything else I want to do. Here are the blocks that I have finished so far. I'm working on a sixth block right now and will update the posting shortly. (updated) Then I will need to get busy on my April blocks, but I have a secret stash of hexies already made up, so I am ahead of the game there! These blocks are all made with Kaffe Fasset fabrics and some random batiks, thai silk and blender cottons.
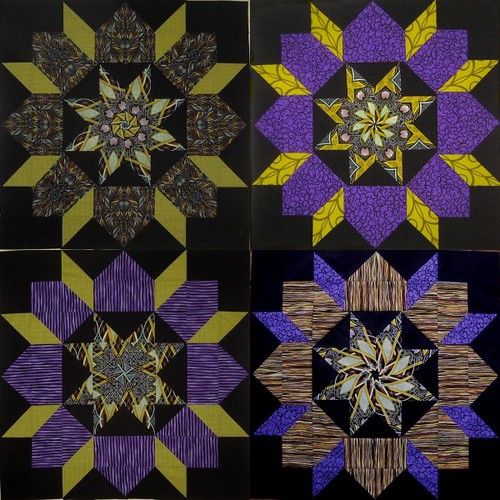
The other project I have been working on is a "Swoon" quilt. You can get the pattern here: Thimbleblossoms Swoon Quilt Pattern The blocks are great fun, they are 24" square and I have been making them more difficult and challenging for myself by incorporating the stack and whack technique. Here is a link for a great tutorial on stack and whack blocks...Connecting Threads Stack and Whack tutorial Here are the blocks that I have assembled so far, I have 5 more to go! If you like the stack technique, there are some great books on the subject by Bethany Reynolds.
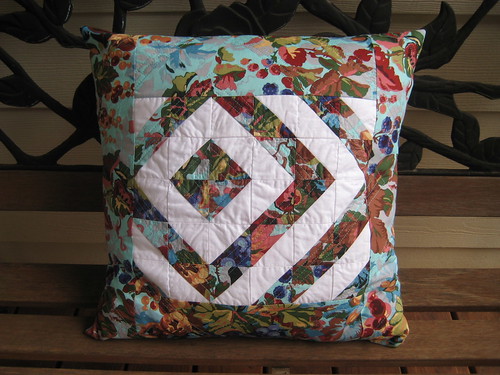
And if that wasn't enough, I decided that I needed a new pillow cover for an old pillow so I dug through my stash and came up with this. It's two inch square, half square triangle blocks assembled in an off set manner.
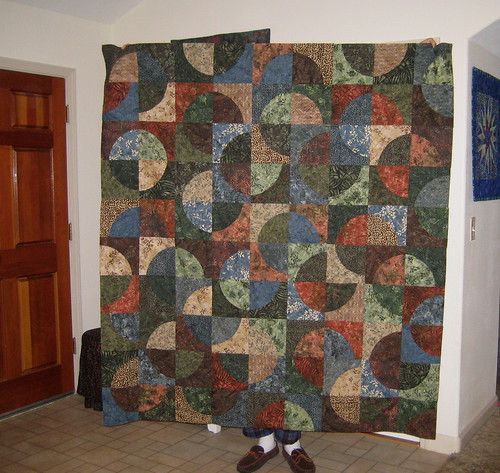
And if that still wasn't enough, I finished a quilt top. Now to go on a search for backing and binding.
My sweet husband offered to hold up the quilt for a picture...so this is officially a "Walking Quilt" now!
Okay, I better get back to the iron and sewing machine! I have 3 more Craftsy blocks to do to get caught up! And maybe I can get another Swoon block cut out before I have to clean house.
We are getting ready for our next block and I want you to see Brenda's block which she has finished ahead of time. She will be using this for the center block in her quilt. You may want to think about this before our next class. If you want to feature something special in your center block, some embroidery, a fussy cut fabric, an applique...these are just some suggestions. It's a great block to do this with, doesn't mean you have to, just an option. Below is the block without any special maneuvering.
Wanted to give you some time to think about this before we meet again.
I also wanted to share that there are a couple quilt shows coming up locally that you might enjoy attending.
APRIL 14 - 15, 2012 FQG QUILT SHOW:"THIRTY YEARS IN REVIEW"
“Dresden Forest” is FOG's 2012 opportunity quilt. Tickets will be sold until 3pm on Sunday, April 15, at which time the winning ticket will be drawn.
This show will be at the Gold Country Fair Grounds in Auburn, CA on
April 14th and 15th
Quilts and wearables; vendors; country store; cafe; raffle baskets; door prizes. Alex Anderson is the featured guest on Saturday! Admission $7. Saturday 10-5, Sunday 10-4.
This is a local show and is just so much fun, they will have over 300 quilts on display and lots of vendors. We will be meeting on April 13th, so I will remind you then. You won't want to miss it.
If you would like to stay after class and play with us, bring your sack lunch to class next time, we can place it in the fridge in the kitchen. I have a couple quilt tops planned for the afternoon, I think we can get two done if enough folks want to stay. One will be a "Twister" quilt and the other will be a "Lawn Chair" quilt. Both are very quick and easy. You may want to learn how to make them and make one for yourself!
We will be utilizing a "construction line" technique so we can get these done quickly. A couple gals will cut the initial pieces, a couple gals will sew the initial pieces, then a couple gals will cut the segments and a couple gals will stitch them back together. Ideally I would love to have 8 of you for the afternoon...if you can. If you like the patterns as we make them, let me know and I will get you a copy of the directions.
The needs of others are ever present, and each of us can do something to help someone.
Thanks Ladies for being so willing to share your talents.


 So, I have completed the top, I ended up doing one zig that is mixed from left overs and placing a 3 inch strip of the Kona Cotton Ice Frappe in between the rows to expand it a little. I'm happy with how the top turned out. Now to select some backing and binding. I will probably add another 3 inch strip around the entire piece as a border. Don't want a big one. I'm pretty sure I know how I want to quilt this as well. More to reveal later!