Thursday, September 12, 2013

Our Final Block of This Year's Perfect Paper Piecing Group

This is a little late getting up, but here we go!  Woven Star, our final block this year.

my student Sandy's block

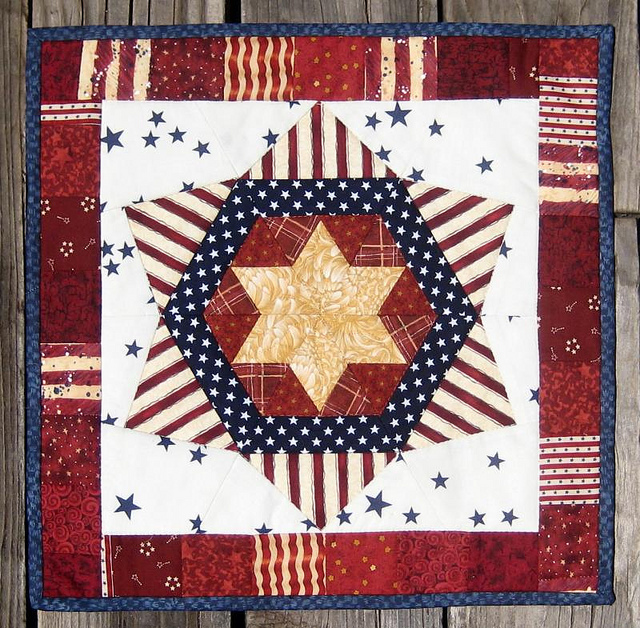
The Woven Star.  The beautiful block pictured above, featuring Kaffe Fassett fabrics, was created by one of my students, Sandy Simester.

Now there are some tips to make this block easy.  Get yourself a box of color crayons or colored pencils.  You want to be able to identify where your fabrics will be placed in your block.  Trust me, this is an important step with this block.  It looks easy, particularly after some of the other blocks that we have made, but there is no room for messing up on this one.

You will need to print out 4 copies of the blocks.  Now the blocks are too large to print on one sheet, so you will need to match them up, tape them and then use them to paper piece as we normally do.

If you have access to legal paper and a printer, tape one copy together and print them out as needed on your copy machine.
If not, you will be making 4 copies of each piece and taping them together to form 4 triangle components that will form your block.

As we have done before, please trim the excess paper, leaving about a 1/2 inch extra all the way around.  Remove your thread from your machine, including the bobbin thread.  Stitch all your lines to pre-perforate your paper pattern, making it easier to see where your fabric will go, easier to fold and eventually easier to remove.


Lay your pieces out as shown above, this is how they will form your block once they are trimmed down.  Select your fabrics, match up a color crayon and mark each of the areas of your block with the corresponding color.  Looking at the block above, you see the pink color in the small #1 triangle, looking to the right, moving counter clockwise, you can see that pink again on the next component block in the triangle #4...I want that area of both of those blocks to be the same color.  Study the block at the beginning of this blog and you can see how the colors move around the block.  If you do not mark your pattern pieces and carefully assemble them, you will not be happy with your results.  Take your time.  Check and double check that you have your pieces in the right place.  As you can see, it's not a difficult block to sew at all, it's only complicated by the placement of the colors.  Here is another example below.  Think about your colors, your textures, what you want to express in your block.  You might select your background fabric and then weave 4 other folded fabrics together and lay them on top to audition them.


Woven Star Block

Before you stitch your 4 component blocks together, Trim the excess fabric and lay them out on your mat to make sure that you have everything where you want it.  Stitch 2 of the component block together, and do the same for the other two, press your seams in opposite directions and then nestle your center seams as we have done in class before.  Stitch the 2 halves together and press your seam open to reduce the bulk.

Here is what this block might look like replicated in a quilt top.  I have put a link at the top of this blog to the patterns and there is one at the side as well.  Have fun and be sure to share what you make!  Remember, the block will finish up at 12.5"


Sandy's block in mosaic


my block in mosaic

Monday, September 2, 2013

UPDATE: Kaffe Fassett, Philip Jacobs And A Storm At Sea!


Top Finished, ready for quilting


Philip Jacobs Lavinia on the cutting board

I woke up yesterday and pulled out my stash of Kaffe Fassett, Philip Jacobs and some random batiks and knew exactly what I wanted to make!  Last year a friend recommended that I purchase the Fast2Cut Template by Wendy Mathson.  So I did.  I have been sitting on it mentally hatching a quilt and finally decided to do something about it this weekend!  


I decided to get Wendy's book which was also recommended.  I have read it cover to cover several times.  You can get a copy at your local quilt store or online at Amazon.com  I can recommend it to you!


I decided to make the quilt that she is showing on the cover...but I want different colors than what she had selected...so here goes!


Cutting out the bits and labeling them.


Sewing the first sub component.  The ruler does all the work for you, it's so easy!  I had to pay attention the first couple times and then it's like magic!


The first two rounds are up on the design wall.


Adding the third round

Half way though the fourth round I realized that I was short on the light green Philip Jacob Lavinia that I was using...EEEK!   Why didn't I buy the whole bolt when I had the chance???   Honey!  We have to go down the hill, I have to go to the fabric store...I'll buy you lunch!  Down the hill we go...lunch eaten...fabric store closed?  REALLY???  Okay, calm down.  Honey?!  We have to drive to Rocklin to Beverly's to see if they have any.  Down the hill still further we go.  The traffic is horrendous!  They don't have it!  NOOOOOOOOOOOOOOOOOOOOO!  Back home, dejected, sorting through the piles of fabric on my table...wait, what is this?  Is it?  It is!!!  One single strip left, just wide enough, if I am careful, to get out the bits I need!!!!!  Oh Happy Day!!!  Oh Happy Day!!!
Thanks Honey for being so patient and sweet.


Adding the fourth round, there are two more to go before I am ready to stitch all the sub blocks together.  Looks very different from the book cover doesn't it?

I am loving me some jewel tone fabrics right now...back to the sewing table...You will have to check back to see how this finishes up!

On the home front, it has been raining all day!  Thankfully!  We have the windows open and fresh air is streaming in. I'm sure this is helping with the fire up the road and the one in Yosemite.  Grateful for the relief from the smoke!

Andrew has returned from Burning Man 2013, I have not spoken with him, but I think he had a good time.  Here is his finished costume complete with lighting!  (All they are missing are some trick or treat bags...LOL)


Along with all the costume fun...I decided to start a mug rug swap on Ipernity...so here is a little quick pic of my finished mug rug for my swap partner.  She loved it!

All Finished and going out in the mail today!

If you would like to join us in our next swap...come on over to www.ipernity.com/group/mugrug and join in the fun!

Saturday, August 17, 2013

UPDATE 8-27-12: American Fire Video by Jason Phipps and Kellen Walker


Film by Jason Phipps and Kellen Walker

Pretty amazing video of the fire burning near us.

This is an updated version of the video of the American Fire with footage provided by California Interagency Incident Management Team 4 and Fire-watch Cobra, US Forest Service.

The American Fire, started at approximately 4:30pm on Saturday August 10, 2013, is burning in heavy fuels on extreme slopes about eight miles from the community of Foresthill, California and has grown to 25,000 acres as of August 26, 2013. There are 1,196 dedicated personnel fighting the fire at this time to prevent the fire from reaching populated areas. Many of the previously dedicated personel have relocated to the RIM Fire near Yosemite CA. They have successfully contained the fire American Fire 83% at the time this video was originally posted. Heavy fuels are creating large amounts of smoke, which is a significant issue for the Sierra Foothills, Tahoe area, and Sacramento Valley. The cause of this fire is still under investigation.

A special thanks to Kellen Walker for helping us film under such dangerous conditions, thanks to Karen Marko-Meyer for logistical advice, and Wes Schultz for contributing his amazing photography. And of course, thank you to those firefighting professionals risking their lives in combating this amazing force of nature.

For additional photographs of The American Fire by Wes Schultz visit -http://notnownotever.exposuremanager.


Filmed by Air National Guard

Aireal Fire Fighting of the American Fire


Smoke from the American Fire being forced down into Reno 
from the thunder storms

Video by National Weather Service Reno


Video by Chris Terry

Pics from our PPP Class Yesterday And Ramona's Back!

Sandy Simester's Block featuring Kaffe Fassett and Phillip Jacob fabrics

We had a small turn out yesterday, but much fun was had by all!  Our dear Ramona was back in class and it was so good to see her getting around so well.  She has kept up with the class and brought all her blocks to share!  Well Done!!!

Ramona's Blocks

Her blues are beautiful, she has two more blocks in process right now, but I have no doubt they will be every bit as lovely.  This is going to make a soft and pretty quilt.

I am working out how I am going to get this pattern Woven Star Block, scanned into the computer for you all to enjoy.  It has to be printed out on legal paper to make the 12.5 inch finished block.  My scanner is only letter sized.  Leave a comment if you have any suggestions on the best way to accomplish this.  I was thinking about cutting the pattern in half and posting the PDF with the two halves which you would have to tape together.  And that may be what I do, because I'm thinking that everyone probably has letter size paper to print on and not legal.  I'll get after that this afternoon, check back here for a link to the pattern on our PPP link page.

Ramona and Teri working away

The American Fire has been burning away now for a week up here and we are all choking with smoke, especially in the mornings.  The fire is now up to 10,000+ acres with only 30% containment as of last night.
American Fire photo from Yuba Net

The fire is burning up canyon from us about 10 miles as the crow flies...and as the inversion takes place the smoke drops down the canyons and we wake up to...
Smoke in the mornings

The picture above was taken on the second day of the fire, we are now a week into it and the smoke is much thicker and more choking.

Anyway, back to fabric and sewing fun!  Here are a couple more blocks from class.

Teri's Block

The trick to this block is to have some color crayons with you when you are first laying out what you want to do.  Figure out what colors you want and where you want them.  On the pattern, you will circle the number 1 on one segment of your block with your red color crayon.  Now look to see where the tip of that or the corresponding #4 will fall in the next segment and circle that with your red crayon also.  Now you know, what ever fabric you are putting in #1, will also need to go in #4 on the corresponding segment.  Don't worry, when I post the pattern, I will also post photos of how to do this.

My block, The Woven Star

It's a very easy block with not many pieces but if you don't pay attention while you are sewing it, you will not have the results you want, it can be tricky at first.  I will post hints and tips with the pattern.

You all know by now, that I love to play with the mosaic maker at BigHugeLabs.com  so here are some mock ups of these blocks, so you can see what it might look like in a quilt.


Three completely different looks with the same block, just changing up the fabrics.  Isn't quilting fun!  Well, I have a day of sewing ahead of me, finishing up Andrew's costume, some BOM's I'm working on and I will probably start another project, just because...LOL.

The Woven Star will be the last block in our PPP class this year, the meeting next month will be to finish up any blocks that need to be finished and to start your quilt top or what ever you plan to use your blocks for.  Perhaps a table runner with matching place mats???  Your call, your creation.

The October meeting will be a pot luck to see every one's work and enjoy a lovely brunch together!


Check back this evening or tomorrow for the PDF pattern and instructions for our final block, The Woven Star!


Wednesday, August 14, 2013

PPP Class This Friday! New Block Will Be Posted

This is NOT the block we will make Friday, this is from our last class.  I made this little quilt for the LQSVSG.

This Friday, August 16th will be our Perfect Paper Piecing Class. We will be making a new block this Friday.  I will not post the pattern until late Friday, but it will be available at the class.  For the block we will be making, you will need 4 different fabrics plus a background fabric. 

We will be making the block shown below, The Woven Star.  This example uses only three fabrics, 2 for the star and 1 for the background.  For class we will be using up to 4 for the star and 1 for the background.

Woven Star

This is not a difficult block to make, but you must pay attention to placement as you go along.  We will discuss some tips for making that easier in class and I will post them this weekend along with samples of class work.


So a couple weeks ago, I decided to start a Mug Rug Swap on Ipernity!  I put up this invitation on Flickr, Ipernity and FaceBook 


I've had a great initial response!  We have 17 folks signed up for the first swap!!!  What fun.  Everyone is busy creating their inspirational mosaics.  There are currently 30 folks in the group, some are watching this first round and will jump in on future rounds.  I hope you will come check us out, join the group and have some creative fun with us!!!

Whether you are a veteran quilter or a newbie...everyone is welcome.  The rule of thumb is to make something to the best of your ability, something you would be proud to have your name associated with.  

Our first swap is a Fall/Halloween theme.  The mosaics are fun to look at. There are several great options and directions for people to head in.  It's going to be fun to see what everyone creates!


Come join the Mug Rug Swap at Ipernity!


Saturday, August 3, 2013

Burning Man - Costume Completed, The Update


Burning Man 2013


Once a year, tens of thousands of people gather in Nevada's Black Rock Desert (also known as "the playa") to create Black Rock City, a temporary metropolis dedicated to community, art, self-expression, and self-reliance. They depart one week later, having left no trace whatsoever.

In the 1990's my son attended Burning Man along with about 6000+ other individuals.  He is returning this year but this time, there will be 70,000+ individuals sharing the playa.  This should be an entirely different experience and I am anxious to here about it when he returns.  Part of the immersion into this experience is to express yourself with costume.  Last week, Andrew came down for a visit and we went to Jo-Ann's to make the initial fabric selection for what he has designed.  


We started by making a paper pattern for a "space age collar" and things are evolving from there.


He told me that he would like to have the black sections of the collar, float over the top of the silver sections as he wants to attach some battery operated lighting.  Quickly, the clothesline in my craft closet came to mind.  We cut a strip of fabric and folding it in half over the clothesline, I used the zipper foot to create cording which I will use to separate and create space between the two collars.


The fabric he selected is really fun, I was thinking it might be difficult to sew on, but it's a dream!  90% poly and 10% spandex.


Cording completed!  Check!  Now for the collar bits.


We got some really cheap batting and stitched the collar pieces together with the batting on the bottom.  He wanted dimension and this will give us plenty!


I am leaving the one side open on the silver pieces, they will get run through the serger for a finished edge that he can stitch down to a t-shirt.  The black collars are stitched all around.


The stack of collars are finished with the initial sewing, now the batting must be trimmed and the fabric must be turned right side out.  I carefully pushed out the pointed areas with a large wooden knitting needle.


So here we have the collars ready for top stitching which will create a very metalic look.  Then I will start on the belt and the belt buckle.   I have purposely left a large space in the outside edge for us to insert wire to give this some lift and shape....The collar will be V-shaped front and back with pointed tips at the shoulders that will rise up a bit...let's see if we are successful...more to be revealed!


Pinned up on the design wall.


Well, Andrew was down yesterday and we finished up his costume for Burning Man.  There are other bits that go with it which he has at home, but these are the contributions I helped with:

The Liquid Metal Shirt

After  finishing the collar, Andrew decided that it needed a liquid metal shirt underneath...so, we made this!

The Completed Costume

The collar looks great over the shirt and is held in place by a couple strips of industrial strength velcro, so no worries about it slipping off the shoulders.

The Fur Shirt


And as an after thought, he decided that he also wanted a "fur" shirt for the evening.  It can get cold out there on the Playa...hard to believe, I know.  I was shaking my head (internally) when he told me this and shaking it even more when I saw what he picked out, but you know what?  It actually made up into a really good looking shirt, suitable for wear, post Burning Man.

Great day, spent creating with my son.  Truly a collaborative effort.  


Friday, July 26, 2013

Retro Rubies - The Remix and The Finish


If you have been following my blog, you have seen this fabric spread before.  Today I am starting on Andrew's quilt.  The pattern he picked out was Retro Rubies by Alyssa Lichner which is featured in the Spring 2013 issue of Modern Patchwork.  


I started reading the instructions the other day...whew, that girl went to some trouble to make that quilt.  I am basically lazy, first to admit it.  My mind got to thinking, why all that fuss, curved seams, piecing bits...no, not for me.  Don't get me wrong, if there was pattern involved and it was a complex pattern, I would be all over it.  But hey, this is MODERN patchwork.  So, I have redrafted the pattern and here it is for those of you, who like me, would enjoy this quilt with a lot less effort.

I will be posting photos as the work progresses so you can compare the results and see if you, like me, are all about the remix.

Here is the REMIX pattern in PDF format with further pictures and instructions to follow.


I am missing one color, which I will pick up this weekend when I'm down in Rocklin.  All my "petals" are cut, two of each color.  I cut them with the right sides of the fabric together so I cut two at a time and used the rotary cutter and a ruler, lining up against the edge of my template with the ruler to get a straight and accurate cut, then free handing the corners.  Now I will start stripping the fusible pelon into blocks.


With right sides together, (the bumpy side is the right side of the fusible in this instance) pin the four corners.  I pin inside the seam line area so I don't have to remove pins until after I am done sewing and I'm not stitching over any pins.


Cut away the excess fusible.  I use a ruler on the straight areas to make this quick and easy and free hand the corners.  This is much easier than trying to cut your fusible to the pattern and then trying to seam them together.


Clip your corners to the seam line, just like you do in dress making.  This will help them lay flat when you turn them.  Also clip your tips to eliminate the bulk in that area when you turn.


Take some snips or a seam ripper and CAREFULLY make a slit in the fusible.  Make it at least 3 or 4 inches long.  Turn your work right sides out now.


Take a wooden knitting needle or spoon or something with a blunt end and just run it along your seam line, careful to not poke through your fusible.


Turn it over and finger press...do NOT press with your iron until you are placing this on your background fabric or you will have a MESS!

Stack of pellon next to the stack that's stitched.

Stack is ready for trimming.

Done trimming the last bit of excess pellon, ready to slit the pellon and turn.

Turned and finger pressed.  Stack ready to be placed on the background

Kona Cotton Ash for the background.


There you have it, this is up on my design wall and I won't press them onto the background fabric until I have them all made and can play with the color arrangement before the final pressing.  

I will use a ruler to line up my blocks before pressing, that way, everyone will look uniform.  This is a charming wall hanging. Andrew wants a throw size, so might be cutting a few more bits before I'm all finished.

Hope you enjoyed this remix!  Here is the finish...