Saturday, January 25, 2014

Mystery Quilt Fun and Creating the Seminole Border


I'm playing with an online group on Facebook called "Just Us Quilters" and they started a Mystery Quilt.  I love Mystery Quilts!  So of course I was in.  And this one only required 3 fabrics!  Nice.


Now this looks very complex, but when you do a Mystery Quilt, everything is broken down into little bite size chunks and it all goes very fast!  Yes, I know, that is surprising isn't it?!  There are tons and tons of Mystery Quilt patterns out there.  You never know what your quilt will look like until you solve the Mystery.


I changed one block up just a bit as I went along.  My top is completed, the "Mystery" is solved.  Now I am working on the border pieces.  I want to do a little 2 inch square going all around the center, then the light fabric and then the teal.  It will echo what is going on in the quilt blocks nicely.

You can see in the photo at the top, that I am auditioning the fabrics for the border.  Here are the instructions for how to make a basic seminole block border.  The blocks in the quilt start at 2 inch width, so to compliment them I am using the rust fabric and the light background in the same 2 inch dimension.  

Cut 2 strips of the light background fabric 2" x width of fabric
Cut 2 strip of your accent fabric (rust) 2" x width of fabric

I like to cut these strips in half so I am working with a 22 inch piece as opposed to a 44 inch piece.  Sew them together in a strip set as you see below.  Press to the dark.

Now take your ruler and measure off 2 inch pieces and cut as below.


You will want to lay these out so that they are staggered as shown below, when you flip them over to sew to each other, they will nestle together at the seam.


I know this looks a little weird, but you will take up a 1/4 inch bit with your seam allowance and it all sorts out.

Take them to your machine and start chain piecing until you have a length you want to work with.


You can tuck a pin in next to the seam if you are worried about them shifting as you sew.  But they should nestle together easily.


When you are done, you will end up with a piece like this, take your ruler and carefully trim off the points so that you have at least 1/4 inch of fabric sticking beyond your squares.  This will provide you with a nice seam allowance when you stitch it to your quilt, so that all your points will be spot on.


Now let's audition the border with the seminole patchwork squares.


I like this effect.  I hope you enjoyed this mini tutorial on basic Seminole technique piecing for a border strip.  Below is a brief history of Seminole Patchwork and some examples, as well as a list of books for you if you would like to explore this technique further.  It's a fabulous way to make quick statement borders for your quilts!  And we have these amazingly resourseful women to thank!

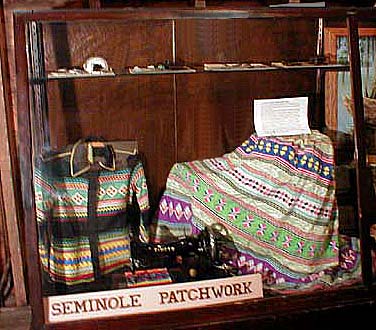
History of Seminole Patchwork

Seminole Patchwork
The introduction of hand-cranked sewing machines around 1900 revolutionized Seminole clothing design and prompted women to begin experimenting with strips of colorful cotton fabric bought at local trading posts. Working in their remote camps in the Everglades and Big Cypress, by about 1916, Seminole and Miccosukee women had developed a new and distinctive style of clothing known as taweekaache or patchwork.
If you could imagine, living in the Florida Everglades in the 1800's and needing cloth to sew for clothing and basic needs.  It's not like you could just roll to the local fabric store.  It would take a trek of weeks to get to civilization.  These resourceful women had to utilize what was at hand and they created beautiful artful designs (as women from all cultures strive to do).  They worked with tiny bits of cloth by hand, creating techniques that were both simplistic in their approach and complex. 


To make patchwork, different colored cloth is first torn into strips and then sewn together to make long bands of geometric patterns and designs. These strips are then joined horizontally to other bands of colored cloth to assemble the body of the garment. The most complicated designs need to be cut and re-sewn many times.
According to one local story, Seminole Indians who guided the advance clearing crews during the Tamiami Trail's construction often collected the surveyors' colored cloth streamers at the end of the day to use in making patchwork clothing.
Patchwork is still a source of cultural pride and identity to the Seminole, and a product of great commercial value. Designs are never written down and new patterns are still being created.
To learn more about the Seminole Indians, their culture and their museum, visit www.seminoletribe.com.


Books you may enjoy:


Sunday, December 15, 2013

Christmas Table Toppers


These little table toppers are quick and simple to make.  I hope you will enjoy the following tutorial.  There are several on the web and you can purchase patterns if you like.

* * *

To start with you will need:

1 -  12.5 inch square of background fabric.
2 -  5 inch squares of background fabric.
1 -  20 inch square of batting
1 -  20 inch square of backing fabric
1 -  12 inch square of pellon 805 fusible

Assorted scraps of holiday fabrics for leaves and ornaments.

2 -  2.5 inch strips cut width of fabric (40-44 inches) for your           
      binding.

* * *

To make the ornaments,  I cut strips of fabric random widths and stitch them together.  I used a cup to trace 4 circles on the Pellon.  I rough cut them out and placed them as desired on the strip set.  Press the Pellon patterns onto the backside of your strip set and then cut out carefully with sharp scissors.  

Using random bits of scrap fabric for the leaves, draw your leaves and berries onto the Pellon and again, press them onto the wrong side of your fabric.  Carefully cut out your pieces with sharp scissors.

Take your 12.5 inch square of fabric and fold in half, press.  Do this again the opposite way and again on both diagonals.  See below.


This will create lines to help you place your pattern pieces in a symetrical fashion.

Now, lay out your pieces as desired and press into place.


Take your 5 inch squares and cut them both on the diagonal as shown below.


Fold your triangles in half and finger crease on the long side, do the same for your block, fold it in half and finger crease.  This will help you line up your pieces uniformly.  I have placed a purple mark to show you below, but your finger crease will be evident and it is not essential that you mark your fabric.  


Pin your side pieces to your blocks, matching your finger creases.  I like to place three pins, one in the middle and one at each end.  Be careful not to stretch these triangles, they are cut on the bias.


When you have them all stitched on, press to the outside.

Now for some decorative top stitching.  I like to place a 12 inch square of Pellon Stitch-N-Tear Lite beneath my fabric for stability.


Pin the Pellon Stitch-N-Tear into place so that it does not shift while you are stitching.


Stitch your pieces into place with your desired stitch, straight, satin or perhaps blanket stitch or another decorative stitch of your choosing.  This is the time to satin stitch your ornament tops.  I just stitch back and forth until I have the desired shape and then stitch a little circle around the top with straight stitching a couple times.  If you are not comfortable free handing these, you can draw them on with a disappearing quilt marking pen to make it easier.


Place your backing down, wrong side up, then place your batting and your table topper.  You should have plenty of batting and backing on all sides.  Iron and then pin into place.  Quilt as desired.  Carefully trim your block and bind the edges.  There is a great binding tutorial that I will link here:  http://thecraftyquilter.com/2013/06/how-to-bind-an-inverted-corner/


Wasn't that fun!  I am making lots of these right now.


Thanks for stopping by, I hope you and your family have a very Merry Christmas!


Sunday, October 27, 2013

We Have A Finish Folks!


Yes, I know, this was last years BOM with Craftsy...it's been a busy year, what can I say.  But I have finally finished it, quilted and bound with a little help from my friends.


Sophie and Honey Bee, they are always there ready to help.  Bee is holding down my chair, keeping it warm and Sophie is holding down the quilt so it doesn't fly away, she is very good at that.


I am trying to reason with her, explaining the difficulty I will have manuvering the quilt with her on it...she's not going for it.


She is thinking, "I am in the sun, on the quilt, it smells like mommy and I am warm and happy, time to sleep now".  After much coaxing and some kitty cookies...both the girls retired to the livingroom to watch TV with dad.


Now I know what you are thinking...this is some wild fabric, and yes it is!  It's "Miami" by Philip Jacobs.  The colors are perfect and I am in love with the way it "reads" on the edge of my quilt.  Just stitching it on was a joy and finishing it by hand on the backside gave me the greatest pleasure.  I love the vibrancy of the colors.


This is my new "most favorite" piece of acrylic right this minute!  It is called "The Binding Tool".  You may already have one and if you do, why didn't you tell me about this?  It's amazing and makes that perfect ending to your binding experience.  If you don't have one, this is a MUST GET, MUST HAVE tool for your quilting pleasure.  I'm going to show you how to use it in the photos below and will include a video that is on youtube so you can see just how easy it is.


First thing, you have stitched your binding all the way around your quilt, leaving and opening of 12 inches and leaving long strips of at least 10 inches of binding on your start and finish ends.


Fold your binding strips back and place the tool on one side, printed directions are on the tool so you can't screw up.  Place your binding over the top of the tool as shown.


Mark with a removable marking pen, the line where it is indicated on your tool.  Then flip your tool and do the same on the otherside.  (TIP:  if you cannot read the writing on your tool, you have it wrong side up)


Again, make the mark where indicated on your tool.


Okay, don't get scared, here comes the fun part.  Fold out your binding and lay it flat on your board, for the left side, line the tip of your tool against the line you drew and make sure your edges line up with your binding strip.  Now cut.  Whew...I know, kind of scary...


Pay attention here.  Do the same for the otherside, BUT place the line of your tool, over the line on your fabric.  Remember to flip your ruler and make sure you can read the print.  Now cut.  


Take the cut edges and pin them together, right sides of fabric together, you will note that the flat tips when you cut will perfectly line up on the edge of the opposing binding strip!  Yeah!!!


Now stitch a 1/4 inch seam.  Open out your binding, press your seam open and whaaalaa!  Was that AWESOME?!!!  Look at that, it is perfection, not too lose, not too tight, why by golly Goldie Locks, it's JUST RIGHT!


Now just finish stitching down your binding and you are ready to turn and if you are like me, hand stitch the backside.  


Here is the video for this amazing tool!


You want one now don't you!  

Sunday, October 20, 2013

Autumnal Flurries!


The oak and madrone leaves are drying on the trees now and it doesn't take much of a breeze for them to come swirling down.  The forest floor is carpeted in their gold and brown beauty, crackling as the deer wander through.  I think this is one of my most favorite seasons.  The sun is starting to drop down in the southern sky, the mornings are brisk and this past week we have been treated to a Hunter's Moon.  It has been so bright that even here in the forest, all the stars are dimmed behind it's blazing pale reflection.  

It calls for a moon glow table runner, something with lots of reflective bits, something that would express that Autumnal glow that lays below the pines right now.  Spider webs glistening in the last rays of the warm sun and pumpkins in the field, ready for their special night.

 The table runner is complete, batting and quilting done, now to pick out a suitable binding.  For me, binding is like framing a piece of art.  


My friend Brenda Allen has just completed a beautiful Halloween Quilt!  Hand stitched center pannel with color crayon color on the fabrics, a fun technique!  Her fabric selections are always great.

I love the BOO surround!

Her backing is awesome!


Color applied to fabric with color crayons!

I always appreciate her beautiful creations.


We had our last quilt class for the year this past Friday.  Everyone was busy working on their individual projects.  Teri brought in her quilt top to pin and it is just so bright and wonderful!  She is really turning out to be a very talented quilter!

Teri pinning her quilt top.

In addition to her quilt top, she brought in a tree skirt that she made this past year.  Just cute as can be!!!


I am doodling along with my Sugar Block Quilt...here is my mess...LOL.


I am planning four corner blocks that will look like the one above, each block in the four corners will be different but will be framed with the flying geese and the white fabric.  More to be revealed there.  I have blocks from 3 other BOM's that I have yet to assemble.  Slacking off.  Lots of quilting in my future, lots and lots of quilting.

So, like the flurry of leaves that are falling to the ground now, I have a flurry of projects to complete.  A quilters work is never done.  Thankfully.