Saturday, June 7, 2014

The Zen of Machine Piecing


How do you complete your quilt tops so fast?  It's a question that I am often asked.  It's not a secret.  I'm not special.  It has nothing to do with the number of years I have been quilting.  It has to do with organizing your space for economy of motion and repeating the same step in your sewing process as often as possible, otherwise described as chain piecing.  

Currently I am working on a quilt designed by Bonnie Hunter called "Jared Takes A Wife".  The block is not complex, the components are broken down into easily achievable pieces.  It is definitely suitable for chain piecing, trimming and pressing...as are most quilts that have a repeated block design. 


Getting organized:

I like to set up my machine in front of me with about 5 inches of space in front of the machine and the edge of the table, in that 5 inches I have the following:  A magnetic pin cushion sits to the right, directly in front and slightly to the right out of my sewing line... I place a small pair of scissors, a seam ripper and tweezers. (the tweezers do double time, I thread my needle with ease and they act as a stiletto when needed.)  To the left of my machine I have a rotating cutting mat, small rotary cutter, any rulers for the project and a inexpensive high intensity light that I purchased from IKEA several years ago.  This gives me a bright work light which I can adjust to light the area I need. (it was fun to hear Bonnie Hunter talk about her IKEA light on her quilt cam)  My chair is a desk chair on wheels and when I turn to the left of my machine I have my ironing board right there with my iron.  Economy of motion, no jumping up and down to run to the iron and press, no jumping up and down to run to the cutting mat...everything is within arms reach.

Fabric Selection:

First things first, get all your fabrics selected for your project.  I am shopping from my stash for this quilt, some of these will end up in the quilt, some will not.  I like to just pull everything in the color range that I want and then start paring down from there.  If you are at the fabric shop, do the same thing.  Pull all the bolts that you think you like and then pare down from there.  Shopping online? Save a copy of the fabric photo to a folder on your desktop, then pare down to exactly what you want for your project.


Neutrals don't have to be plain, they just need to read that way from across the room.  Neutrals can be any color, they are the area of the quilt that serves to gives your eye a rest.   I love fabric printed with script and have a variety in my stash.  They will work fine for this quilt.


Cutting:  

Get your pattern out, read through it carefully. (just like baking a cake, make sure you have a clear understanding of where you are going and what you need)  Get your fabric cut according to the pattern instructions.  I like to use zip lock bags in a variety of sizes to store my pieces.  This way, I'm not scrambling through a pile on my table to find what I am working on.


Piecing:

Okay, here we go! Most quilt patterns will break your block down into components.  For simplicity we will use this block below as an example. You can see that there is a four patch in each corner...that means I need 4 four patch components to make this block.  Then, each four patch has been sashed, I need to do that four times for this block, then there are 8 pieces that make up the points of the star and finally a center block.  Whew, I'm exhausted just thinking about it.  Well, if you break this down and repeat the same component until you have enough for all your blocks, it goes really fast.  Your mind is not flip flopping about what is next, you are in the Zen of the moment, repeating the same movement over and over.  It can be incredibly relaxing and you can solve some of the great world problems while your machine is humming away! Really!  And if you toss something in the crock pot before you start, you will have dinner sorted as well!


My quilt top looks scrappy, how did I do that?  First I cut strips of my fabric selections.  Stitch a random strip of neutral to a random strip of red, then cut them into the required 2 inch pieces.  Toss them in a basket and pull out a piece that doesn't match the one you have in your hand...pretty simple.  I needed 120 four patch blocks.  This diagram is from Bonnie Hunter's Quiltville.com and perfectly illustrates this method.
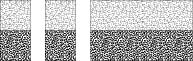


Now you could cut 480 - 2" squares and then sew them all together to make your four patch blocks, but you might be at the machine a while and who wants to cut out tiny 2" squares by the gazillions?  

When you are making multiple blocks that are the same in design you can repeat sub components to speed up your piecing time.  


According to the pattern, I now had to sash all 120 of those four patch blocks.  I short cut this too...by sewing a wide strip of the sashing fabric to a strip of the corner stone fabric, I could then cut strips that were already pieced for that one side of the block.  Just like in tutorial for the drop shadow quilt block...


Same technique gives you the cornerstone already stitched in place.  To sew this part of the component quickly.  I took a strip of fabric and just stitched my four patch blocks right to it, cut them apart and then stitch on the piece with the cornerstone already attached.


Mark all of your diagonal stitching lines at the same time...yeah, it's a lot of marking.  Put a quilt show on your Ipad and let it play while you are marking them all.  We don't want to have to stop while we are sewing to mark the next piece.  I use a fine tip permanent marker, it gets trimmed off so I don't care.  You can use whatever you want, just make sure it doesn't bleed into your fabric.

Chain piecing is what speeds things along...do not cut your thread, just put the next piece right up there and keep stitching.

This accomplishes several things.  #1. you are not wasting thread  #2.  you will not have to load your bobbin as often  #3.  you will not have to expend brain power to contemplate your next move.
You are in that Zen moment of nothingness!  Just sewing the next piece, then the next piece, then the next piece...all the same.  Pretty soon you will end up with a pile out the back of your machine that looks like this...

Don't freak out!  They are all stitched together, nothing will get lost and now you can practice the Zen of clipping all those bits apart.


Isn't this awesome!  Snip, Snip, Snip and you have an amazing pile!  Yes, YOU DID ALL THAT!  And it was quick wasn't it?


Okay Grasshopper, now we trim.  All of them, all at once, the same motion, repeated over and over.


Save those triangles...you can use those in another project, or you can toss them...These are tiny, I probably wouldn't stitch them, but I will use a glue stick and paste them onto card stock for some pretty Quilty looking note cards!  (do you like my Antique ruler?  How long ago do you think they stopped using Garfield 1-1112?)

Yes, you know what is next Grasshopper...the Zen of ironing...


Repeating the same motion over and over gives you the speed.  Do all the same process, all at the same time.  What a lovely stack of finished components!


Again, we are finishing up this component, matching the two sides and chain piecing them just like we did above.


Now it's like a deck of cards, just deal out the components for the block from your prepared stacks.  


Add the sashed four patch blocks and a solid center.  Done!


And that Grasshopper, is how the Elephant was eaten.


Sunday, May 18, 2014

Tutorial - Sashing Your Blocks and Assembling Your Quilt Top


In this tutorial, we will learn how to sash our blocks for this quilt.


I love me some Kona Cotton!!!  We will use 2 1/2 inch strips for our sashing...why?  because you can buy them precut in a jelly roll if you like and save time, or you can buy by the yard and cut your own.  It's a standard size and easy to work with.  If you want more space between your blocks...use a wider sashing strip.

For this quilt top, I have used 15 strips.

Take a strip and sew it using a 1/4 inch seam to one of the shadow sides of your block.  Now...you can cut strips to fit your block, or you can feed them one after another onto your strip as you sew and cut them apart after, which is what I like to do.  Don't butt them right up against each other, leave about 1/2 inch between blocks. You will be able to get three blocks to a strip.  


When you have stitched one side on all your blocks, press them open with the seam toward your shadow. Trim any excess fabric even with your blocks. Stack them all the same way, next to your machine and do the same for the remaining side of your shadowed block, as shown below.  Your block should look like it has 2 "L" shapes on one side of it.


Again, press toward the shadow.

Now, lay out your blocks in a way that is pleasing to you, stand back and take a look...you may want to switch some.  Make sure that your shadow is falling the same way for all of your blocks!


If you have a camera, take a picture of your layout.  Sometimes, things will pop out at you in a photo that you don't see with your natural eyes.  This is the time to change it up, before you start sewing.  If you are happy with the layout, proceed.

Now we will sew our blocks into rows as shown below.


Be careful as you are transferring your blocks to your machine to sew that you are not rotating them, keep all your shadows in the same direction.  Now we will stitch our rows together and our quilt top will almost be finished!  Oooooh!  You can see the illusion of the blocks floating above the background!  Isn't that fun?!


We need to stitch two lengths of background fabric to the two remaining sides.  To do this, you will need to piece two strips together for each side as they will not be long enough on their own.

Again, using a 1/4 inch seam allowance, stitch your strips to your sides and you are ready to start thinking about borders!


At this point, your quilt top will measure 56" x 56".  You can add borders to fill it out to the size you would like.  My suggestion is that you audition possible borders, think about the fact that the drop shadow design in this quilt is really the focus.

Next in this quilt tutorial will be the borders.


Saturday, May 17, 2014

Creating a Drop Shadow - Tutorial


We will be continuing with the blocks we created the other day.  Directions for how to create a Stack and Whack Block can be found here: 

 http://www.sisterofthedivide.blogspot.com/2014/05/stacking-fun.html


Starting with the blocks, we will square them up to 11 inches.  To do that, I place my square up ruler on my block, lining up the 5 1/2" line with the center seam going both ways, trim around those two sides and turning your block around 180 degrees, do the same for the remaining two sides.  Do this for all of your blocks.


Now we will create the strip set for our drop shadow.  For this block I have selected a black shadow and white background fabrics. You can use a multitude of colors for the shadow, yours may be dark gray or light gray, navy blue...actually any color.  Your background fabric will need to match the fabric that you will be sashing your block with in order to create the illusion.

Cut:

2- Strips       11" x width of fabric   Shadow fabric
2- Strips         2" x width of fabric   Background fabric


You should have two strips like the ones in the photo above.  My strips are folded in half as you would cut them.  If you are uncomfortable working with a long strip set, you can cut the fabric strips in half on the fold and work with shorter strips.  

Next we will seam these together using a 1/4" seam as shown below.


You are now ready to start cutting your drop shadow strip set.  Lay your ruler along one edge, making sure that you have lined it up straight before you cut.  You will be cutting strips measuring 1 1/2" wide by the width of this strip set as shown below.  One of the ways you can make sure you are cutting this straight...Line up one of the lines of your ruler along the seam line between light and dark fabric.  


You will need to cut 2 strips for each block in your quilt.  My quilt will have 16 blocks.  I will need to cut 32 strips for this quilt.  


Carefully lining up the background fabric with the edge of your bock, stitch one strip to the side of your block, using a 1/4 inch seam allowance, as shown above.  ALWAYS start from your background fabric with your stitching, not from the shadow end. Press your block. Trim away any excess even with your block.


Take your second strip and sew it to the bottom of your block as shown above, again STARTING from the background fabric and stitching toward the shadow fabric.  Press your block and trim off any excess at the end.


The next in this tutorial series will be sashing the blocks.  You have finished creating the shadow illusion.  You can set them out as I have on my background fabric to audition your blocks for your final layout.  

That was fun!  Look at the great effect we are getting with that drop shadow!  If you don't want to make the Stack blocks, you can substitute a feature fabric.  Let your mind go, there are lots of possibilities with this technique!  


Sunday, May 4, 2014

FB Page Give Away!


To celebrate the launch of my Facebook page, Sister Of The Divide, I will be giving away 5 fat quarters of Kaffe Fassett Fabric to one lucky winner whose name will be drawn at random.  To be entered into the drawing, you much like the facebook page, leave a comment under the posting and share.  For an additional entry, leave a comment on this blog. Drawing will be May 31st.  There is nothing to purchase to enter.  Good Luck!

Stacking Fun!


Last class I did a demo of the Stack and Whack method and promised I would put it up here for you to see.

For clear cut directions on how to select and stack your fabric here is a link to the directions by Quilter/Author Bethany Reynolds:


This was my starter fabric, a bold print by Free Spirit Westminster Fibers called Stylized Tropical Garden.  I bought it about 3 years ago and knew the minute I saw it that I wanted to do a Stack with it.  It has been sitting in my stash waiting for this moment.  And since this is my year to work from  my stash...well, here we go!

Following Bethany's instructions for stacking the fabric, I stacked 4 repeats one on top of the other.  I then decided to cut 6" strips across the width of the fabric.  Why 6"?  My ruler is 6 inches wide, it's easy and I'm lazy...lol.  I then subcut them again into 6 inch squares as shown below.


This creates "sets".  A stack of four pieces that are exactly the same.  I can have lots of fun with these!  First try putting the stack together different ways, rotating the pieces.  You can get some interesting blocks from this. 


From my "set" above, I can arrange them to create the following four options just by rotating them.


Isn't that cool?!  Yes!!!  And each "set" will create something entirely different.  These blocks finished at 11 1/4 inches.  They may vary depending on your 1/4 inch seam.  The nice thing is they are incredibly easy to square up to the same size when you are all finished!


*********************************************************************************

Okay, lets have some more fun!  Let's take that 6" set and cut it diagonally both directions as shown below.


Now we have created 4 more "sets".  (to keep your sets together, place a pin through all four layers until you are ready to use it)

Let's take one of these "sets" and put it together in a block as shown below:


There is only one way that these blocks will come together, there is no optional rotating with these, but the results are great also!  Here are the four blocks that were created from this cut.


Such variety from one little square set of fabric!  Your mind is racing right?!  


Infinite possibilities depending on where you cut.

***********************************************

Okay, what to do with leftovers...you may find that you have some odd bits left from your strip, they didn't quite measure 6 inches square...You can go ahead and cut them into 3 inch pieces or 2  1/2 inch pieces or even 2 inch pieces.  Subcut them again to make squares or in the case of the 2 inch strips...you can lay them side by side for another unusual effect.  


These don't look like much do they...but see below...


*******************************************

So I hope you will try this technique, there are a myriad of possibilities.  Just look at the blocks I got from my six inch strip of fabric below... And these aren't all of them!


*****************************************************

If you like this technique and want to learn more, you can get some great books by Bethany Reynolds:


 Here is a link to another post in my blog that also discuss this technique:  http://sisterofthedivide.blogspot.com/2012/07/tutorial-creating-stacked-lemoyne-star.html

Have fun and show me your photos!!!


Monday, April 7, 2014

Fun With Art Quilts


This month in our class, we are exploring art quilts.  I love McKenna Ryan's patterns.  Her love of nature shines through in her work.  Although these look complicated, she breaks it down for you and once you have mastered the principles you can take it into drafting your own pieces.

The first thing to do is pull a bunch of fabrics that you think will work, you don't have to exactly copy her color choices, you can do whatever you want!  Think of her picture on the cover as a guide to help you with your choices.  If you don't have lots of fabrics to choose from, buy small pieces at your local quilt shop, maybe go with a friend and share.  Read your pattern through from start to finish to make sure you understand the directions.  Just like baking a cake, it's a recipe for success.


Once you have your fabric selected, you are ready to get busy tracing your pattern.  I use Pellon 805 Wonder-Under.  I purchase it by the bolt at the fabric store, it's cheap and can be used for a number of things.  I use a sharpie marker and lay the Pellon over the top of the pattern, tracing each piece.  It helps if you use a small piece of tape on the edges to hold everything in place.


After you have traced and labeled all of your pieces, cut them out leaving a bit around each piece.  You will iron these onto the backside of your fabric and then trim your fabric pieces to the pattern.


When you get some pieces cut out, you can start laying them out on your background.  DO NOT PRESS THEM IN PLACE!!!  You can see that I have a sky and water, stitched together for my background, then I will lay out all of my pieces before pressing them onto that background.


Using a non-stick pressing cloth, you can lay it over top of your pattern and line up your pieces, give them a little tap with the iron and then you can peel them off and place them on your background as one piece.  You cannot see the pattern behind this piece due to the lighting, but I can see it fine to place my bits.


After you have everything where you want it on your background, give it a good press with a dry iron to secure everything.  Trim up your edges and you are ready to border, quilt and bind it as a small wall hanging or you can make it up as part of the larger quilt she has designed.


Some of the gals in our class are a bit apprehensive about this process, so I thought I would throw it up here.  Just have fun with it.  If you get stuck, call me or drop me an e-mail.  

See you all on April 25th at 9am for our next class.  I will be demonstrating the Stack and Whack method.  I think you will enjoy it.  Bring whatever you want to work on that day, if it's this project or you are working on something else, that is fine too.

Mean time, Happy Easter!  I'm grateful for the atoning sacrifice that was made for me and you by our Lord and Savior Jesus Christ.  I wish you and your family a wonderful holiday!