Sunday, November 5, 2023

Let's Make and Can Cranberry Juice Two Ways!


Let's Make Some Cranberry Juice and I will show you how to can it two ways!

To make your cranberry juice you will need the following:

7 Quart Canning Jars with lids and rings
3 1/2 cups of white sugar
3 12 oz bags of Cranberries
Orange peel is optional


In each jar, measure 1 1/2 cups of cranberries, 1/4-1/2 cup of sugar depending on how sweet you like it, top with water to the 1" mark on your jar, wipe the rim with a clean towel and place your lids and rings finger tight. Finger tight means just that, you are not cranking it down hard.

Now place these jars in your water bath canner with water covering the tops of the jars by 1 inch and bring to a boil. Once boiling you will process at sea level for 25 minutes, adjust the time for your altitude. We are at almost 5000ft so I add an additional 10 minutes.

When done, remove your jars to a cloth covered counter to cool for at least 24 hours. Do not tighten the rings. The sugar will not be dissolved, don't worry, you are going to let these sit on your shelf for 4-6 weeks before you open them. Check your seals the next day, make sure you have a good seal on your jar, remove the rings and wipe the jar well. Lable with content and date and set in your pantry.  You can shake them before you use them and the sugar should have gradually dissolved. Strain the juice and save the berries. You can use them in cakes, breads, muffins, etc.

You can flavor your cranberry juice by adding a strip of orange peel, some apple slices, raspberries, cherries, grapes, what ever you like! Don't be afraid to be creative.

The second way to make your cranberry juice is to place your 3 bags of berries into a large pot, add 10 cups of water and 3 cups of sugar. Bring to a boil over medium high heat and boil until the berries are soft and release their juice. Strain the pulp and ladle the juice into clean quart jars, wipe your rims with a clean cloth and place your lids and rings, again finger tight. Process in your water bath canner same as above. These are ready to drink right away. If you want some for your table, there is no need to process additional jars, you just pour what you want in a pitcher and can the remainder.


Again, don't toss out the berries you have strained off. You can use them to make fruit roll ups, you can make ice cream with them, you can add them to your baked goods, you can even use them to make a bbq sauce. This is a no waste option.


 And now you know how simple it is to make cranberry juice! I found my berries on sale for $1.50/bag and with the sugar it ended up costing me 69cents a quart! And you know what's in it!

I hope you enjoyed this post, please feel free to share with your friends. Comment below if you like. Follow us on Facebook and Instagram!

Let's Make Some Napkins!

Let's make some napkins! These are quick, easy and inexpensive, finish beautifully and they will look lovely on your table. Suitable for gift giving, tucked into a basket with some additional small gifts or even just tied with a pretty ribbon and gifted on their own! Wonderful for a housewarming, bridal shower, birthday, picnic in the woods, you can think of a million ways to enjoy them and gift them.


To start you will need 1 fat quarter per napkin. 1 yard of fabric will make 4 napkins. You can mix and match your fatquarters if you like or have them all the same!

Cut your fabric to measure an 18" square.  Press under 1/2" all around the edges of each napkin as shown below.


Now fold your napkin on the diagonal, matching up one side and creating a point, as shown below. I found it helpful to place a pin to align your edges. 


Using a ruler mark a line measuring 1" as shown below. Line your ruler up with the bottom of the folded fabric as shown and the top of your 1" should rest on the edge of the napkin as shown below. Make your mark with either an air erase pen, or a small sharp pencil, or chalk...just mark with something that will come out easily.


It will help you if you pin the edges of the Napkin as shown before you stitch on the line.


TIP: Start your stitching just a few stitches in from the edge and backstitch to catch and secure, then when you stitch off, backstitch again to secure your other edge.


This is important, you will clip each of the corners after you stitch, you want a clipped shape like the photo below with the wide part to the outside edge and the narrow part to the inside as shown below. Becareful not to clip your stitches, you don't need to get that close.


Finger press your seam open and turn it right sides out, gently use a chopstick or a knitting needle to help turn out your point. Press your napkin and topstitch close to the turned edge as shown below.


You can press again and you are finished! You have beautiful mitered corners and are ready to set your table!


I hope you enjoyed this tutorial. Share it with your friends and be sure to follow on Facebook and Instagram for more!

Friday, July 22, 2022

Everyone Needs a Zippered Pouch!


I have a weakness for pouches, I love them! I love to make them. They are great for organizing not just make up essentials but quilting essentials, EPP kits, first aid supplies for your home or car, quick grab and take office supplies for on the road, there is literally no end to the multitude of uses you can find for pouches.


What a fun way to use up your scraps! For this pouch I have used some 2.5" squares that were left over from a quilt. I simply stitched them together until I had a piece large enough that I could fold in half for the pattern. I chose a pretty liner fabric that would coordinate.


The FREE pattern for this pouch is available through Riley Blake Designs and here is the link for the PDF pattern. Taco Pouch Templates There are several sizes and I will post the video tutorial at the end of this blog. For this pouch I selected the Large Size Template. I used a Chalk Marker to mark around the template and then cut it out with scissors.


This is what your piece will look like when you open the fold.


You will also need to cut your lining and interfacing materials with the same template.


Make sure you get an extra long zipper, it makes this pouch quick and easy to create. Follow the directions in the video tutorial by Riley Blake Designs below and you will have yourself a cute pouch! This would be an excellent pattern to use for crumb piecing, using all your random bits and scraps, stitched together to create your own fabric design. For that I would recommend that you cut your interfacing and crumb piece directly onto that to support your work. Have fun with it!


Be sure to watch the video below for complete step by step instructions to create your pouch!


Wednesday, July 20, 2022

Tips When Making The Wensleydale Quilt


Are you working on or contemplating the Wensleydale Quilt by Jen Kingwell? Have you decided if you will hand piece or machine piece this quilt? Will you be paper foundation piecing? So many decisions. For me, hand piecing is out. Her book Quilt Recipes has templates and complete instructions for making this quilt. I will not be providing those here. What I will provide are tips for what is working well for me and tell you why. There are a multitude of ways to approach this quilt and my way is not the only one. I have chosen to Foundation Paper Piece for accuracy.

This is a list of things you will need to make this block:

Quilting Recipes Book by Jen Kingwell

Foundation Paper packet for the Wensleydale Quilt

Elmer's Washable Glue Stick or glue stick of your choice

Template plastic or clear plastic from folder

Permanent Marker  

Add a Quarter Ruler

An old pair of scissors for cutting the template plastic

Scissors

Rotary Cutter

Rotary Cutting Mat

Old Sewing Machine Needle

New Sewing Machine Needle

Thread and Bobbin

Sewing Machine

Iron and Pressing Mat or Ironing Board

My first recommendation is to get her book. Links have been provided for recommended items. In her book are templates for each of her quilts. Find the Wensleydale templates and make a photo copy of them.

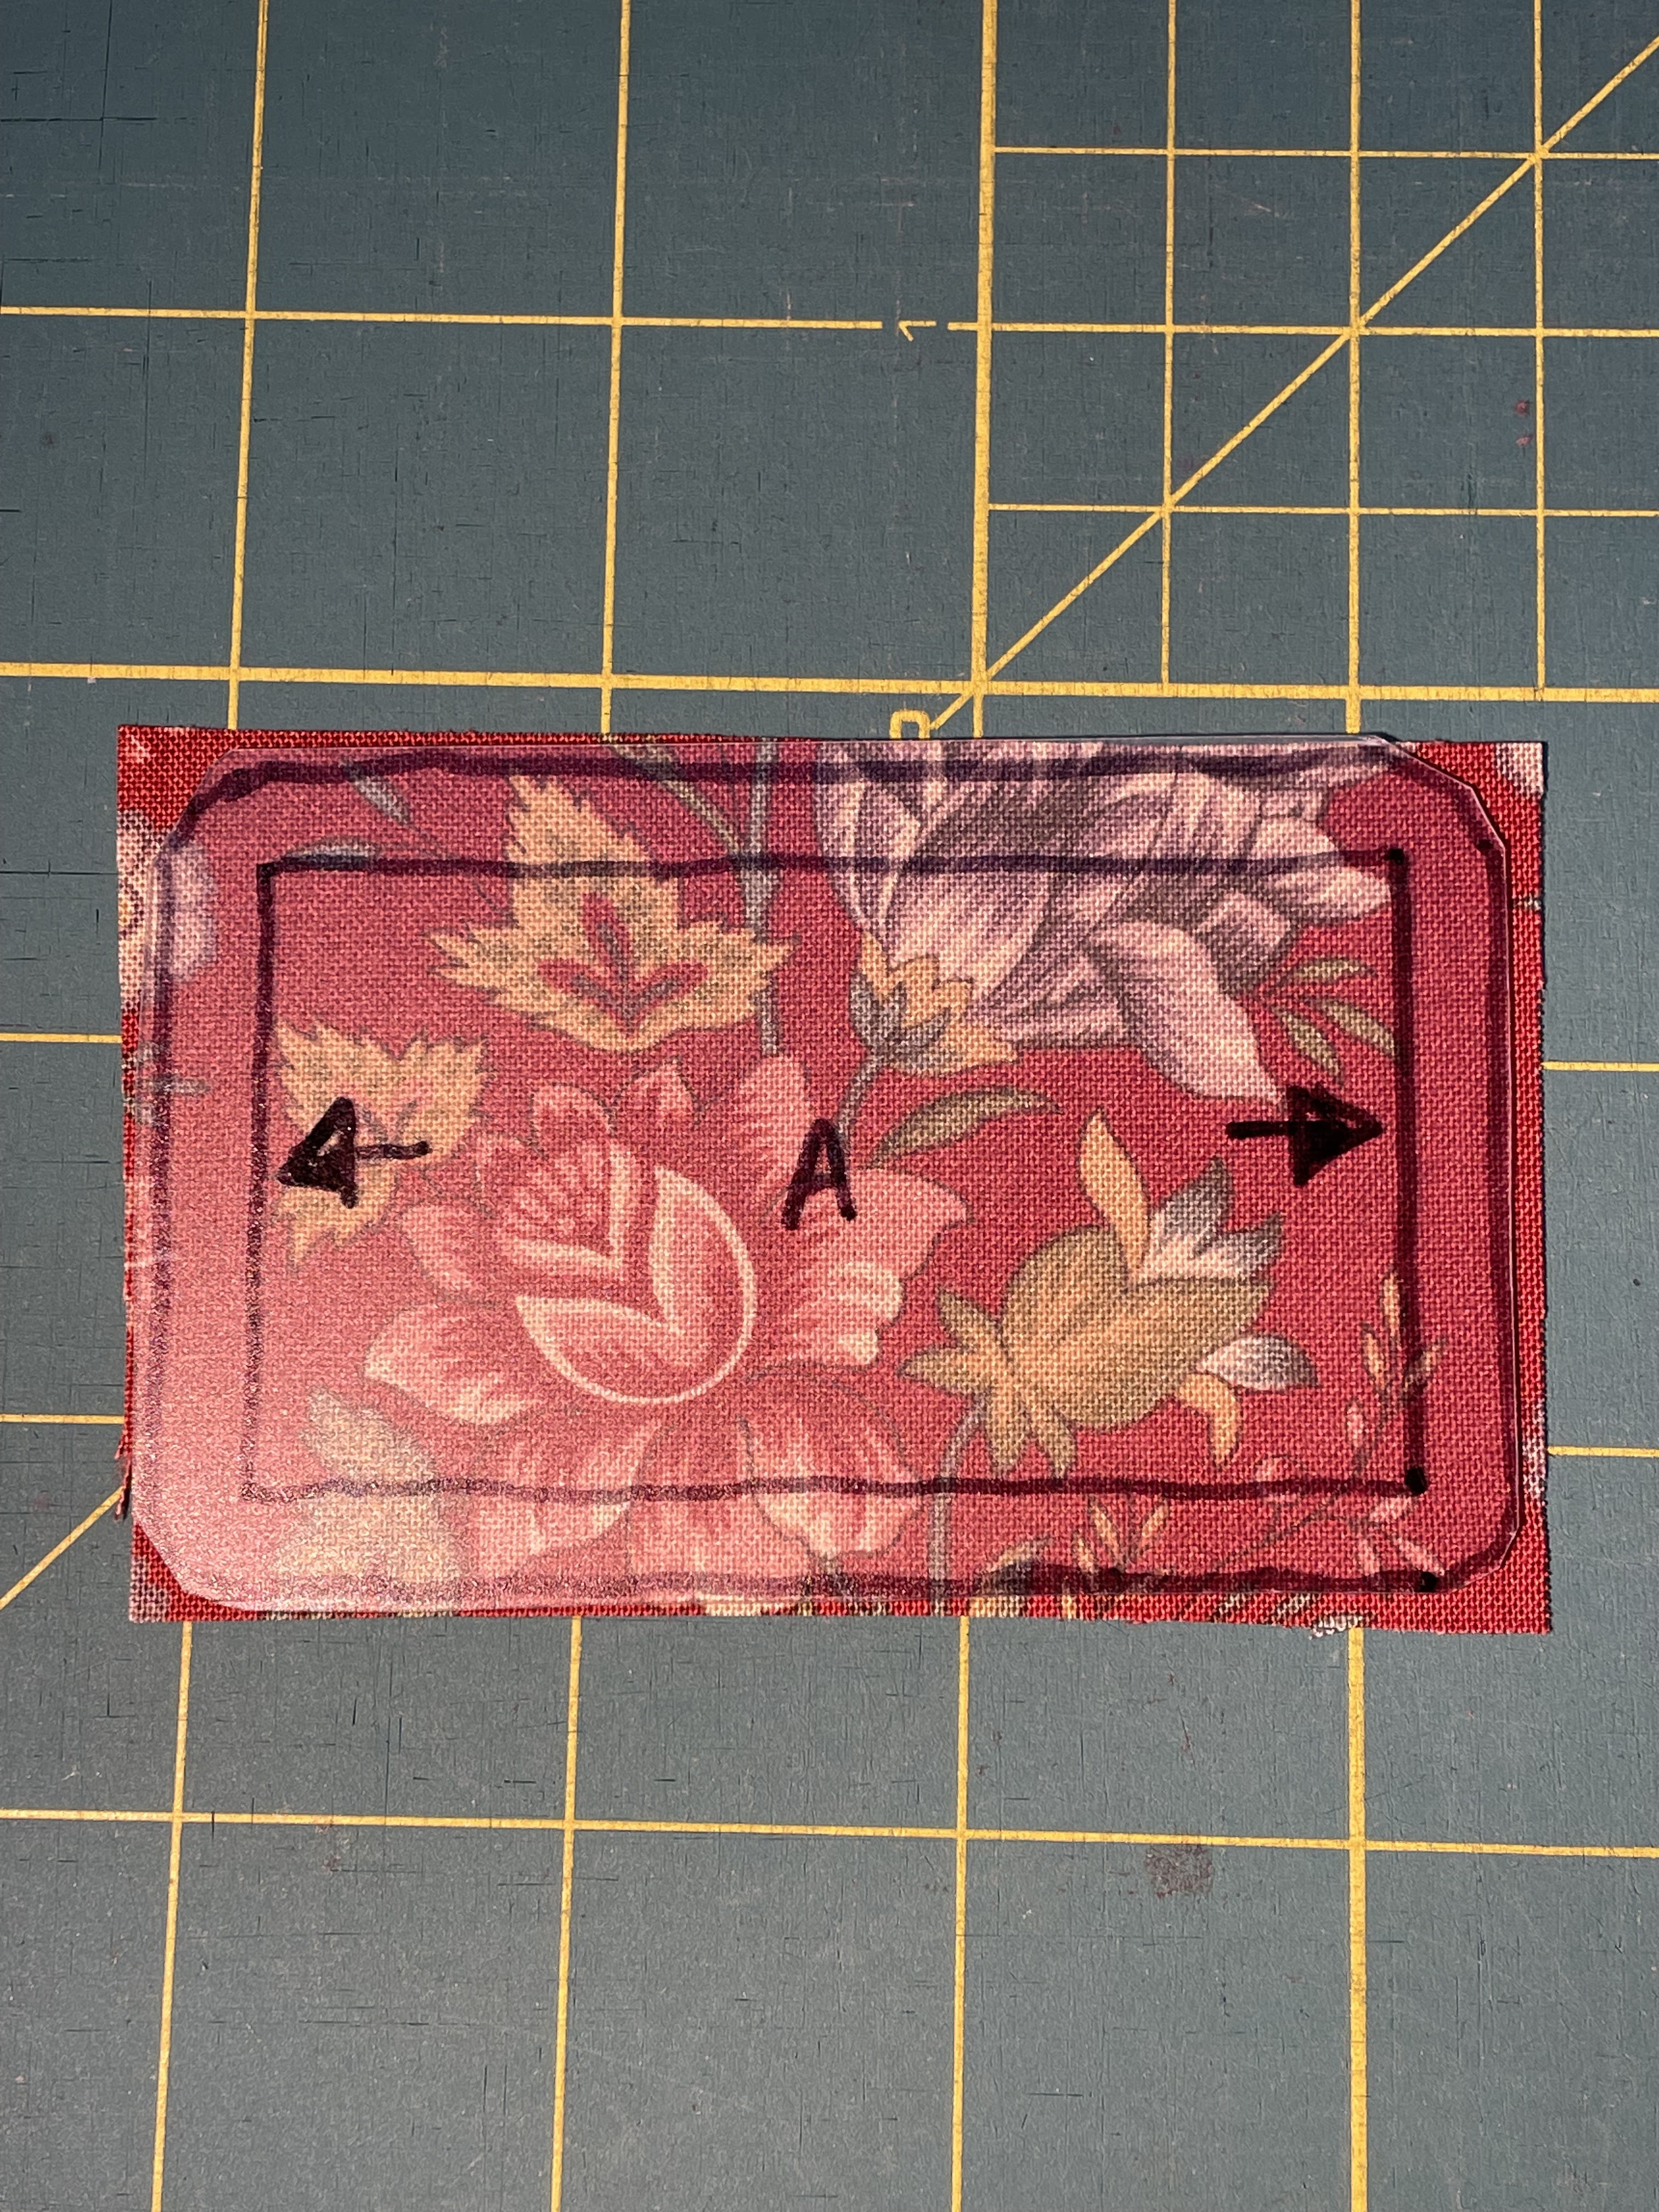
Get yourself some template plastic. You can find this at your local quilt shop, at your local hobby shop, online and if you prefer to save some $$ then just get yourself a clear  plastic folder from The Dollar Store.  You will need a permanent marking pen with a medium tip. Place your clear plastic over the photo copy of her templates in the book and trace them with your permanent marker. TIP: place an arrow to indicate your seam line. This will help you when you are cutting directional fabrics or motifs that you want to align in a certain way.

Take an old pair of scissors and cut out your plastic templates.  

 
Now you may ask, why cut out templates when you are Foundation Piecing? I do this to save on fabric and to allow me to make accurate cuts for directional fabrics and special motifs. By using the template, I know I have a piece of fabric cut to the right dimensions and there will be very little waste when trimming. The plastic template is clear and I can see what I am lining up for my cut. The beauty of having a template to use and Foundation Paper Piecing is that you do not have to worry about being on the cross grain of the fabric, it just doesn't matter.


Purchase a package of the Wensleydale Foundation Papers. They come 60 to a package and that is enough to make the quilt. If you want a larger quilt, purchase an additional package.
 
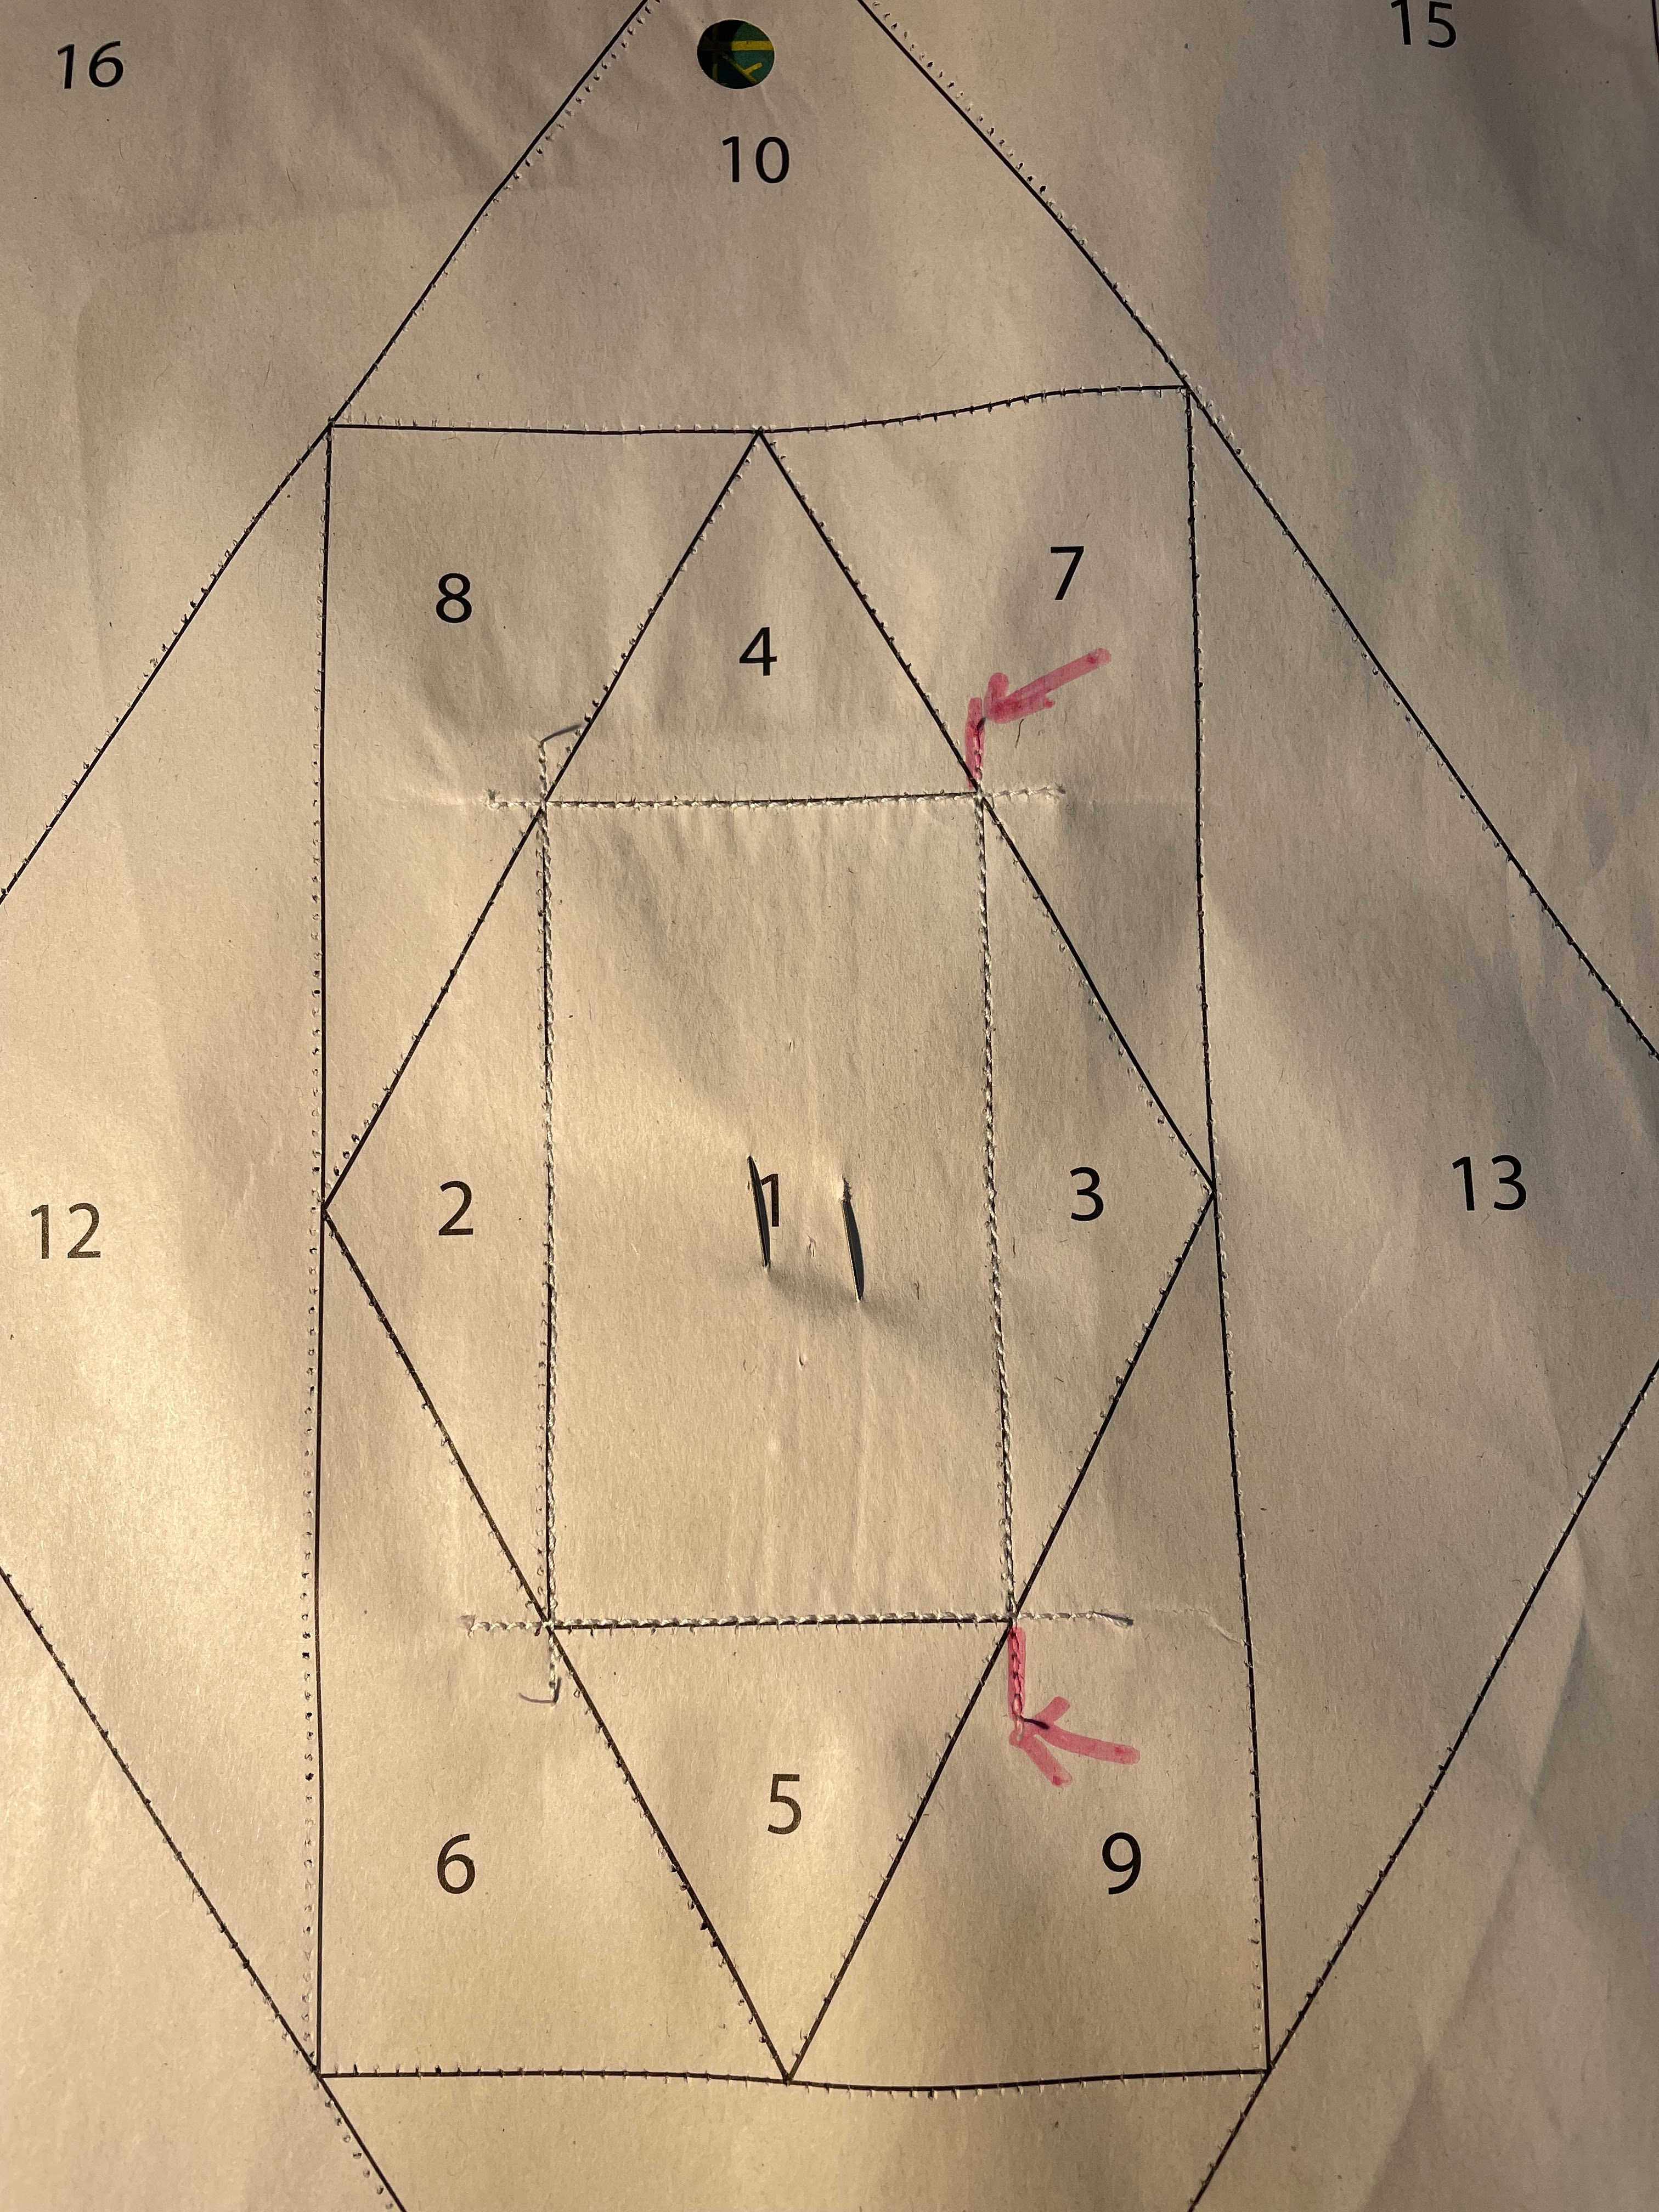
Tear off about 5 sheets of the foundation paper, keeping them lined up. Put an old needle into your sewing machine and remove your thread and bobbin. Now stitch over all of the solid lines on the foundation paper. You don't need to stitch over the very outside lines as these are just the 1/4" seam lines for when you join your blocks. So on one side you will have the solid lines and when you flip the paper over you will see your lines from your needle perforations like the photo below. I only do five sheets at a time so it keeps the perforations crisp.


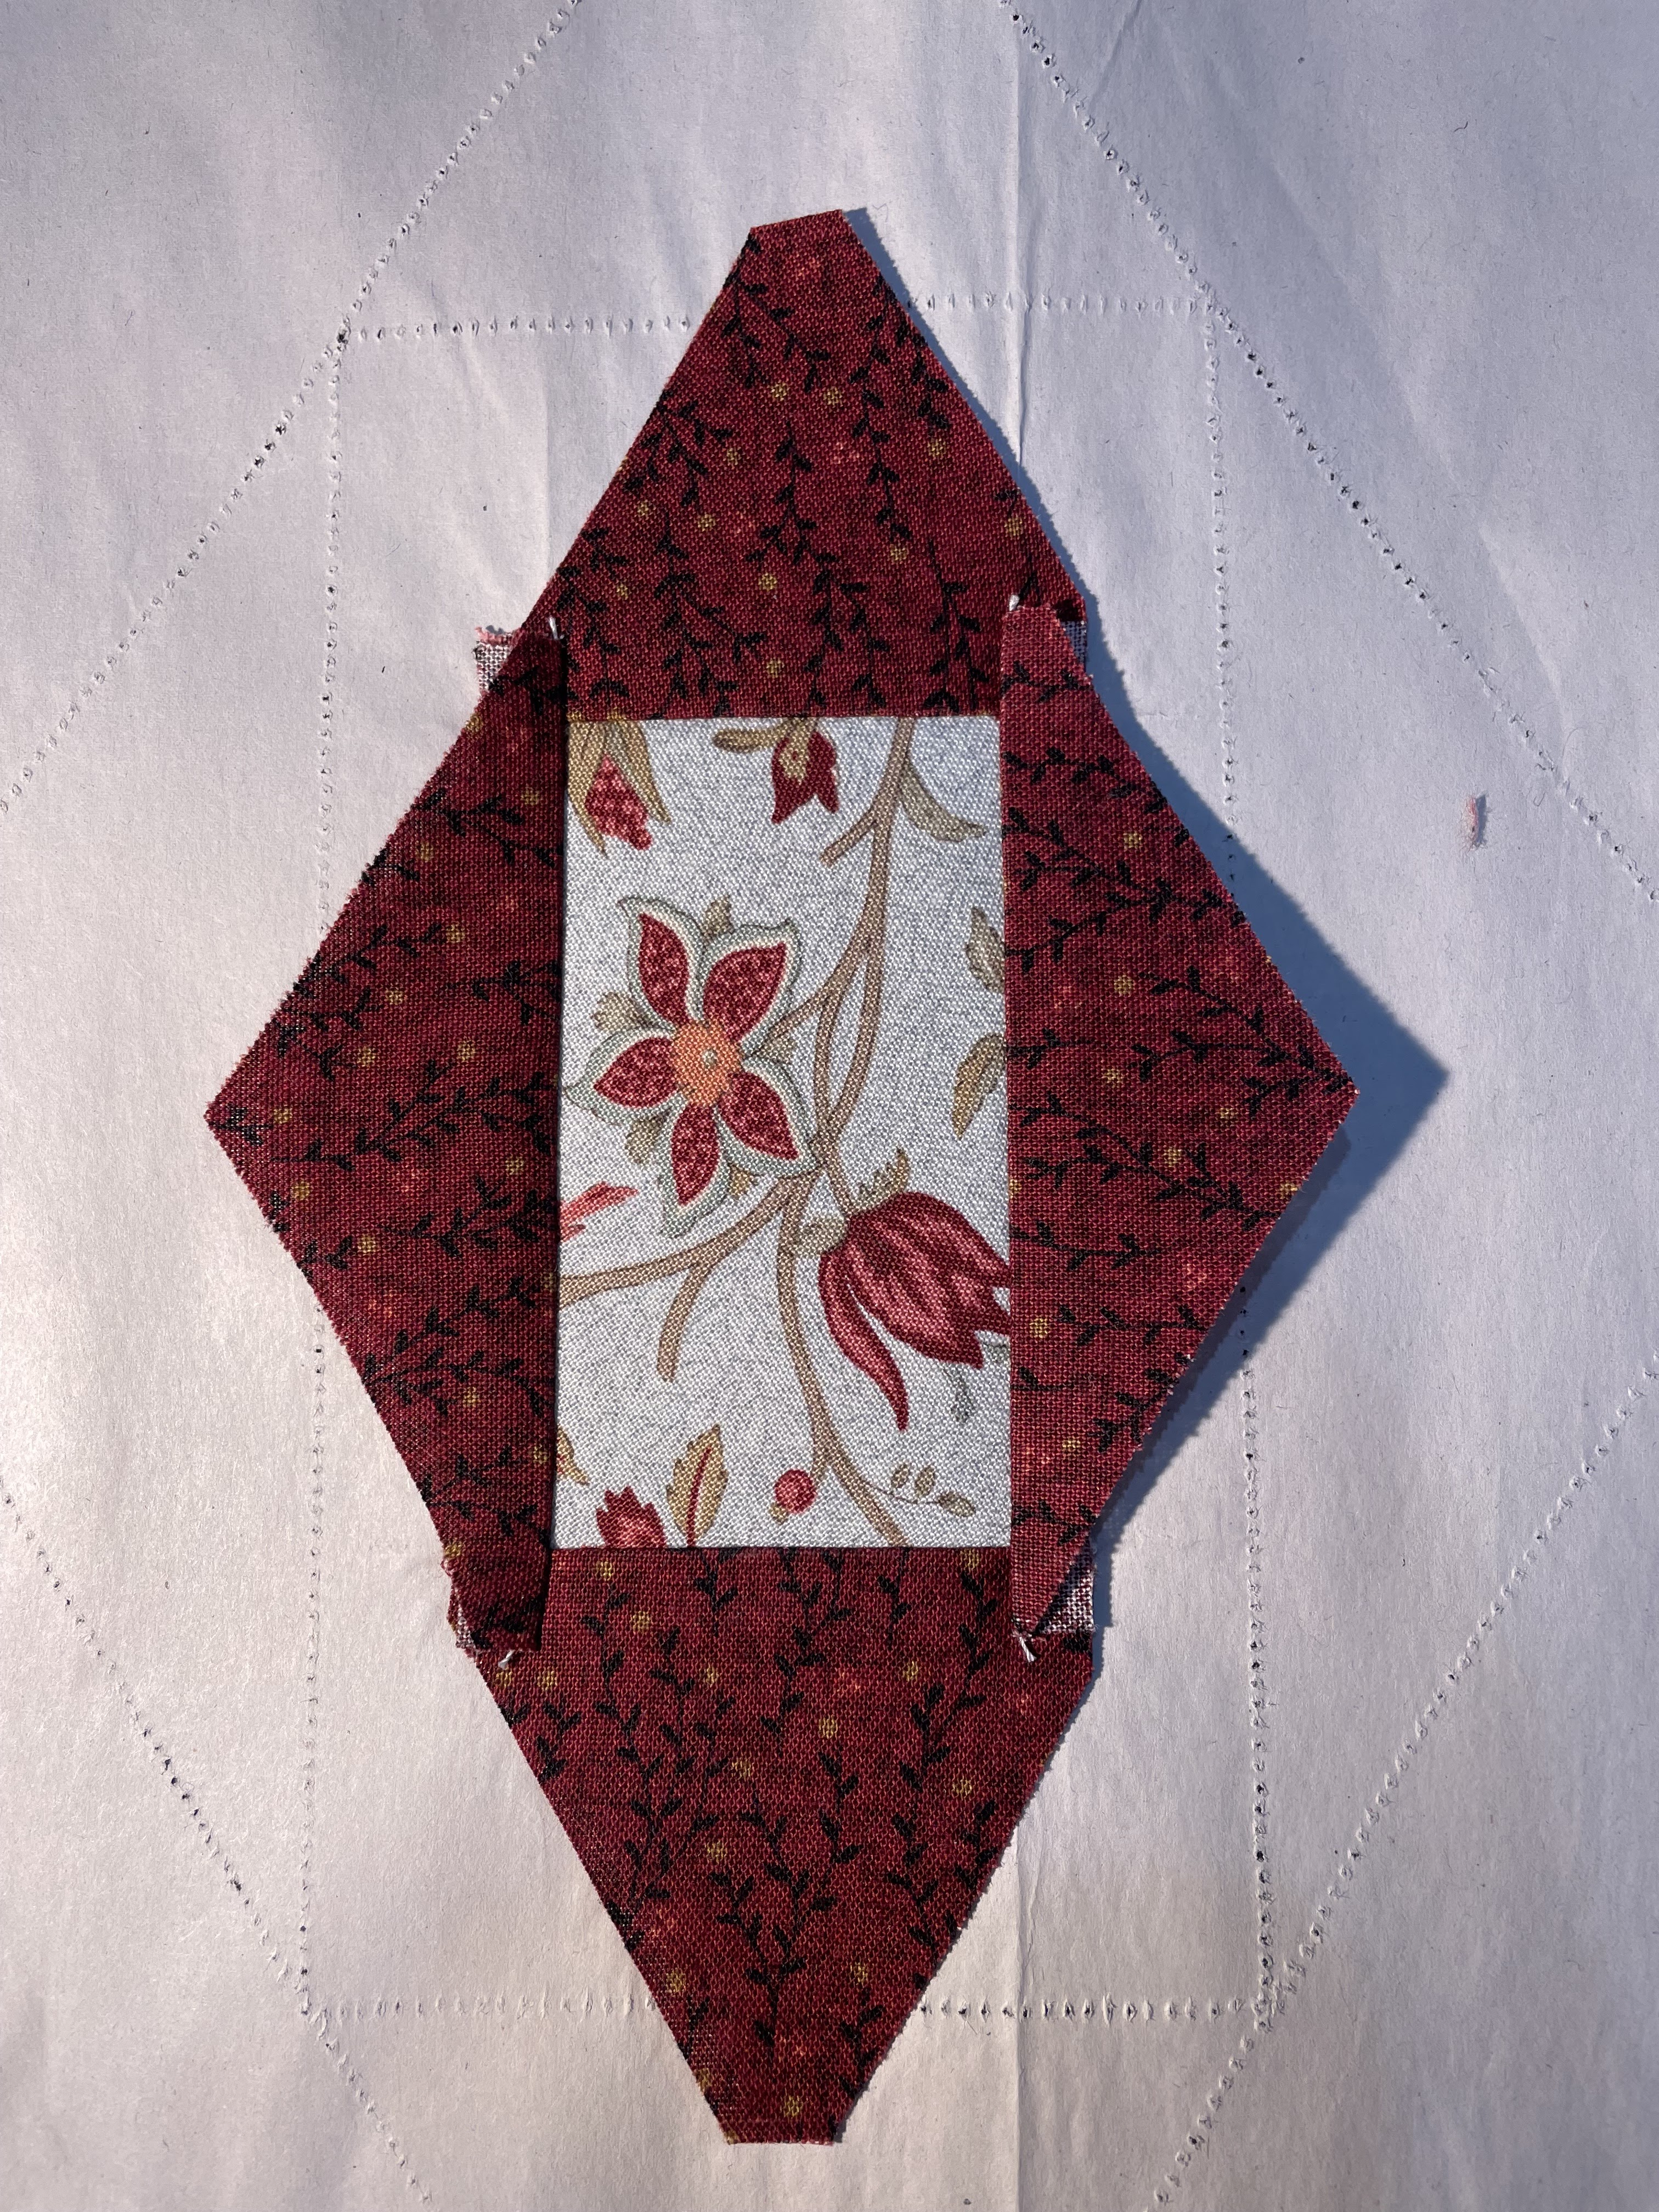
These are the indicator lines that will help you align your fabric, you will stitch on the other side on the solid lines. Now change your needle back to a nice sharp sewing needle, thread your machine and place your bobbin. Get yourself a washable glue stick which you will use to place your first fabric. Using your template A, select your center fabric and cut it out. Use your glue stick to adhere that fabric to the Wrong side of your foundation paper. Spread the glue stick only on that center rectangle area, avoid the perforations. You don't need a ton of glue, just enough to stick your fabric for a bit. 


You will notice that your center piece hangs over your perforated lines. This is correct, you want about a 1/4" around as that will be your seam eventually.


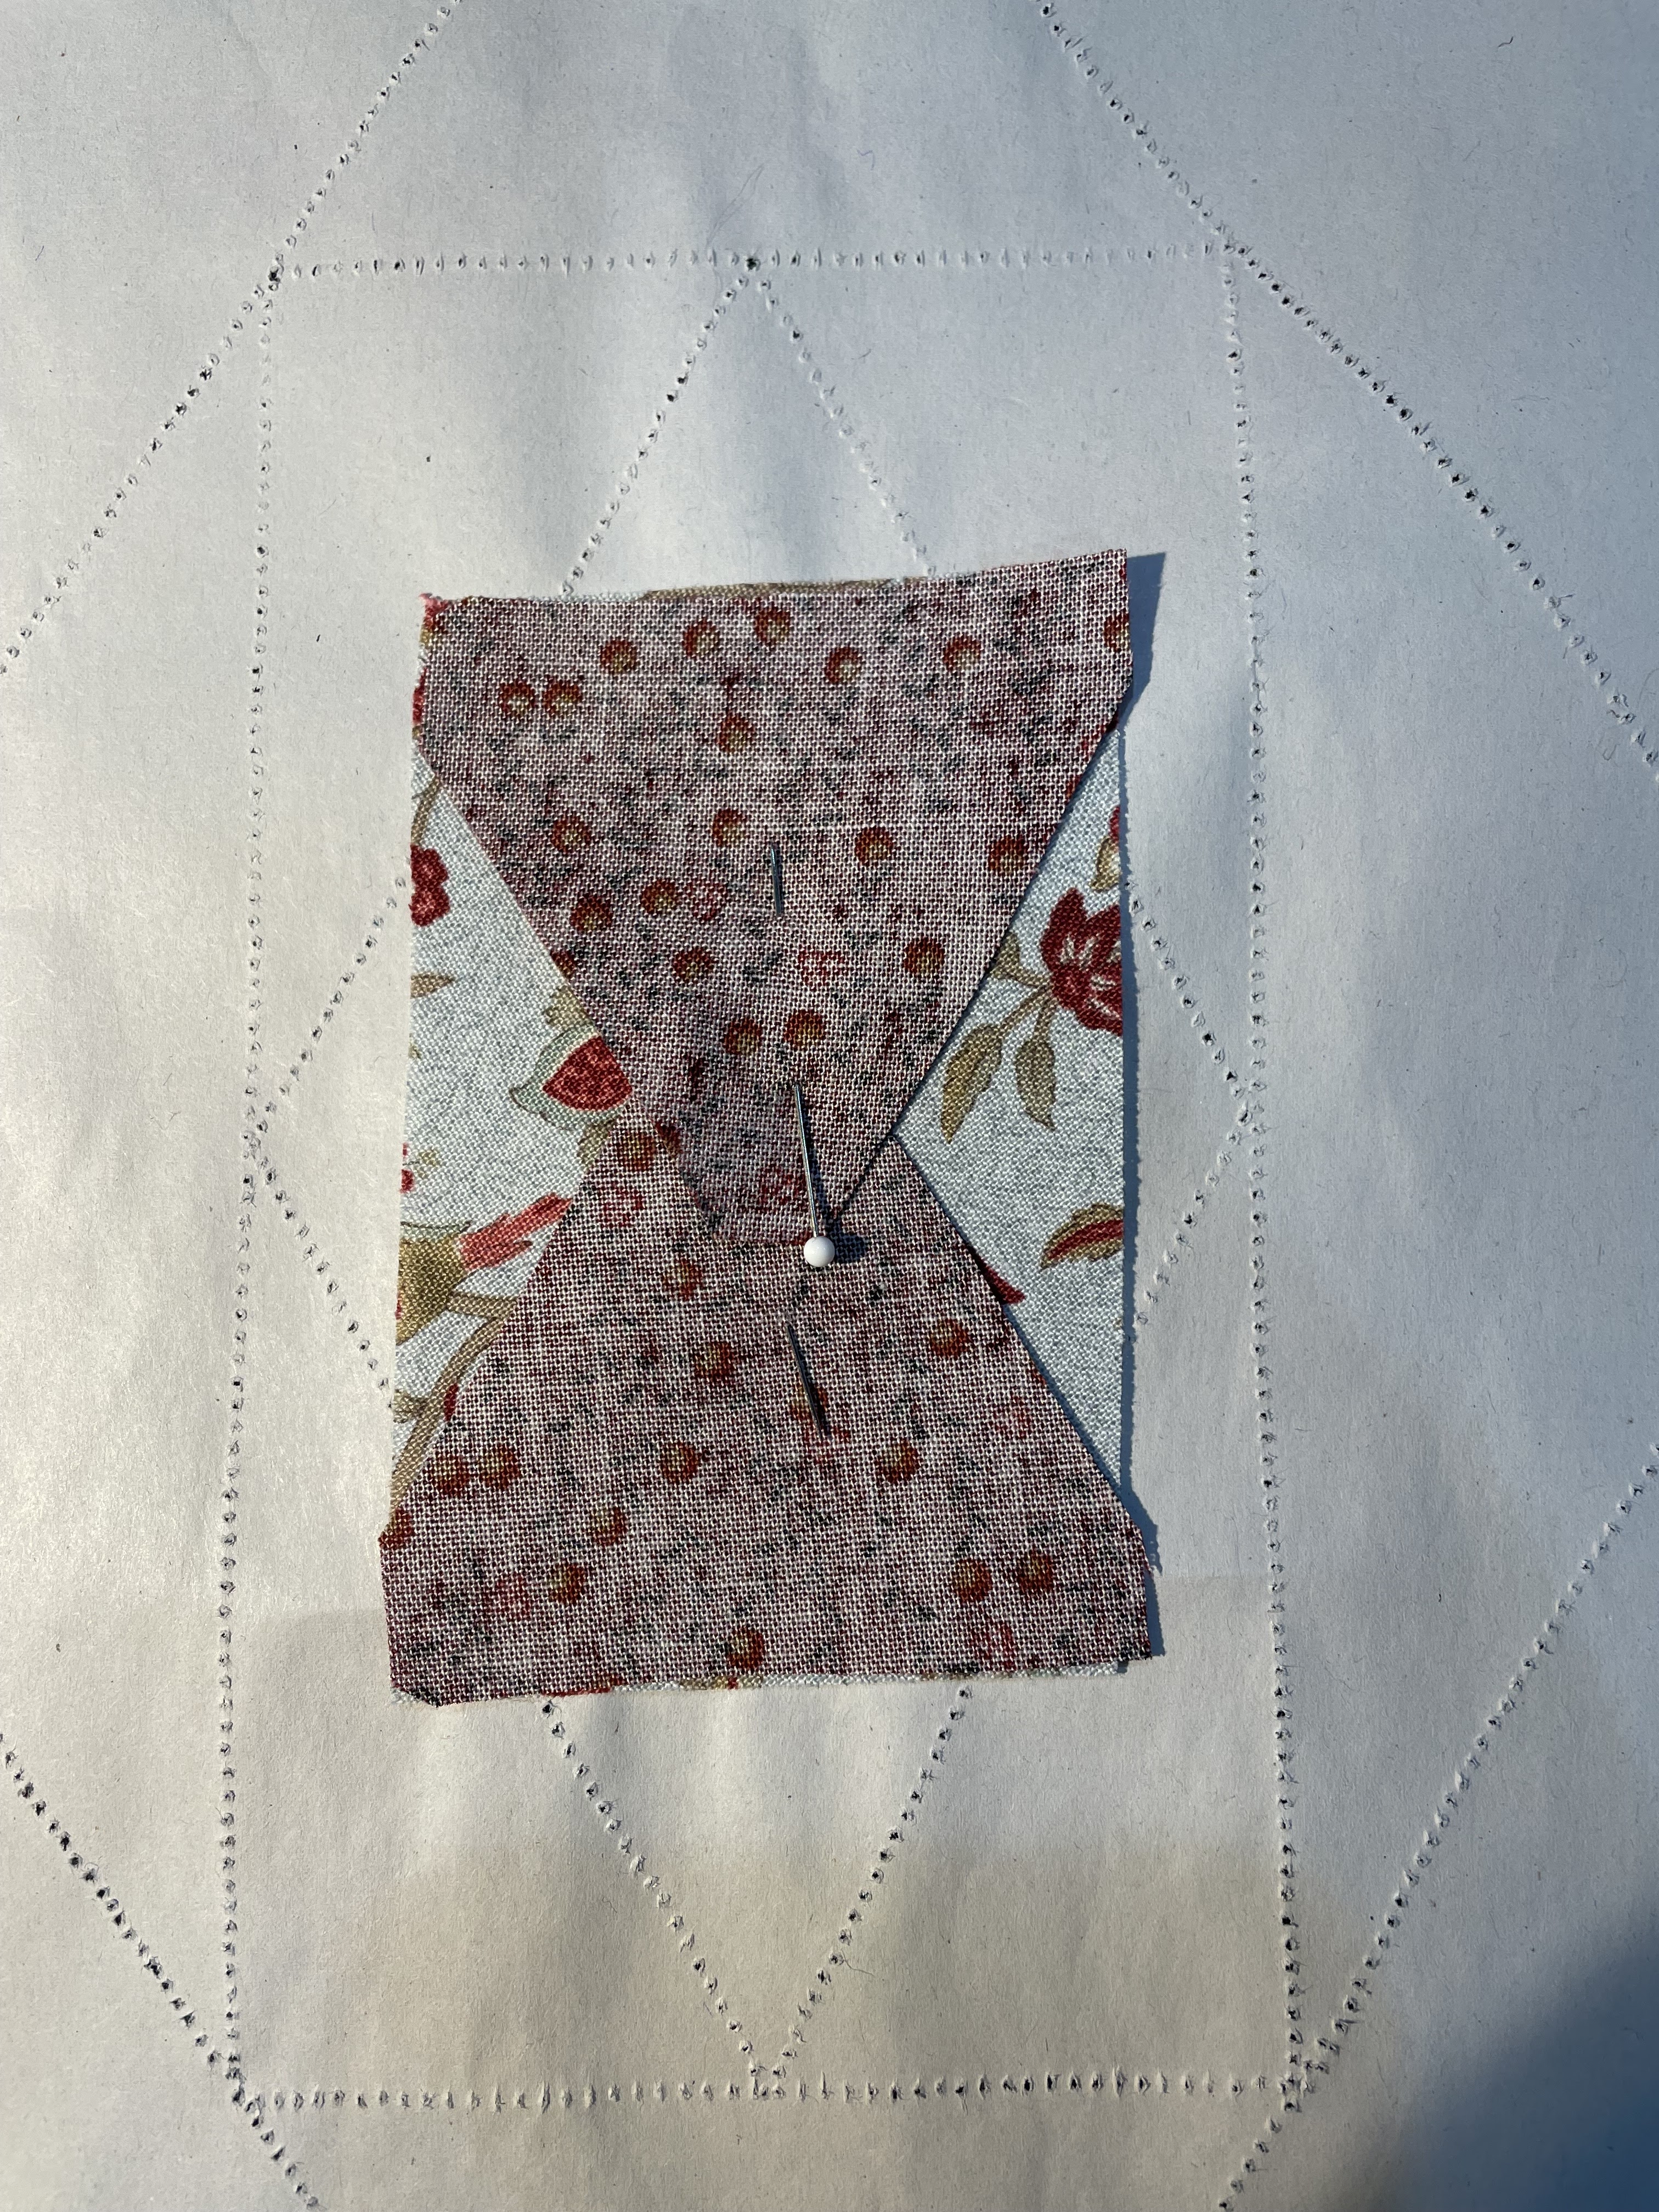
 Now, selecting your B and C templates, go ahead and cut out your pieces. Line up your pieces for opposite sides, either B or C and pin them in place. Put your pins to the center so they are out of your stitching area. 


Turn your paper over and stitch on the solid line, starting about 1/4" beyond the line and finishing 1/4" beyond the line. Check and make sure you have not folded back a piece of your fabric when placing it under your needle. Speed is not the object here as much as accuracy. Take your time and you will avoid a date with Jack the Ripper. 


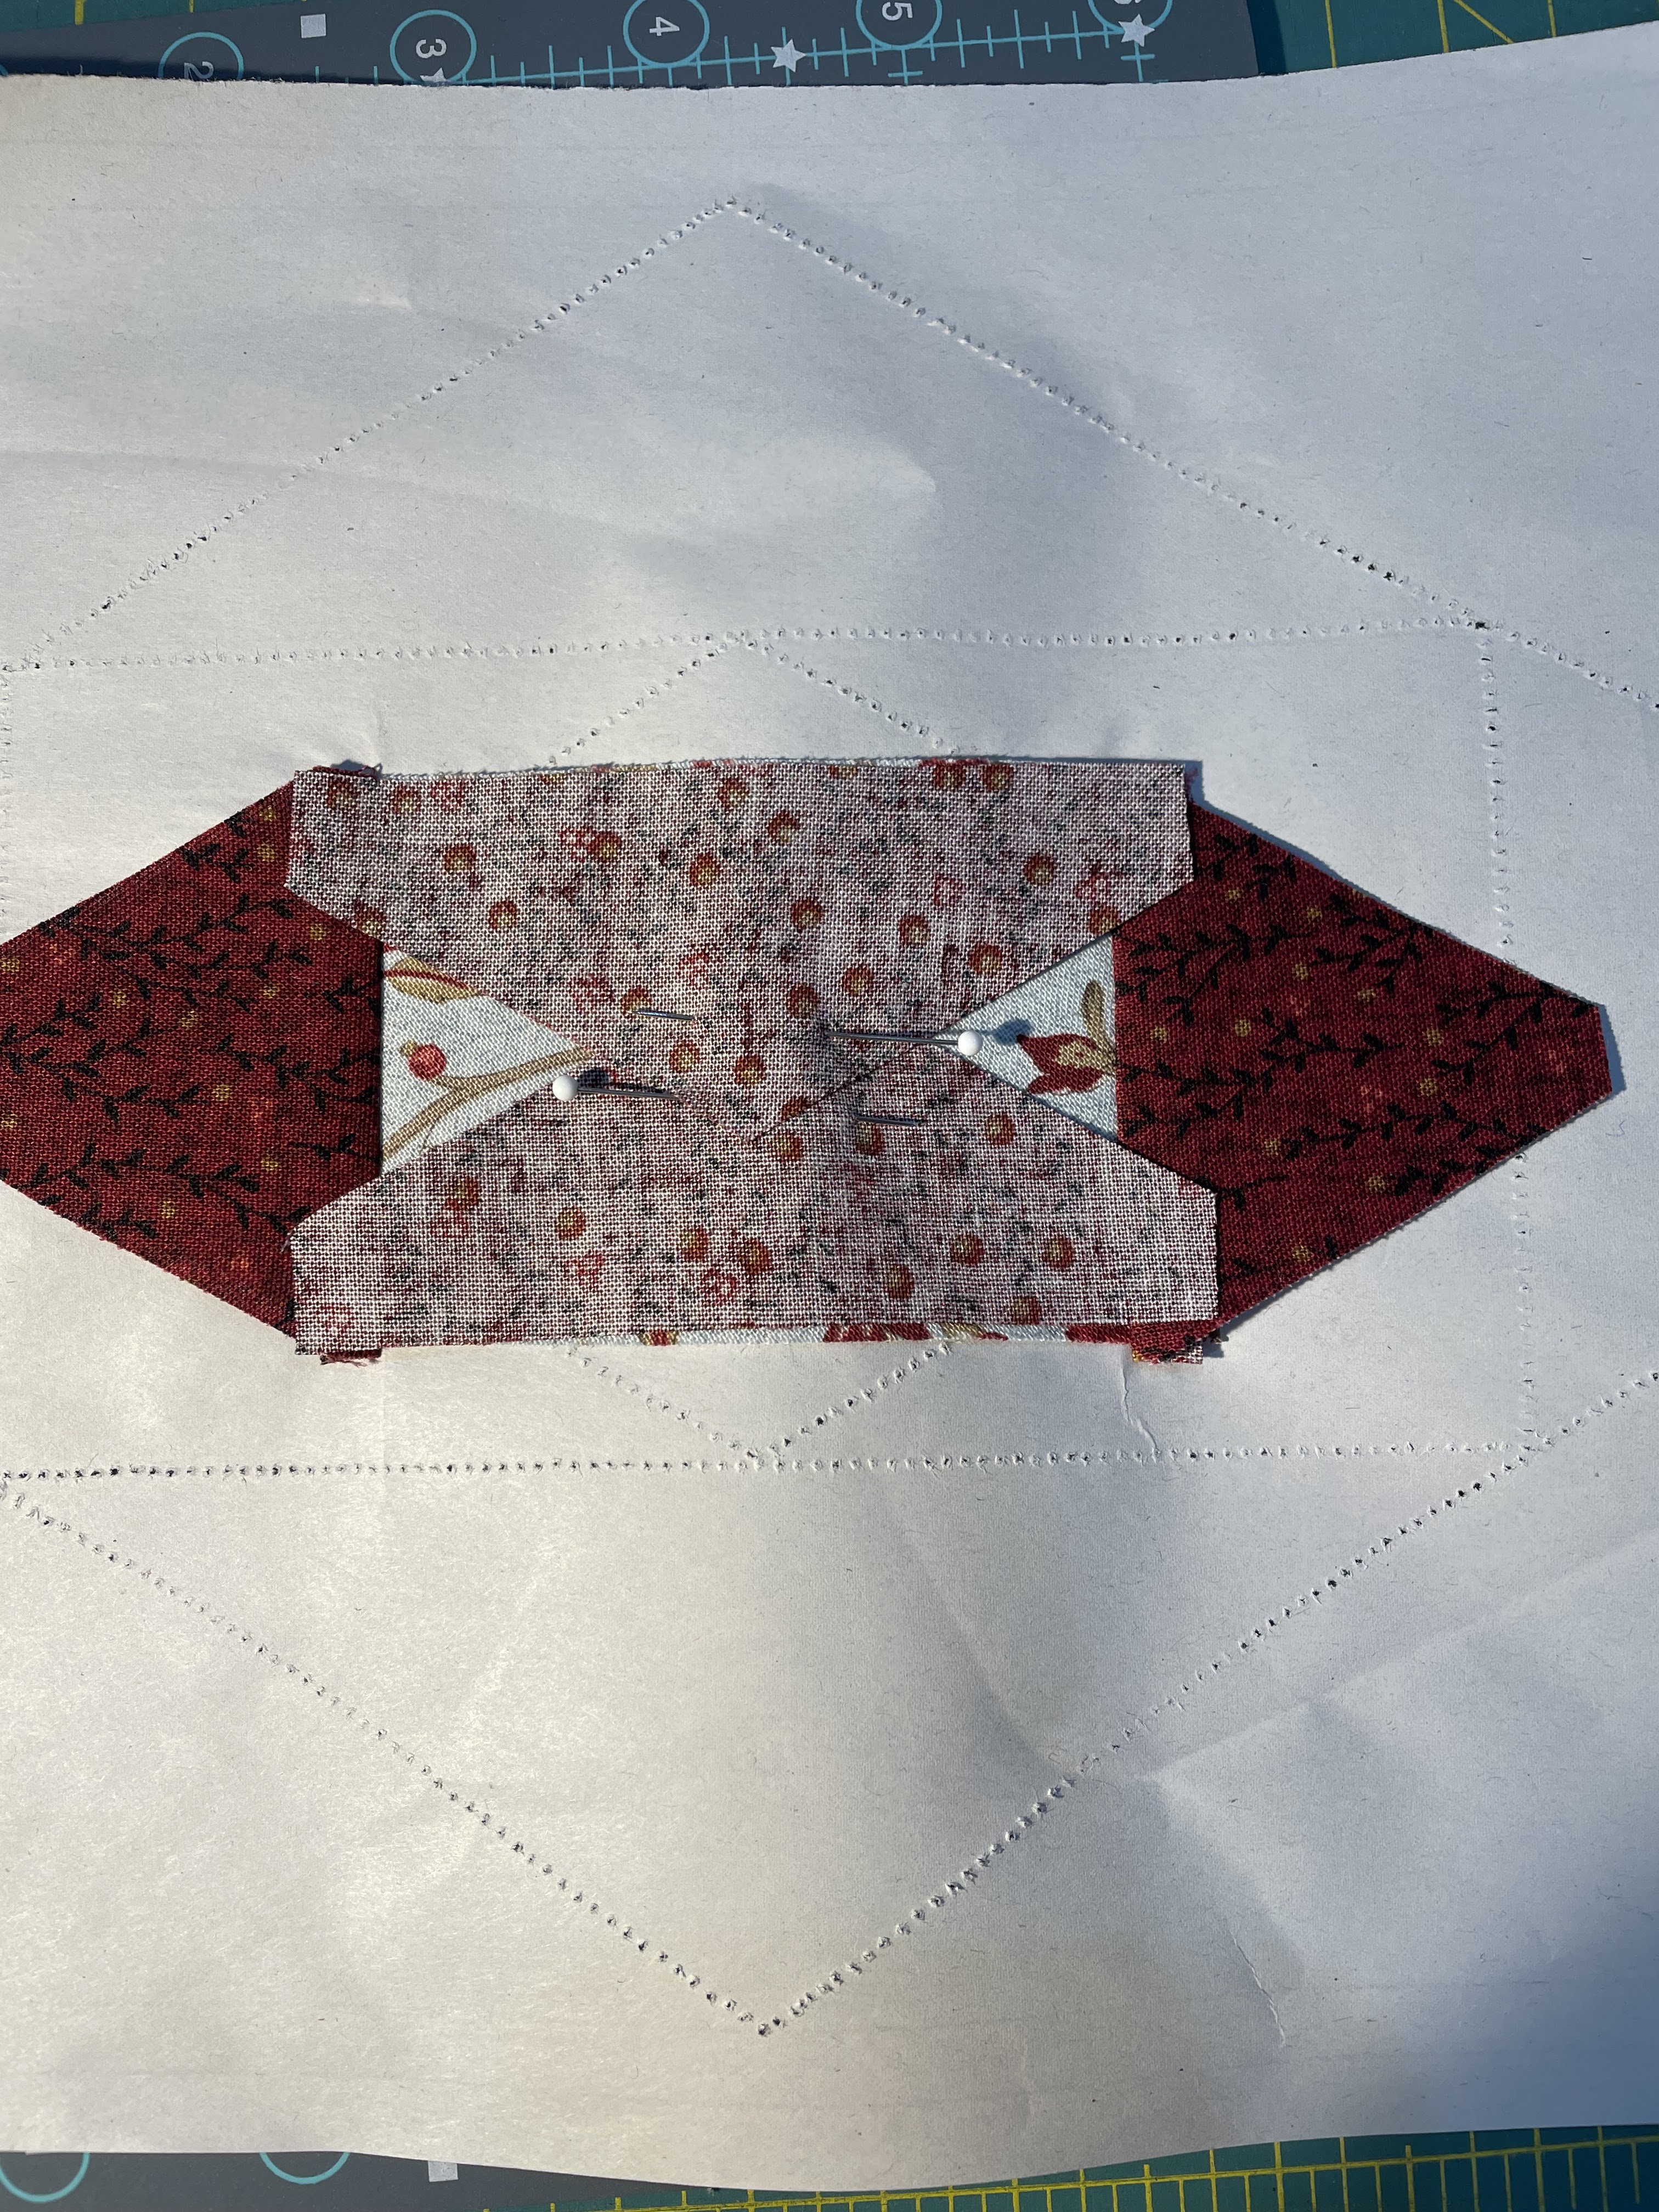
Do the same for the opposite side and then take to the iron and press open.
 

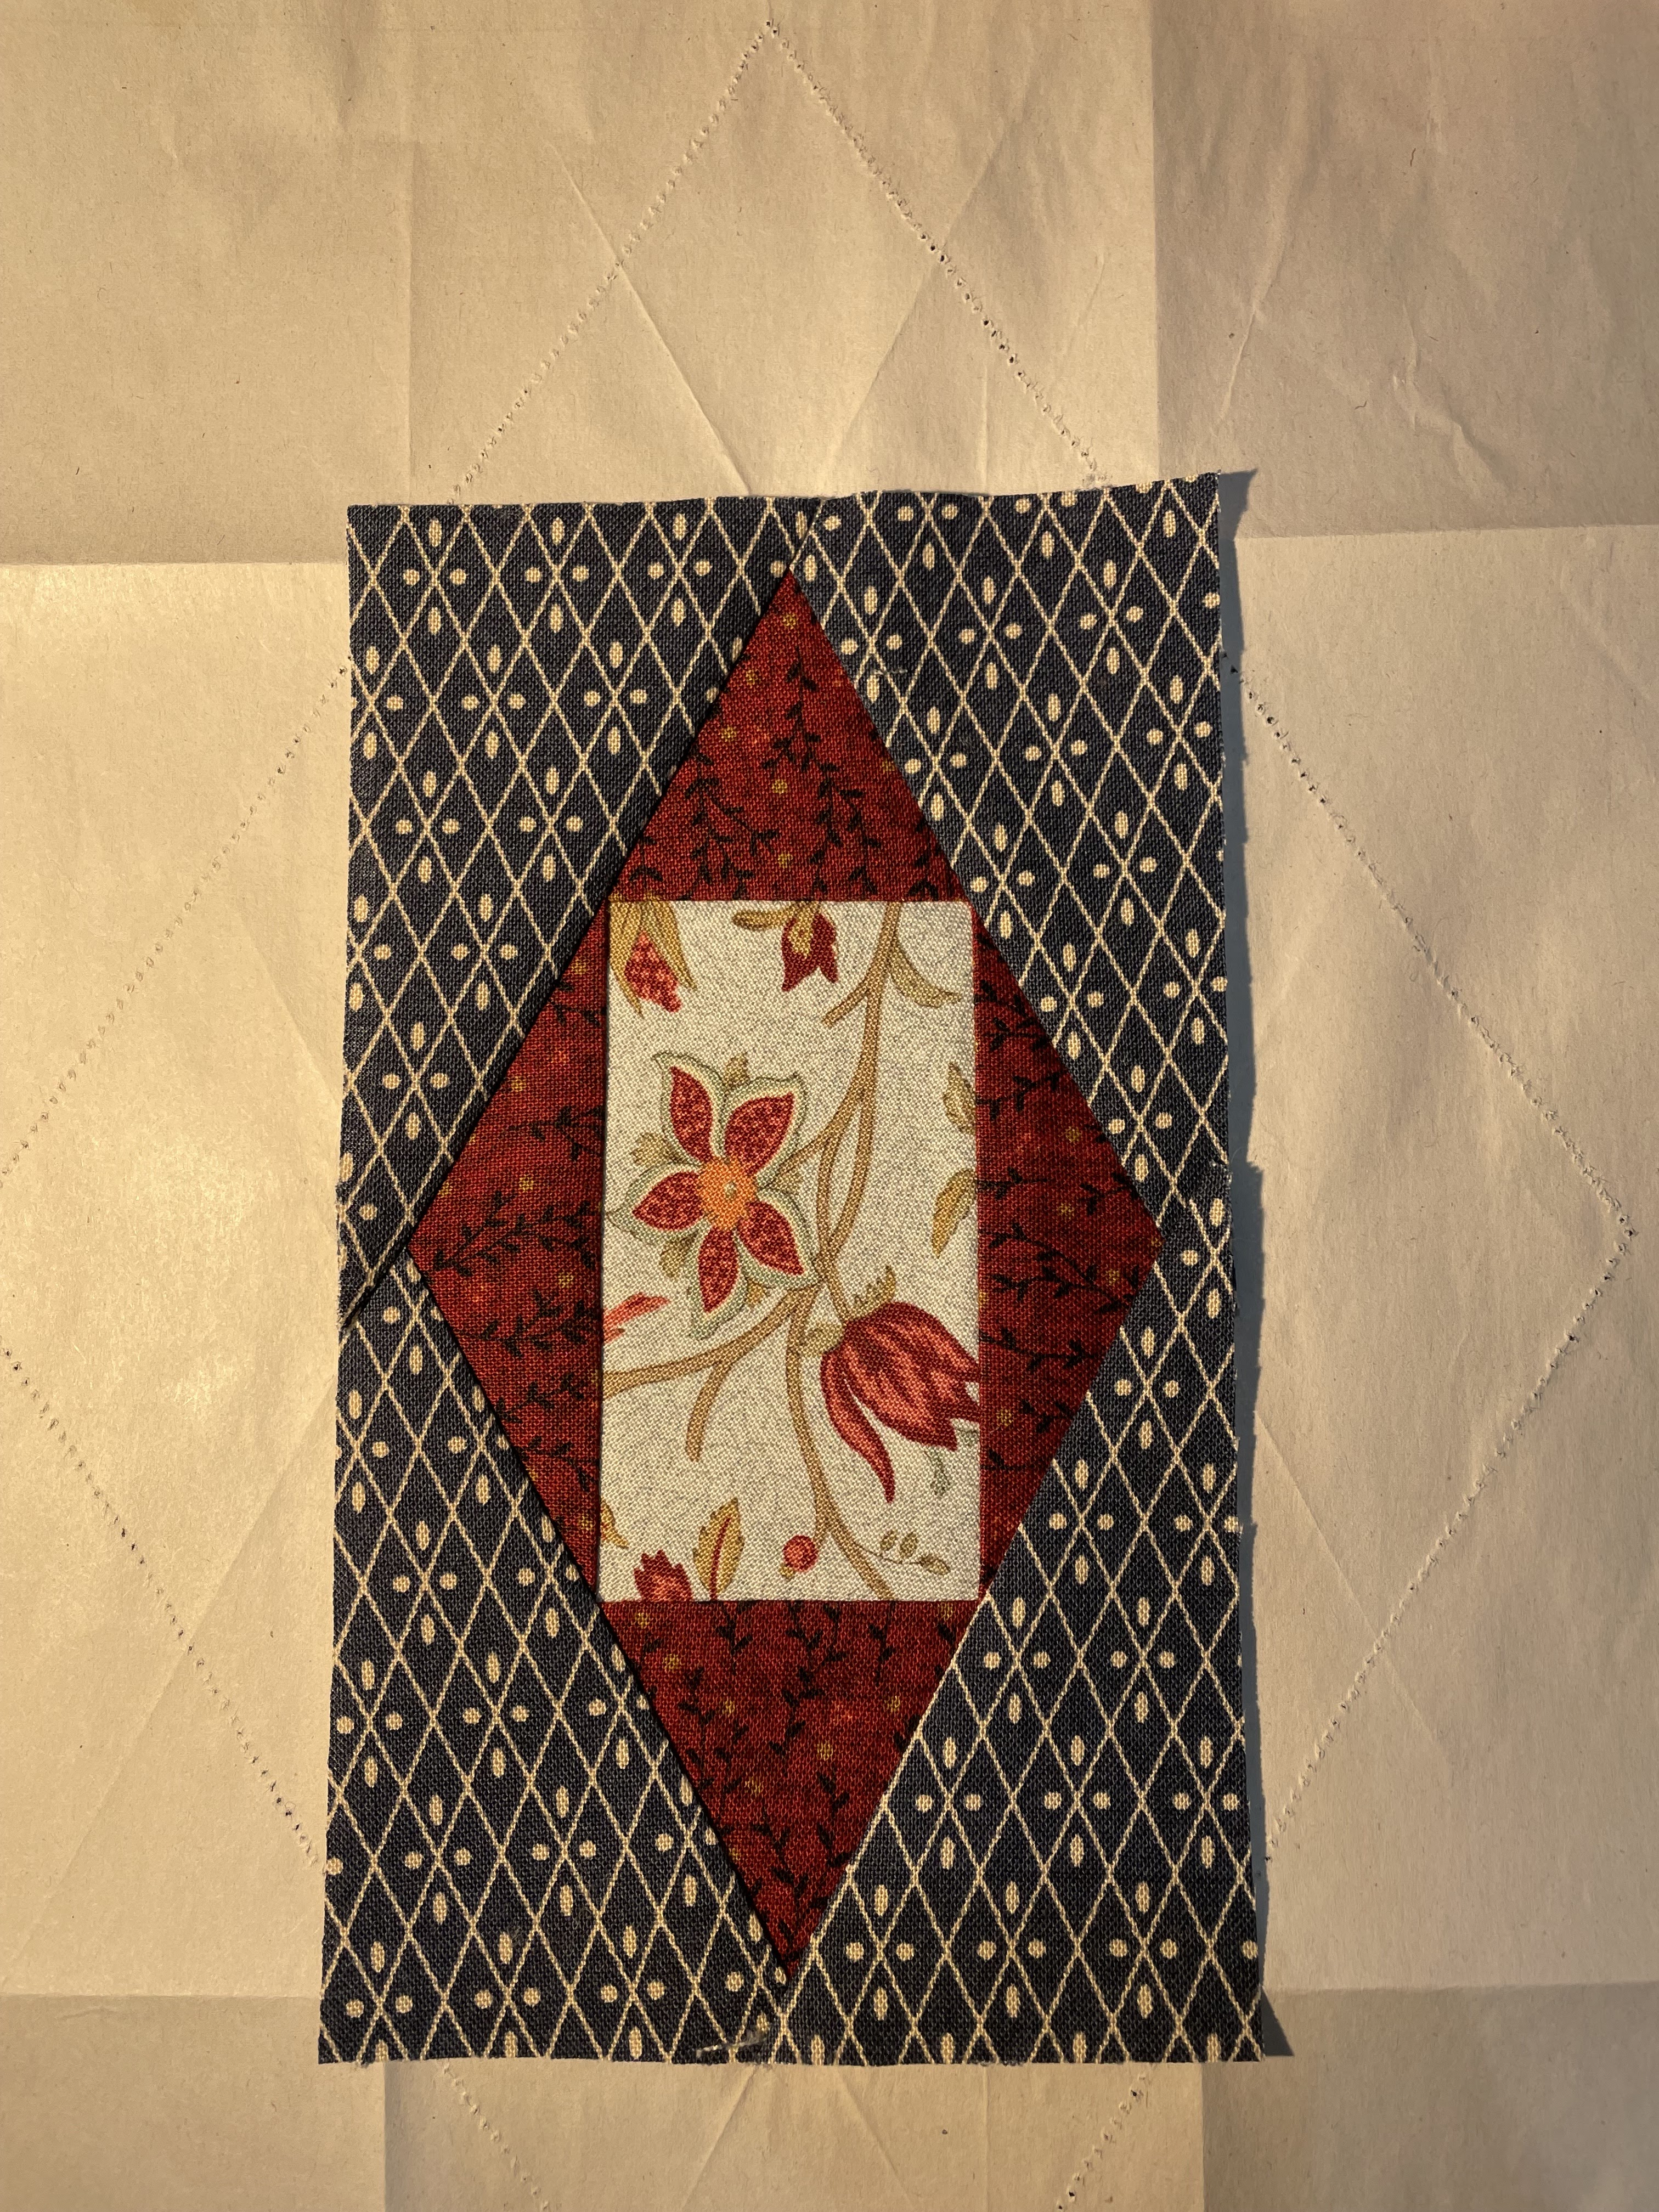
 Repeat this step for your side pieces next.


 Don't worry if things look a bit wonkie here. I want you to place your foundation paper with the fabric on the bottom. Carefully, fold back the line that corresponds to the outside of the current area you are working on, this will be your next seamline and we want to trim things up a bit. Don't fret if your paper tears a bit at the intersection of the seams. You will want to use your Add a Quarter ruler to trim back to just a quarter inch. To do this, fold your paper back to the perforated line, lay your ruler on top of the fabric, you will notice there is a ledge that will catch on the paper giving you a perfect 1/4" seam allowance, you will trim any excess fabric beyond the ruler. 


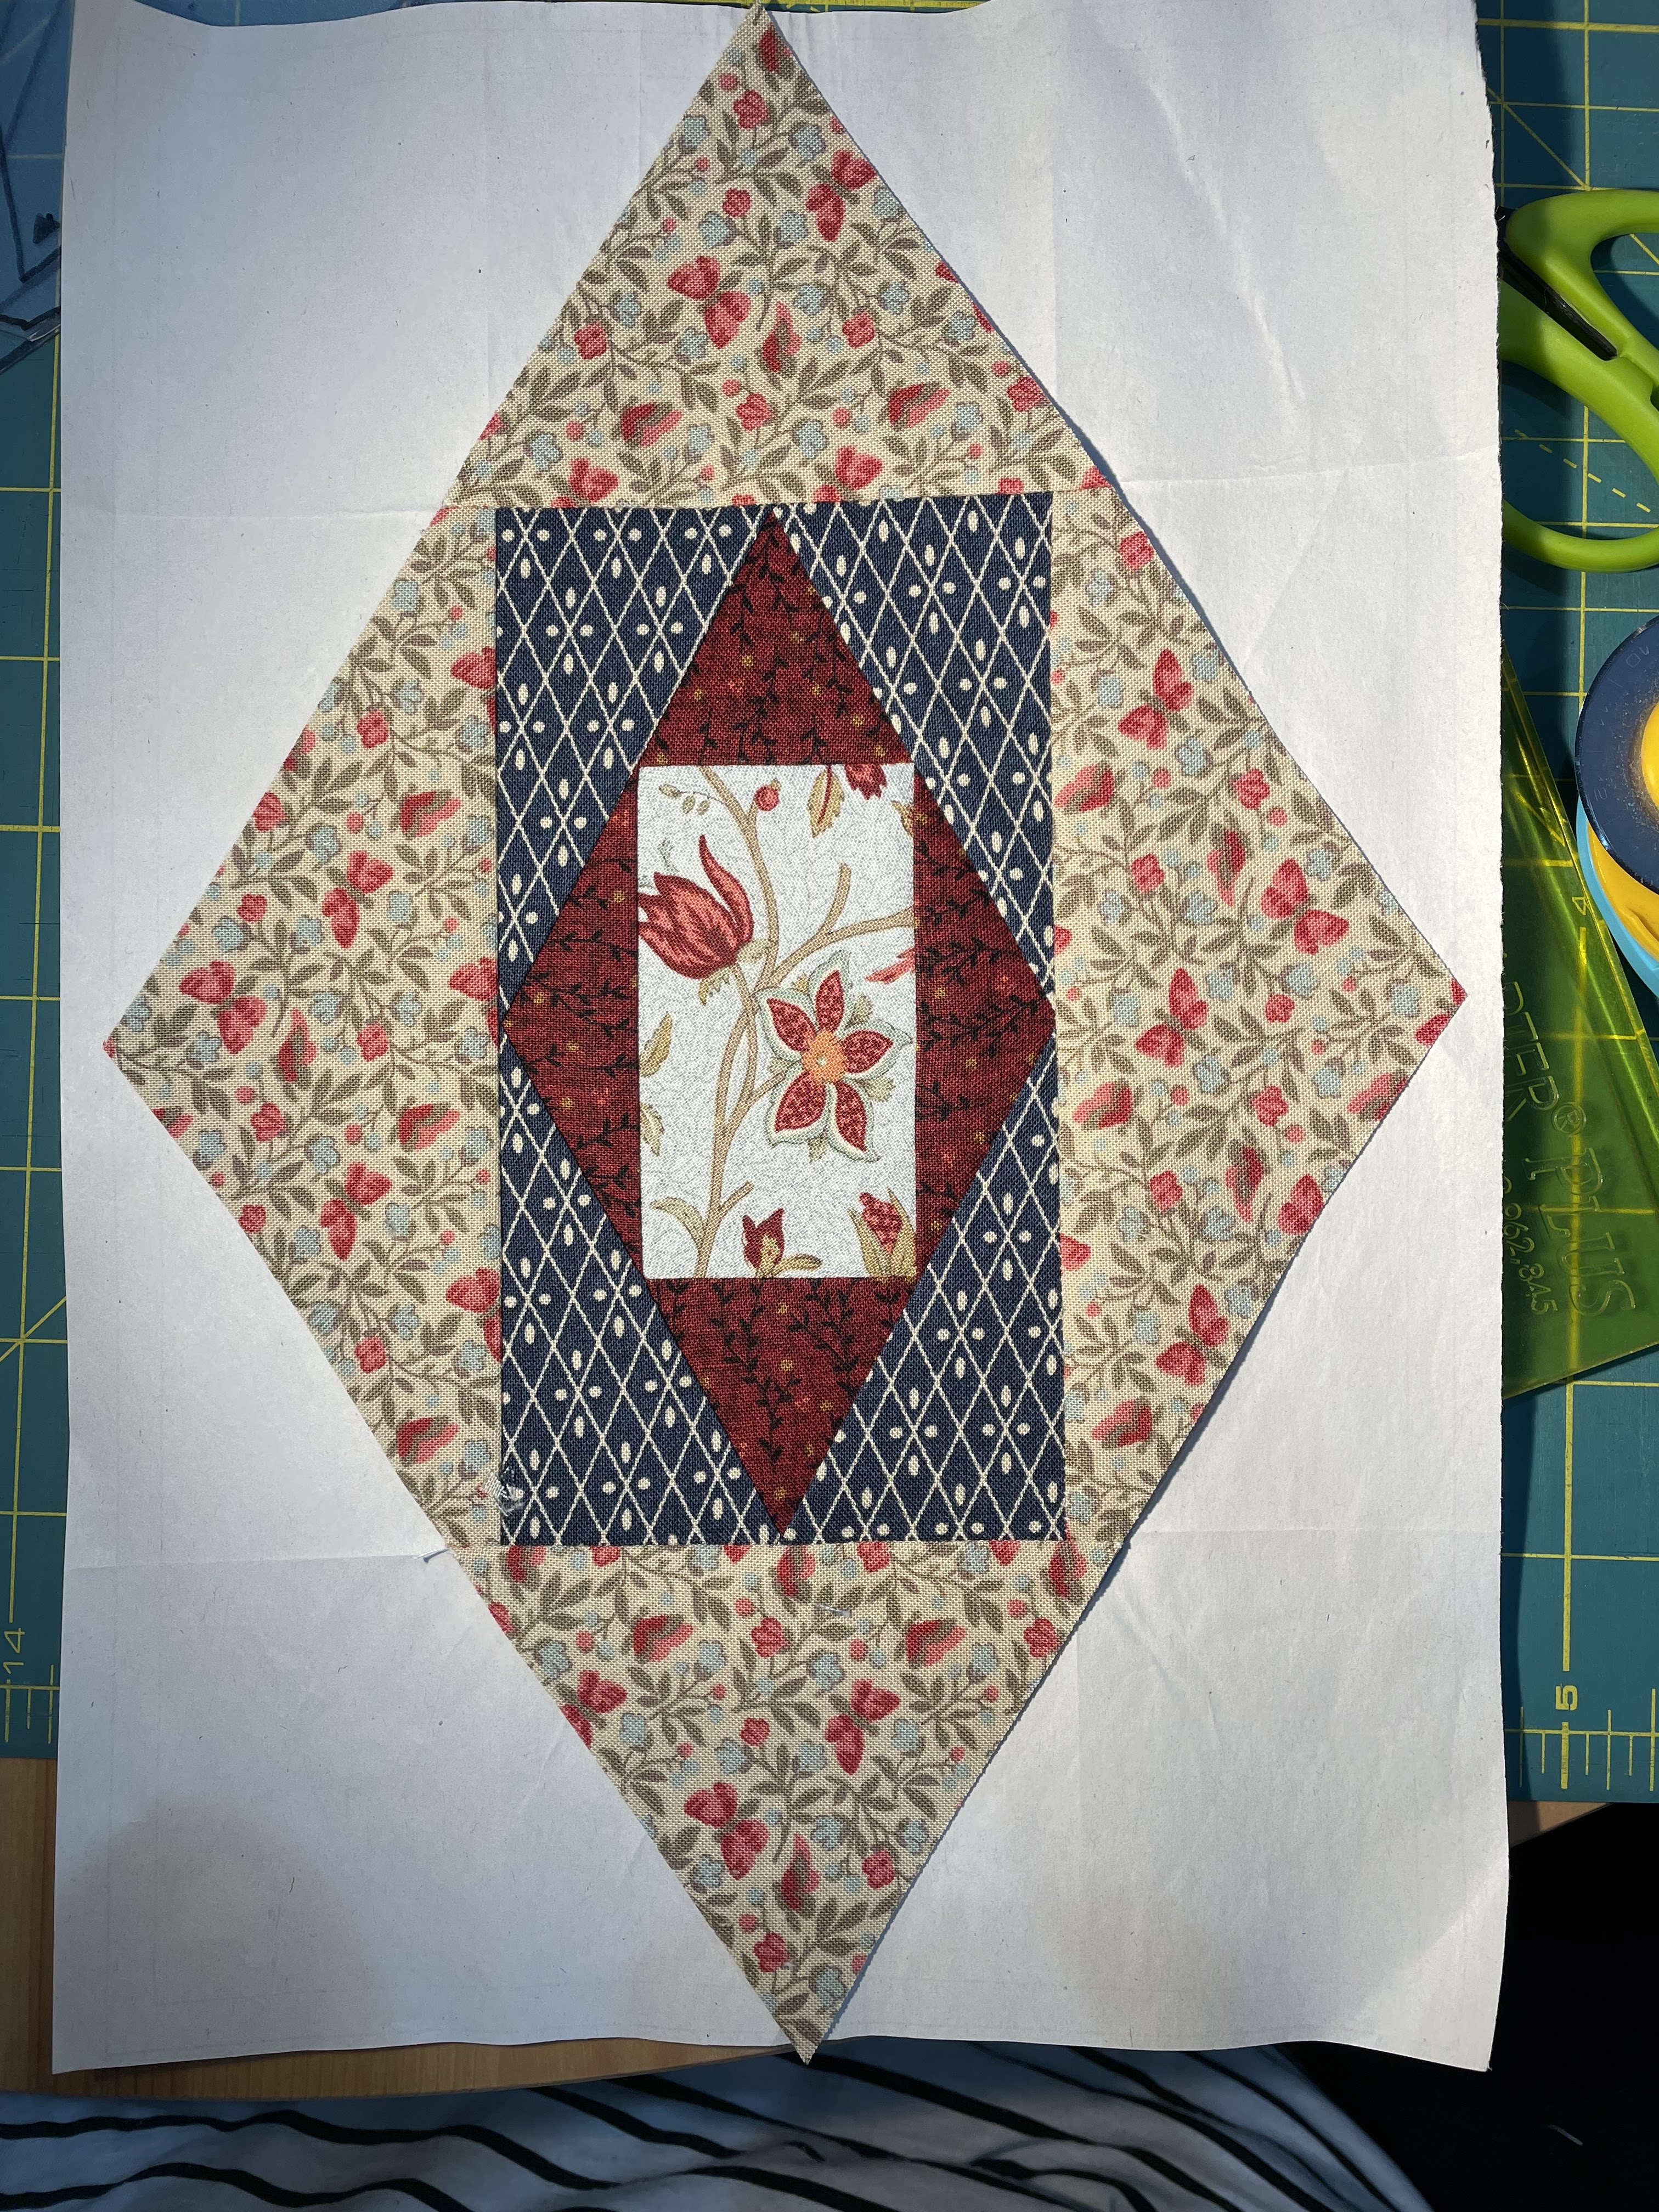
The rest is a repeat of the instructions above, take your next templates, cut your pieces of fabric and align them with the edges as shown below and turning to the opposite side of the paper, stitch on the corresponding solid lines, press open and place and stitch your next pieces. Press open and then trim as outlined above.


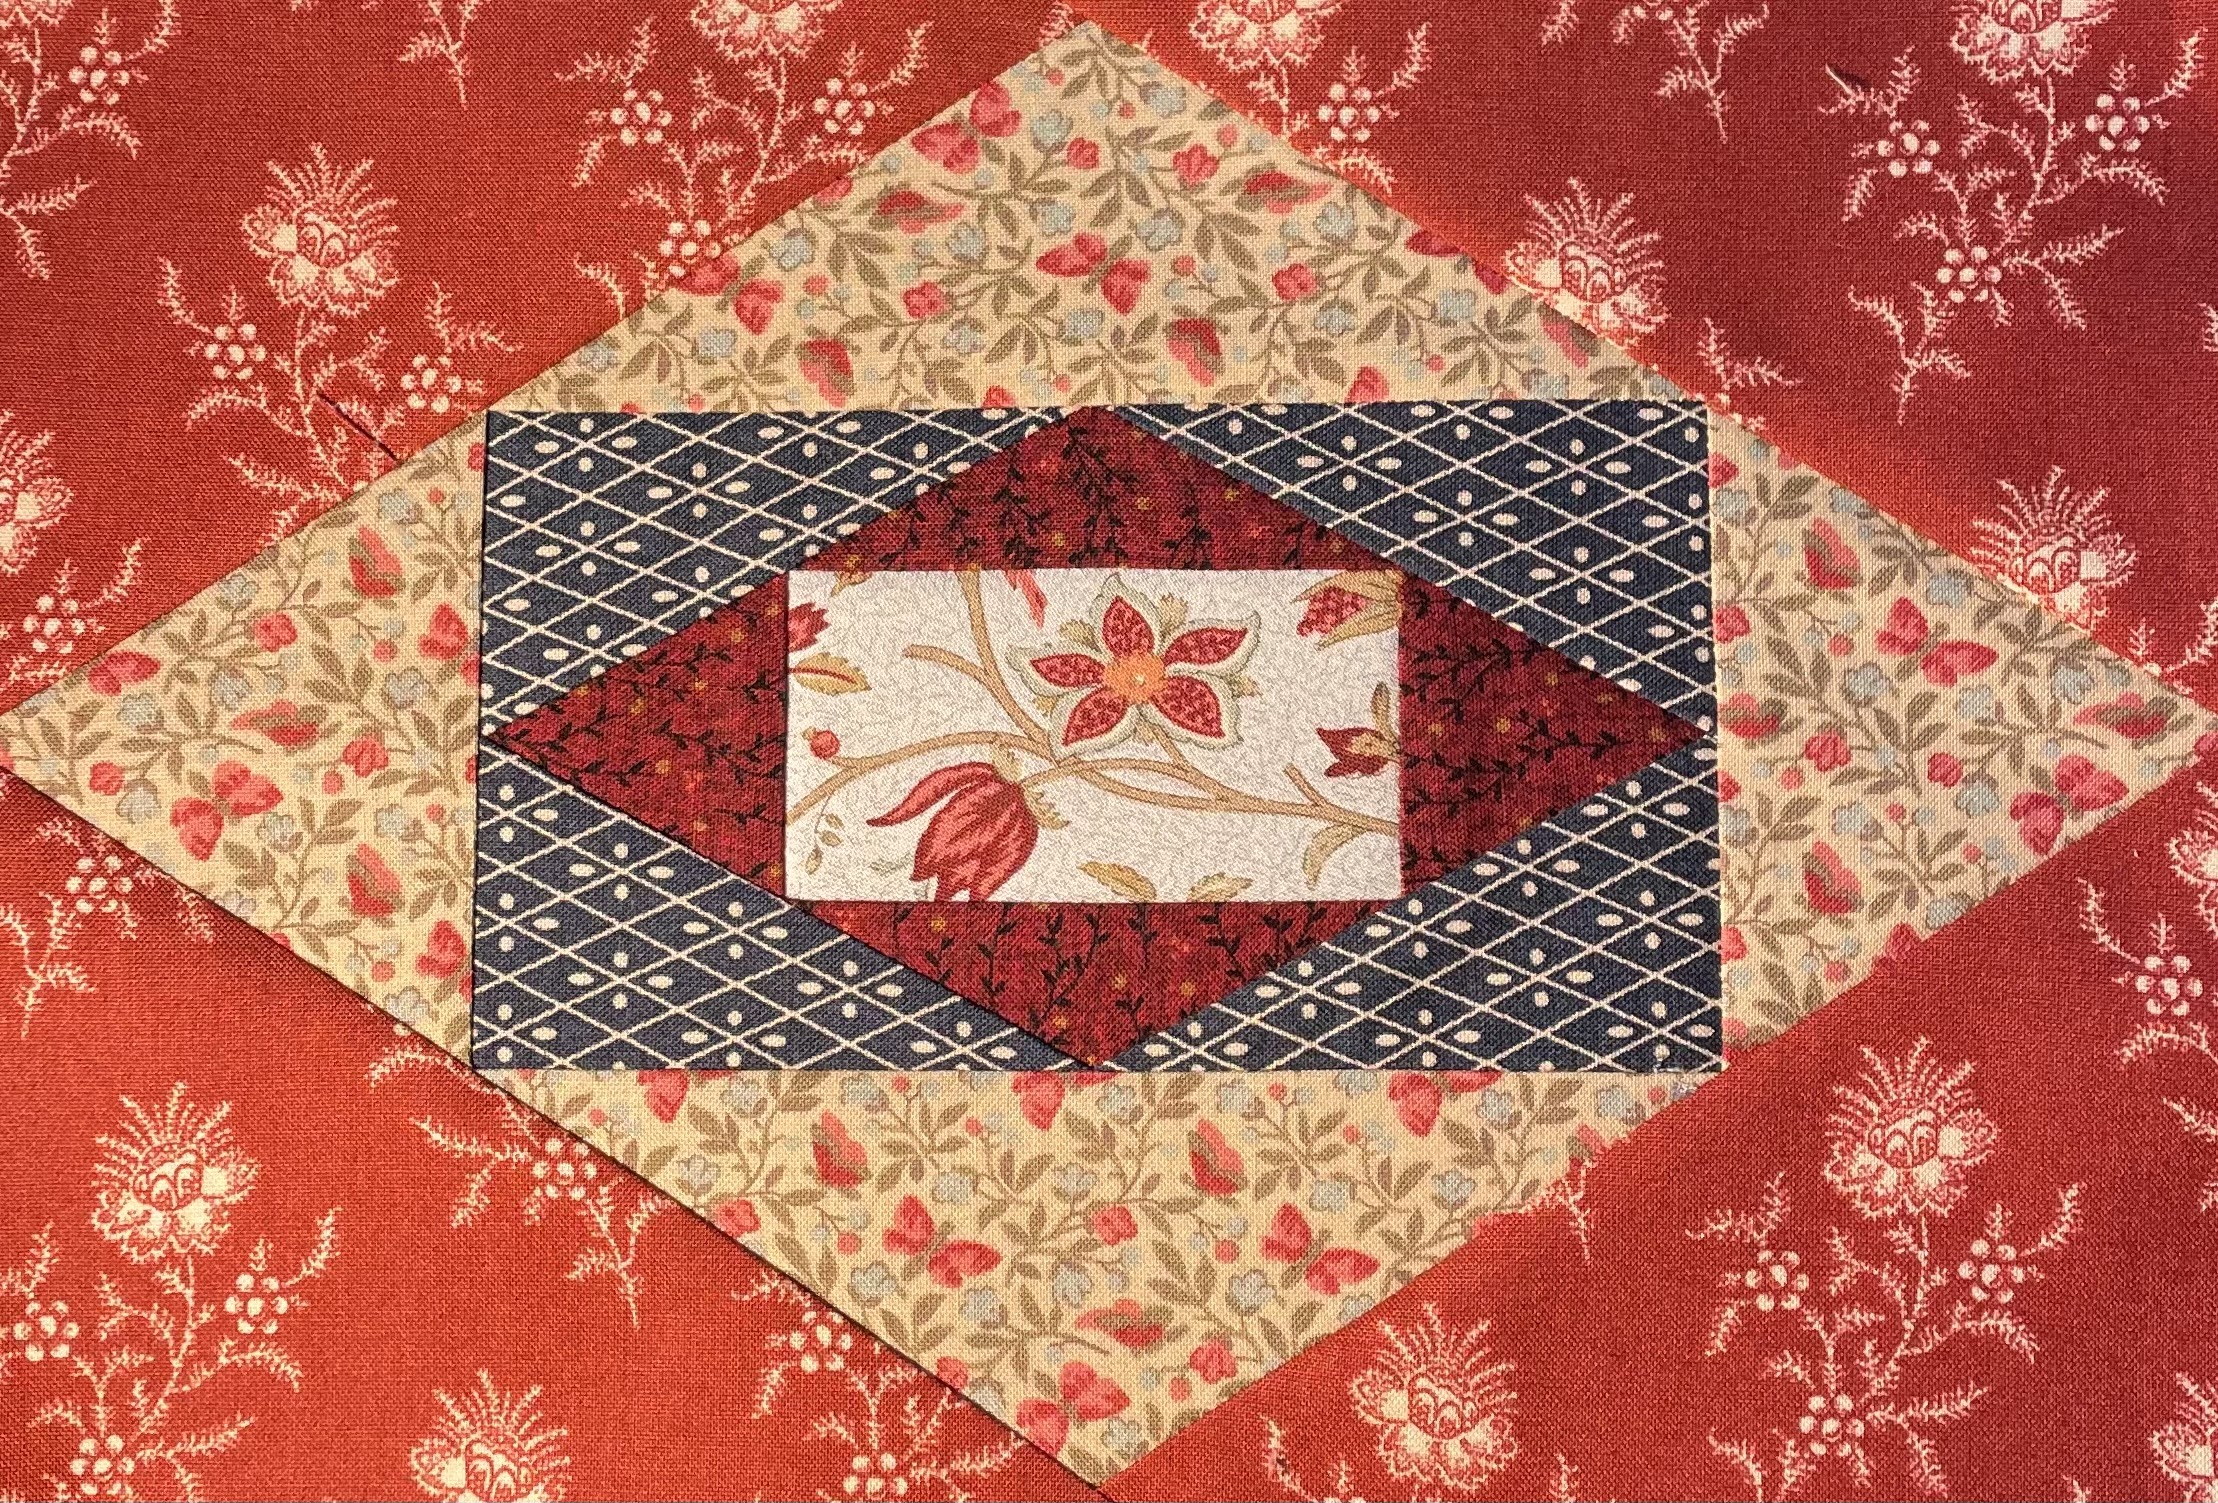
Once you have added your final round of pieces, turn to the paper side and trim your block to the very outside solid line. You will have a perfect block. Now repeat that 59 more times...LOL
 
Hope this helps you a bit. It's a beautiful Quilt and there are tons of fabric options for you to choose from. I highly recommend that you watch her video on selecting fabric, then pick out what you love and have at it!


Sunday, July 10, 2022

Those Airport Cinnamon Rolls!

 
Oh yeah, that smell wafts through the airport, you are early and waiting for your flight and you just have to have one or a dozen! Better get some for later, right?


You no longer have to wait in crowded airports, you don't even have to book a flight! You can make these at home! Here is the link for a PDF download with the recipe for you. Airport Cinnamon Roll Knock Off  They are delicious and the recipe makes 24-30 cinnamon rolls so you will have plenty. It freezes well and you can just take them out and after they thaw, pop them in your oven for pure deliciousness.

* * *
 
I have been watching the Tik-Tok videos of the cinnamon roll bake and so I decided to try it yesterday. This is a completely different recipe than the download above and unrelated other than it's a cinnamon roll.
 
The basic recipe is to get a can of cinnamon rolls, pop them open and put them in a baking dish, pour 1/2 inch of cream on the bottom of the pan around the rolls, top them with a mixture of 1/2 stick of butter and 1 cup of brown sugar. Bake at 350 degrees F for 30 minutes or until done. Frost with the can frosting that came with the rolls.
 
So we did that.


Here is my review of this cinnamon roll recipe. I like the addition of the cream and will try that with my homemade cinnamon rolls next time. They are WAY too sweet, almost cloying, I would cut the sugar for the topping by half and add a tsp of cinnamon. The frosting is just horrible, make your own.
 
So the take away here, use my recipe download up top if you want those good, good airport cinnamon rolls. If you just need a quickie fix for the kids or unexpected company, pop open the canned rolls and do the Tik-Tok version but definitely doctor it up with extra cinnamon and homemade frosting.  


Friday, July 8, 2022

The Glories of The Simple Nine Patch Quilt

 
Ah, The joys of a simple nine patch! Sometimes you just want to sew and not think! and this was one of those times. I promised you some instructions for making this quilt so here we go!

Here is a link to the PDF for basic layout and yardage requirements:
 
You will need approximately:

 
1 1/8 yards of 44" wide fabric in your color choice for the nine patch and and extra 1/2 yard for binding.
2 3/4 yards of 44" wide fabric in your background color choice
4 1/2 yards of backing fabric
 
(these are estimates, I used scrappy bits and mixed them all up)
 
If you are working from scraps or a variety of fabrics, like I did, then cut your colored fabrics into 2 1/2 inch strips. It's perfectly okay to use a jelly roll.
 
Cut several 2 1/2" strips from your background fabric, I used Kona Cotton White for this quilt. Now you will want to stitch together strip sets as shown below. If you are going scrappy, don't agonize over what to put together, stick them all in a bag and just pull out strips and stitch. If you pull out two of the same, put one back and pull out another. You will stitch several sets together, alternating as below, blue, white, blue and then create another set of strips sets with white, blue, white.


Take your strip sets and cut across them to create 2 1/2" strips like below:
 
 
You should have a stack of strips with blue on each end and a stack of strips with blue in the middle. You will use two of the first stack and one of the second stack to create your nine patch. 
 
 
You will need to stitch 50 nine patch blocks for this quilt, if you want a larger quilt, make more blocks.
 
You will now stitch these nine patch blocks to your solid background blocks, alternating every other row to create the "chain".

 
Bind and quilt as desired. I used 2 1/2" strips to create my binding for this quilt. The quilt pattern is called Dawn's Block by Sweet Dreams Quilt Studio.

This was a lot of fun to make, it's easy, it doesn't take a lot of brain power and there is something so endearing about an old fashioned Irish Chain Quilt. Hope you will enjoy making one soon. Come visit us on Facebook at Sister of the Divide and on Instagram at SisterofTheDivide1. See you in the Funny Papers!